Overview
Self-Pay in the EHR
When collecting a Patient Payment in the EHR, there is no “Self-Pay” reason available at this time. While this feature is being developed, follow the steps below for billing self-pay patients and collecting/applying their payments.Workflow Instructions
Step 1 - Collect Payment
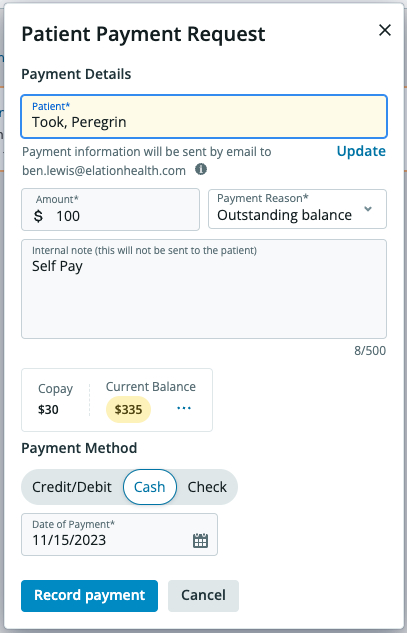
Option A - Collect Payment in EHR
See Collecting a Payment in the EHR for detailed instructions. Payment Reason Options:- Copay - Locks the payment to the patient’s DOS that matches the Date of Payment. Leftover funds will need to be manually applied.
- Outstanding Balance - Allows funds to be applied to any of the patient’s balances until exhausted.
Option B - Collect Third-Party Payment, Record in Elation Billing
If your practice:- Collects Patient Payments through a third-party vendor, and
- Wants to record the Patient Payments directly in Elation Billing (bypassing the EHR)
Step 2 - Create the Claim
Create the Visit Note and subsequent Superbill as you typically would.Step 3 - Lightning Bill to Patient
When you Lightning Bill the Superbill, select PATIENT (not Self Pay), then click Bill Now. This transfers the balance to the patient in Elation Billing.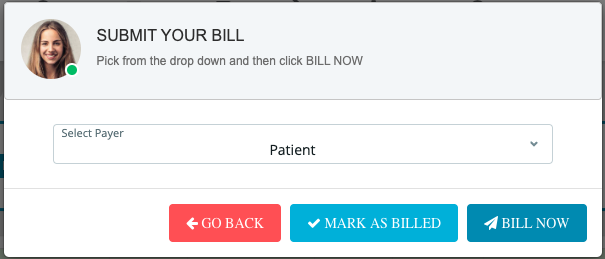
Step 4 - Apply the Payment
Use Applying Patient Payments with ⚡️Apply Patient Payments to automatically apply unapplied funds to patient balances.Reminder: Copays are locked to the patient’s DOS that matches the Date of Payment. Leftover copay funds will need to be manually applied.