Overview
What is posting a payment?
Posting a payment is the process of recording funds received from insurance payers or patients and applying them to specific claims. This includes entering payment amounts, adjustments, and determining where remaining balances should be routed.- You would typically only need to record insurance payments if the payer does not offer ERAs or ERA setup has not been approved yet.
Why is posting a payment important?
Accurate payment posting ensures your accounts receivable is up-to-date, claim balances are correctly adjusted, and remaining balances are properly routed to secondary payers or patients.When to use this workflow
- The manual insurance posting workflow is typically used when:
- You receive a paper EOB and no ERA was sent.
- An ERA has a denied claim.
- Manual posting is recommended to avoid over-adjustment or negative balances.
- An ERA was received but is marked Cannot Auto Post (e.g., missing Superbill ID, missing service-line or adjustment metadata, duplicate claim matches, or reversals/takebacks).
- See the ERA cannot autopost section in Viewing ERAs and Auto-Posting for more details about common reasons an ERA could not auto-post.
- An ERA needs correction before posting (e.g., wrong allowed/adjustment values, payer issued a corrected ERA).
- An ERA is a for a capitation payment - use Posting a Capitation Payment.
- Use auto-posting when an ERA is available and there are no issues or special circumstances with any of the payments— see Viewing ERAs and Auto-Posting.
- Use manual patient posting when collecting a payment outside the Integrated Patient Payments (Stripe) workflow.
Before you begin
- You must have a Billing role with permission to create and apply payments.
- The payer must be set up in Elation, and the claims you are posting against must already be in the system.
- Have the EOB or remittance advice in hand with: check/EFT number, payment date, total check amount, and per-claim allowed/adjustment/payment/patient-responsibility values.
- Confirm the EOB total matches the check amount before posting. If they differ, resolve the variance before saving.
Glossary
- EOB / ERA — Explanation of Benefits (paper) or Electronic Remittance Advice (835). Both itemize how a payer adjudicated each claim.
- Allowed — The contractually allowed amount for a service.
- Adjustment — A reduction from the billed charge (e.g., contractual write-off
CO45). Can beCO(Contractual),PR(Patient Responsibility),OA(Other Adjustment),PI(Payer Initiated), orCR(Correction/Reversal). - Patient Responsibility — Deductible, coinsurance, or copay owed by the patient.
- Bill To — The next destination for any remaining balance: secondary insurance, patient, settled, or crossover.
- Bonus — An incentive amount on the EOB that is paid in addition to claim-level payments (for example, quality program bonuses). Add to the payment details so the check total balances without applying it to a claim.
- Ignored — A portion of the check you do not want applied to a claim (for example, interest, capitation lines you’ll post separately, or unrelated remittance lines). Add to the payment details so the check balances.
- Unapplied — The remaining check amount not yet applied to a claim, bonus, or ignored bucket. Must be
$0.00(green) before saving for the payment to balance. - Crossover — A claim sent automatically by the primary payer (typically Medicare) to the secondary payer; mark as Crossover so Elation does not retransmit.
Workflow Instructions
Posting an Insurance payment
Use this workflow if you’re posting details from a paper EOB. See the Manually posting from an ERA section below if there’s already an ERA on file.When posting an Insurance payment, create ONE payment for the FULL amount of the check. You will add ALL claims from the EOB into this one single payment.
- Payment Method — Select Check, EFT, Credit Card, or other matching the remittance.
- Check Number — Enter the check or EFT trace number from the remittance. If posting an EFT without a number, use a consistent convention (for example,
EFT-YYYYMMDD). - Payment Date — The date the payer issued the check or EFT.
- Posting Date — The date you are recording the payment. Use the current date for current-period close, or backdate to a prior open period if your practice locks periods at month-end.
- Payment Amount — The full check or EFT amount.
- Bonus (optional) — Quality, incentive, or non-claim bonus amounts on the remittance.
- Ignored (optional) — Portions of the check that should not be applied to claims (e.g., interest lines, capitation lines posted separately).
Add claims to your payment by entering the Superbill number AND THEN pressing the Enter key on your keyboard or clicking the Add Claim button.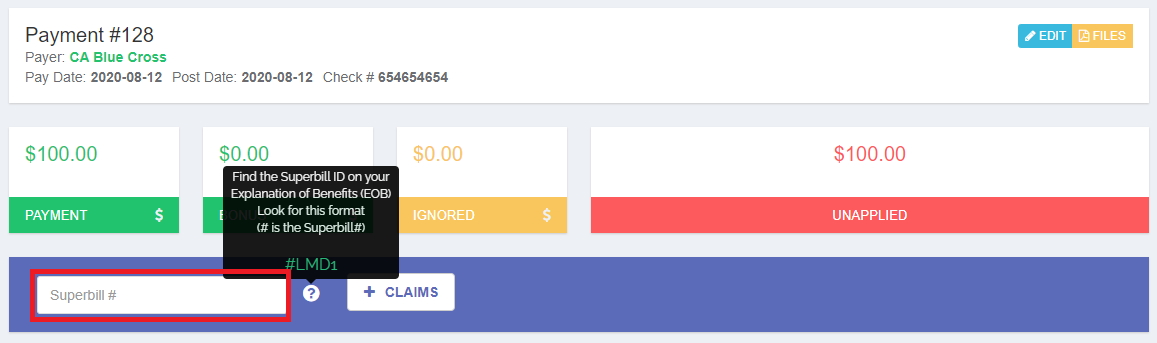
- The system will not let you add claims that don’t exist or add the same claim twice.
The detailed view should be visible by default. If you don’t see the Superbill payment fields, click the Detail button in the blue header.
- You can also use the following quick links in the blue claim header if needed to:
- Open the superbill
- Open the patient’s record
- Edit demographics and insurance
- View claim history
- Delete the claim from the payment
Enter the following for each charge line on the claim:
For secondary/tertiary payments, enter only the Payment and patient responsibility details (Deductible, Coinsurance, CoPayment fields).
- Allowed - Enter the allowed amount.
- Adjusted - Enter any adjustments as listed on the EOB in the first column followed by the adjustment code in the second column (e.g.,
CO45contractual write-off,CO253sequestration,CO97bundled,OA23impact of prior payer adjudication). - Payment - Enter the payment amount. Enter
0.00for a denied or zero-pay line and add the denial reason as an adjustment. - Patient responsibility details (if applicable) - Enter any Deductible, Coinsurance or CoPayment.
The math for each line must balance: Charge (CHG) = Payment + Patient Responsibility + Adjustments. If a line will not balance, add an adjustment for the difference using the appropriate reason code, or correct any value(s) you entered.
Use the Bill To drop-down on the right to select a claim disposition:
- Insurance (e.g., 1 - Aetna, 2 - CA Medicaid) - Claim balance goes into the Claims Queue for the selected Payer.
- Patient - Claim balance is transferred to the patient.
- Settled - Claim balance will be settled.
- Crossover - Claim will be marked billed but will not go to the Claims Queue since the primary insurance payer sent the claim to the next payer directly (must include a name in the Carrier box).
On a manually-posted payment, Bill-To will default to the primary insurance payer. If no payer information is present, it will default to patient.
If the patient overpaid or you collected funds before a claim exists, leave the unapplied amount on the patient as a credit. See Manage patient credits and overpayments and, for refunds, Integrated Refunds.
Manually posting from an ERA
Use this when an ERA was received but cannot or should not be auto-posted (for example, the ERA is marked Cannot Auto Post, contains reversals/takebacks, needs correction or has denied claims). The steps mirror Posting an Insurance Payment above, with ERA-specific handling.From Payments → ERAs, open the ERA PDF by clicking the Payer Name so you can reference it line-by-line while posting.
Note the Check/EFT #, Paid Date, and **Paid Amount **from the ERA. Use these exact values when creating the new insurance payment so the manual record reconciles to the ERA.
Follow the standard Posting an Insurance Payment steps above, entering each claim listed on the ERA.
Handle ERA-specific edge cases:
- Denied claim ($0 payment) — Add the claim to the payment, enter
0.00in the Payment field, and add the denial reason as an adjustment line. Set Bill To based on next action (rebill to insurance, transfer to patient, or settle). If an appeal is needed, see Generating and submitting claim appeals. - Missing Superbill ID on the ERA — Locate the claim the patient’s record by date of service, then add it to the payment by Superbill number.
- Reversals / takebacks / recoupments — Post negative payment lines against the original claim, or follow Posting Voided, Reversed, or Updated Payments for the reversal portion and post the new positive lines normally.
- Corrected ERA — Post the corrected ERA. Mark the original or duplicate ERA as Reviewed without posting.
- Interest / bonus lines on the ERA — Add to the Bonus or Ignored field of the payment details so the check balances without being applied to a claim.
Posting a Patient payment - Automatic
This workflow does NOT apply to Elation EHR + Billing users that utilize Stripe for payment collection. For Elation EHR + Billing Patient Payment instructions, please refer to the Integrated Patient Payments article.
- On the Superbill - If a Copayment Collected amount is entered, a Payment dated to the DOS will be created.
- On the Patient Page (Collect Now) - If your practice has Stripe set up, a payment will be created if a patient pays from the Stripe Checkout page.
- Online Patient Payment - If the patient pays online per their statement, a Patient Payment will be created.
Posting a Patient payment - Manual (non-EHR only)
We do not advise applying patient payments before insurance payments have been applied. Doing so can transfer balance responsibility incorrectly and may require reversal once the insurance payment is posted.
- If you have already applied a patient payment too early, see Posting Voided, Reversed, or Updated Payments.
Enter the payment details:
- Payment Method — Cash, Check, Credit Card, or other.
- Reference Number — Check number or card transaction reference # (if applicable).
- Payment Date — Date funds were received.
- Posting Date — Date you are recording the payment.
- Payment Amount — Total amount collected from the patient.
The detailed view should be visible by default. If you don’t see the Superbill payment fields, click the Detail button in the blue header.
- You can also use the following quick links in the blue claim header if needed to:
- Open the superbill
- Open the patient’s record
- Edit demographics and insurance
- View claim history
- Delete the claim from the payment
Add the amount of the payment being applied to the claim in the Payment field.
- You can split a single patient payment across multiple claims by entering an amount on each claim line; the total applied must equal the Payment Amount of the payment before saving.
Review the Bill To selection and designate where the claim will be routed next. If the balance is $0, the Bill To should be set to Settled.
Posting a Patient payment - Manual (EHR + Billing)
Enter the Payment Reason.
- Copay - Select if the patient is paying a copay for the same date of service as the Date of Payment. These copays are used in the Apply Patient Payments tool.
- Outstanding balance - Select for any payments that are not the copay for the same date of service as the payment.
The detailed view should be visible by default. If you don’t see the Superbill payment fields, click the Detail button in the blue header.
- You can also use the following quick links in the blue claim header if needed to:
- Open the superbill
- Open the patient’s record
- Edit demographics and insurance
- View claim history
- Delete the claim from the payment
Add the amount of the payment being applied to the claim in the Payment field.
- You can split a single patient payment across multiple claims by entering an amount on each claim line; the total applied must equal the Payment Amount of the payment before saving.
Review the Bill To selection and designate where the claim will be routed next. If the balance is $0, the Bill To should be set to Settled.
Special cases
- Partial payment / pending balance — Apply the payment amount, leave the Allowed/Adjusted to reflect what the payer adjudicated, and set Bill To to the next responsible party for the remaining balance.
- EOB total does not match the check — Reconcile the variance before posting.
- Common causes: interest lines (use Ignored or apply via a separate workflow), prior overpayment recoupment lines, or a multi-EOB check.
- Recoupment / takeback lines on a current EOB — These appear as negative-payment lines that offset prior payments. Post the offset as a negative payment line on the original claim, or follow Posting Voided, Reversed, or Updated Payments for the reversal portion and post the new positive lines normally.
- Crossover claims (Medicare → Medicaid) — Set Bill To to Crossover and enter the secondary payer name in the Carrier box. Elation will mark the claim billed to the secondary without retransmitting.
- Interest payments — Add to the Bonus or Ignored field of the payment details so the check balances without applying to a claim.
- Capitation / PMPM payments — Do not post here. See Posting a Capitation Payment.
- ERA marked Cannot Auto Post — Post manually following Manually posting from an ERA above. After saving, Mark Reviewed on the source ERA — do not also click Auto Post Now, or you’ll create duplicates.
- Multiple patients on one EOB — Add each patient’s claim(s) to the same single payment so the check total balances in one record.
- Posting to a closed/billed claim — You can still post against a billed claim; saving the payment will update its status. If the claim was already settled in error, unsettle it before posting.
- Month-end / closed periods — Use Posting Date to control which accounting period the payment lands in. Confirm with your billing manager before backdating into a closed period.
Reporting
Posted payments appear in any reports that track payments such as:- Charges and Financial Transactions Report
- Provider Payment Report