Overview
What is a Fee Schedule?
A fee schedule is a list of CPT codes with associated charges that automatically populate when adding procedures to a claim. Fee schedules help ensure consistent pricing and save time during claim creation.Why is a Fee Schedule important?
Having an accurate fee schedule ensures your practice charges consistent rates for services and reduces manual data entry errors when creating claims.Workflow Instructions
Elation EHR + Billing Users
For Elation EHR + Billing practices that add CPTs onto the Visit Note in the EHR, we strongly recommend establishing your Fee Schedule in the EHR. Fees present in the EHR will override any fee schedule in Elation Billing. The Elation Billing fee schedule will only populate a fee on a claim-line that has no charge present.
EHR and Elation Billing schedules are not linked. If you’re adding CPTs to Superbills directly in Elation Billing, they will not pull fees from your EHR schedule.
Creating a Fee Schedule in the EHR
- Navigate to Settings - In the EHR (not Elation Billing), navigate to Settings.
- Open Billing Settings - Under Practice Settings, select Billing.
- Add CPT Code - At the bottom of Popular CPT Codes, select +Add CPT Code.
- Enter Code Details - List the Code, a description, and a Charge.
To add a Charge, Invoicing must be turned on. This option is located above the Popular CPT Codes section.
Creating a Fee Schedule in Elation Billing
- Navigate - You can update your fee schedule from any Superbill. Alternatively, you can create a new superbill by clicking New Superbill under the Billing drop-down menu.
- Add Claims - Click the Add Claims button.
If you’re on a new Superbill, you’ll need to add a patient, then select Rendering, Location, and From Date.

- Select Schedule - Select the appropriate Fee Schedule using the dropdown in the upper-right.

- Add Custom Codes and Fees - Follow these steps to customize your fee schedule:
- Click LIVE EDIT, then change the name of the superbill to something new instead of default
- Click ADD CATEGORY, then name your category and choose a color
- Click the PLUS button next to your category and start searching for and adding CPT codes
- Click on your category box to expand and see the codes, then edit the fees
- Close the superbill or click LIVE EDIT again to complete the process

Live Edit
In this image, DEFAULT will be the name of the created schedule.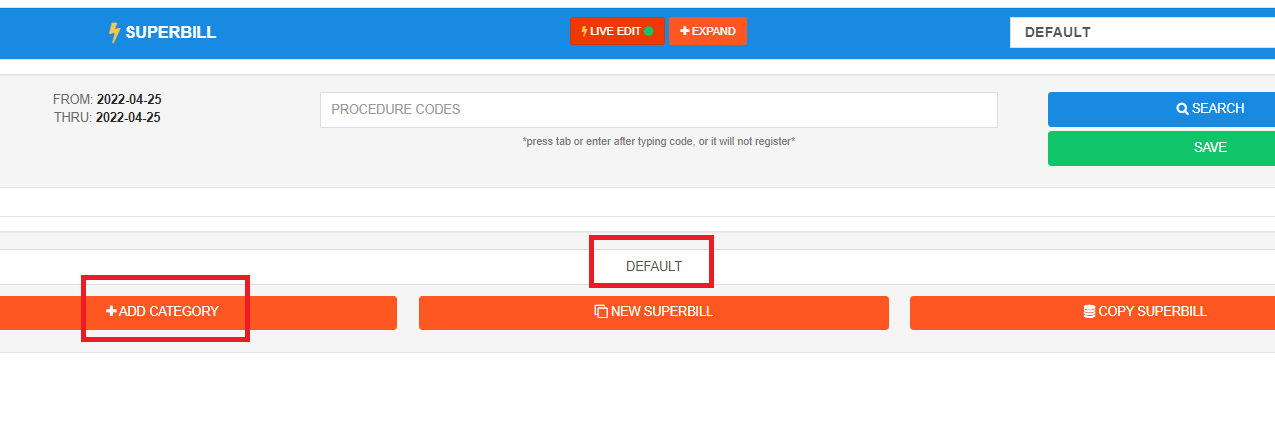
Categories
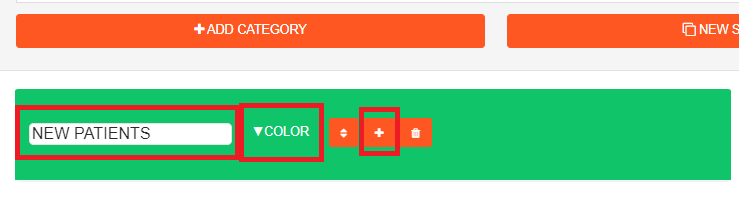
Add Codes

Edit Fees

Setting Fee Schedule as a Percentage of Medicare Rates
In Elation Billing, you also have the ability to set your default fee schedule as a percentage of Medicare rates in your region.- Navigate to Settings - In Elation Billing, navigate to Settings and select Practice Settings.
- Navigate to the Fee Schedule tab.
- Specify a Base Rate percentage of Medicare.
- Select your Medicare Region.
- Select Update Base Fee Rate to save changes.
This base rate percentage of Medicare will apply for CPT codes that meet the following criteria:
- CPT exists in Medicare’s rate database
- Charge amount is $0
- No custom fee exists for that CPT in Elation Billing
Fee Schedule Precedence Order
For Elation EHR + Elation Billing customers, this is the precedence order of managing fee schedules:- Charges set in the EHR Practice Settings > Billing > Popular CPT Codes. These charges will auto-populate when the CPT code is added to the Visit Note or bill in the EHR.
- Charges manually entered for the CPT code in the EHR Bill Dialog. These charges will carry over to the claim in Elation Billing.
- Charges manually entered for the CPT code on the Elation Billing Superbill page.
- Charges specified for the CPT code in Elation Billing’s Custom Fee Schedule.
- Charges calculated using the base rate percentage of Medicare, as specified in Elation Billing Practice Settings > Fee Schedule.