If your practice has been approved to administer the COVID-19 vaccine, please use this step-by-step guide for recommendations of how to use Elation to recall patients, document vaccines, and report administration to your IIS.
If your practice has not been approved to administer the vaccine, but you have other questions about your COVIID-19 vaccination workflows, such as referring eligible patients or documenting vaccines administered elsewhere, please read our
COVID-19 Vaccination Recommendations
article.
In the article we will cover:
- Configuring your settings to allow you to perform the COVID-19 vaccination workflows covered in this article
- Identifying patients who are eligible for the vaccine
- Scheduling patients who should be vaccinated
- Documenting the first dose of the vaccination
- Reporting the vaccines you have administered to the IIS
- Tracking and Recalling patients for the second dose of vaccine
- Documenting the second dose of the vaccination
1.) Configuring your settings to allow you to perform the COVID-19 vaccination workflows covered in this article
Calendar:
We recommend creating a dedicated appointment type in Elation to track your “COVID-19 Vaccine” visits. You can also consider making this appointment type available on your Booking Site for patient self-scheduling.
We recommend creating the following patient tags to allow you to track patients and their vaccination status for reporting and for recalling patients for second doses.
- Create the following patient tag so that you can track vaccines that need to be reported to your IIS: *C-19 IIS Pending
- Create the following patient tags for the start of each upcoming week to allow you to easily track and recall patients who are due their second vaccine dose:***C-19 Due Wk month/day (ex. *C-19 Due Wk 2/1, C-19 Due Wk 2/8, C-19 Due Wk 2/15)
Patient Tags appear in alphabetical order in the patient’s chart. Any tag that begins with a punctuation mark will appear first, so adding the asterisks symbol will help draw attention to these COVID tags.
2.) Identifying patients who are eligible for the vaccine
Please remember to check and follow your local jurisdiction’s latest guidelines to determine which patients are eligible to receive the vaccine.
Use Elation’s Patient List to identify who in your panel qualifies for their first dose of the vaccine.
- Click Reports >> Patient List at the top of Elation.
- On the left side, confirm which provider(s) you’re running the report for. Then apply the filters that you would like to use. For example:
- Check Age and specify patients older than 64.
- Check Active Problems in Clinical Profile and specify patients with certain high-risk diagnoses in their problem list.
- Check Vaccinations in Clinical Profile and exclude patients who already have a COVID-19 vaccine documented in their chart.
- Click Generate List to generate the patient results. The patients will appear on the right side of the page.
3.) Scheduling patients who should be vaccinated
After drawing up your patient list, refer to the Next Appointment column to check if the patient has an upcoming appointment in the near future. If not, use the Contact column and call the patient to make an appointment.
You can also send a Bulk Letter to these patients to share that they can make an appointment for their vaccine via Patient Passport or a mailer.
- From the Patient List results, decide who you want to send the bulk letter to. To select all, click on the checkbox at the top of the page; to select specific patients, click the checkboxes next to each patient’s name.
- Click Send Bulk Letter. Give the bulk letter a name and type in what you’d like the message to say.
- Bulk letters will be delivered via Patient Passport to all patients who already have an account. If a patient doesn’t have an account yet but has their email and cell phone number recorded in Elation, you can choose to invite them to Patient Passport with the bulk letter. After they register, they’ll be able to see your message. For all other patients, you can choose to print a PDF along with their address cover page to mail the message.
- After sending your Bulk Letter, you can check the Bulk Letter dashboard to check who has opened the message in their Patient Passport account.
If your staff are calling to schedule the patient’s initial appointment, consider also booking the follow-up appointment for Dose 2 before ending the call to increase the likelihood of recall.
4.) Documenting the first dose of the vaccination
When you administer the vaccine, document all fields required by the CDC to meet reporting requirements. These include:
| Patient Demographics | Vaccine Details |
|---|
| Recipient name • Recipient ID • Recipient date of birth • Recipient sex • Recipient address | Administration date • CVX (product) • Dose number • Lot number • MVX (manufacturer) • Vaccine administration site (on the body) • Vaccine expiration date • Vaccine route of administration • Vaccine administering provider’s name and suffix |
| The following practice-level Information also needs to be reported, but doesn’t need to be documented in each patient’s chart: Administration address (including Company) • Administering provider’s address, if different than the administration address | |
- Update patient demographics by clicking the patient’s name in their chart.
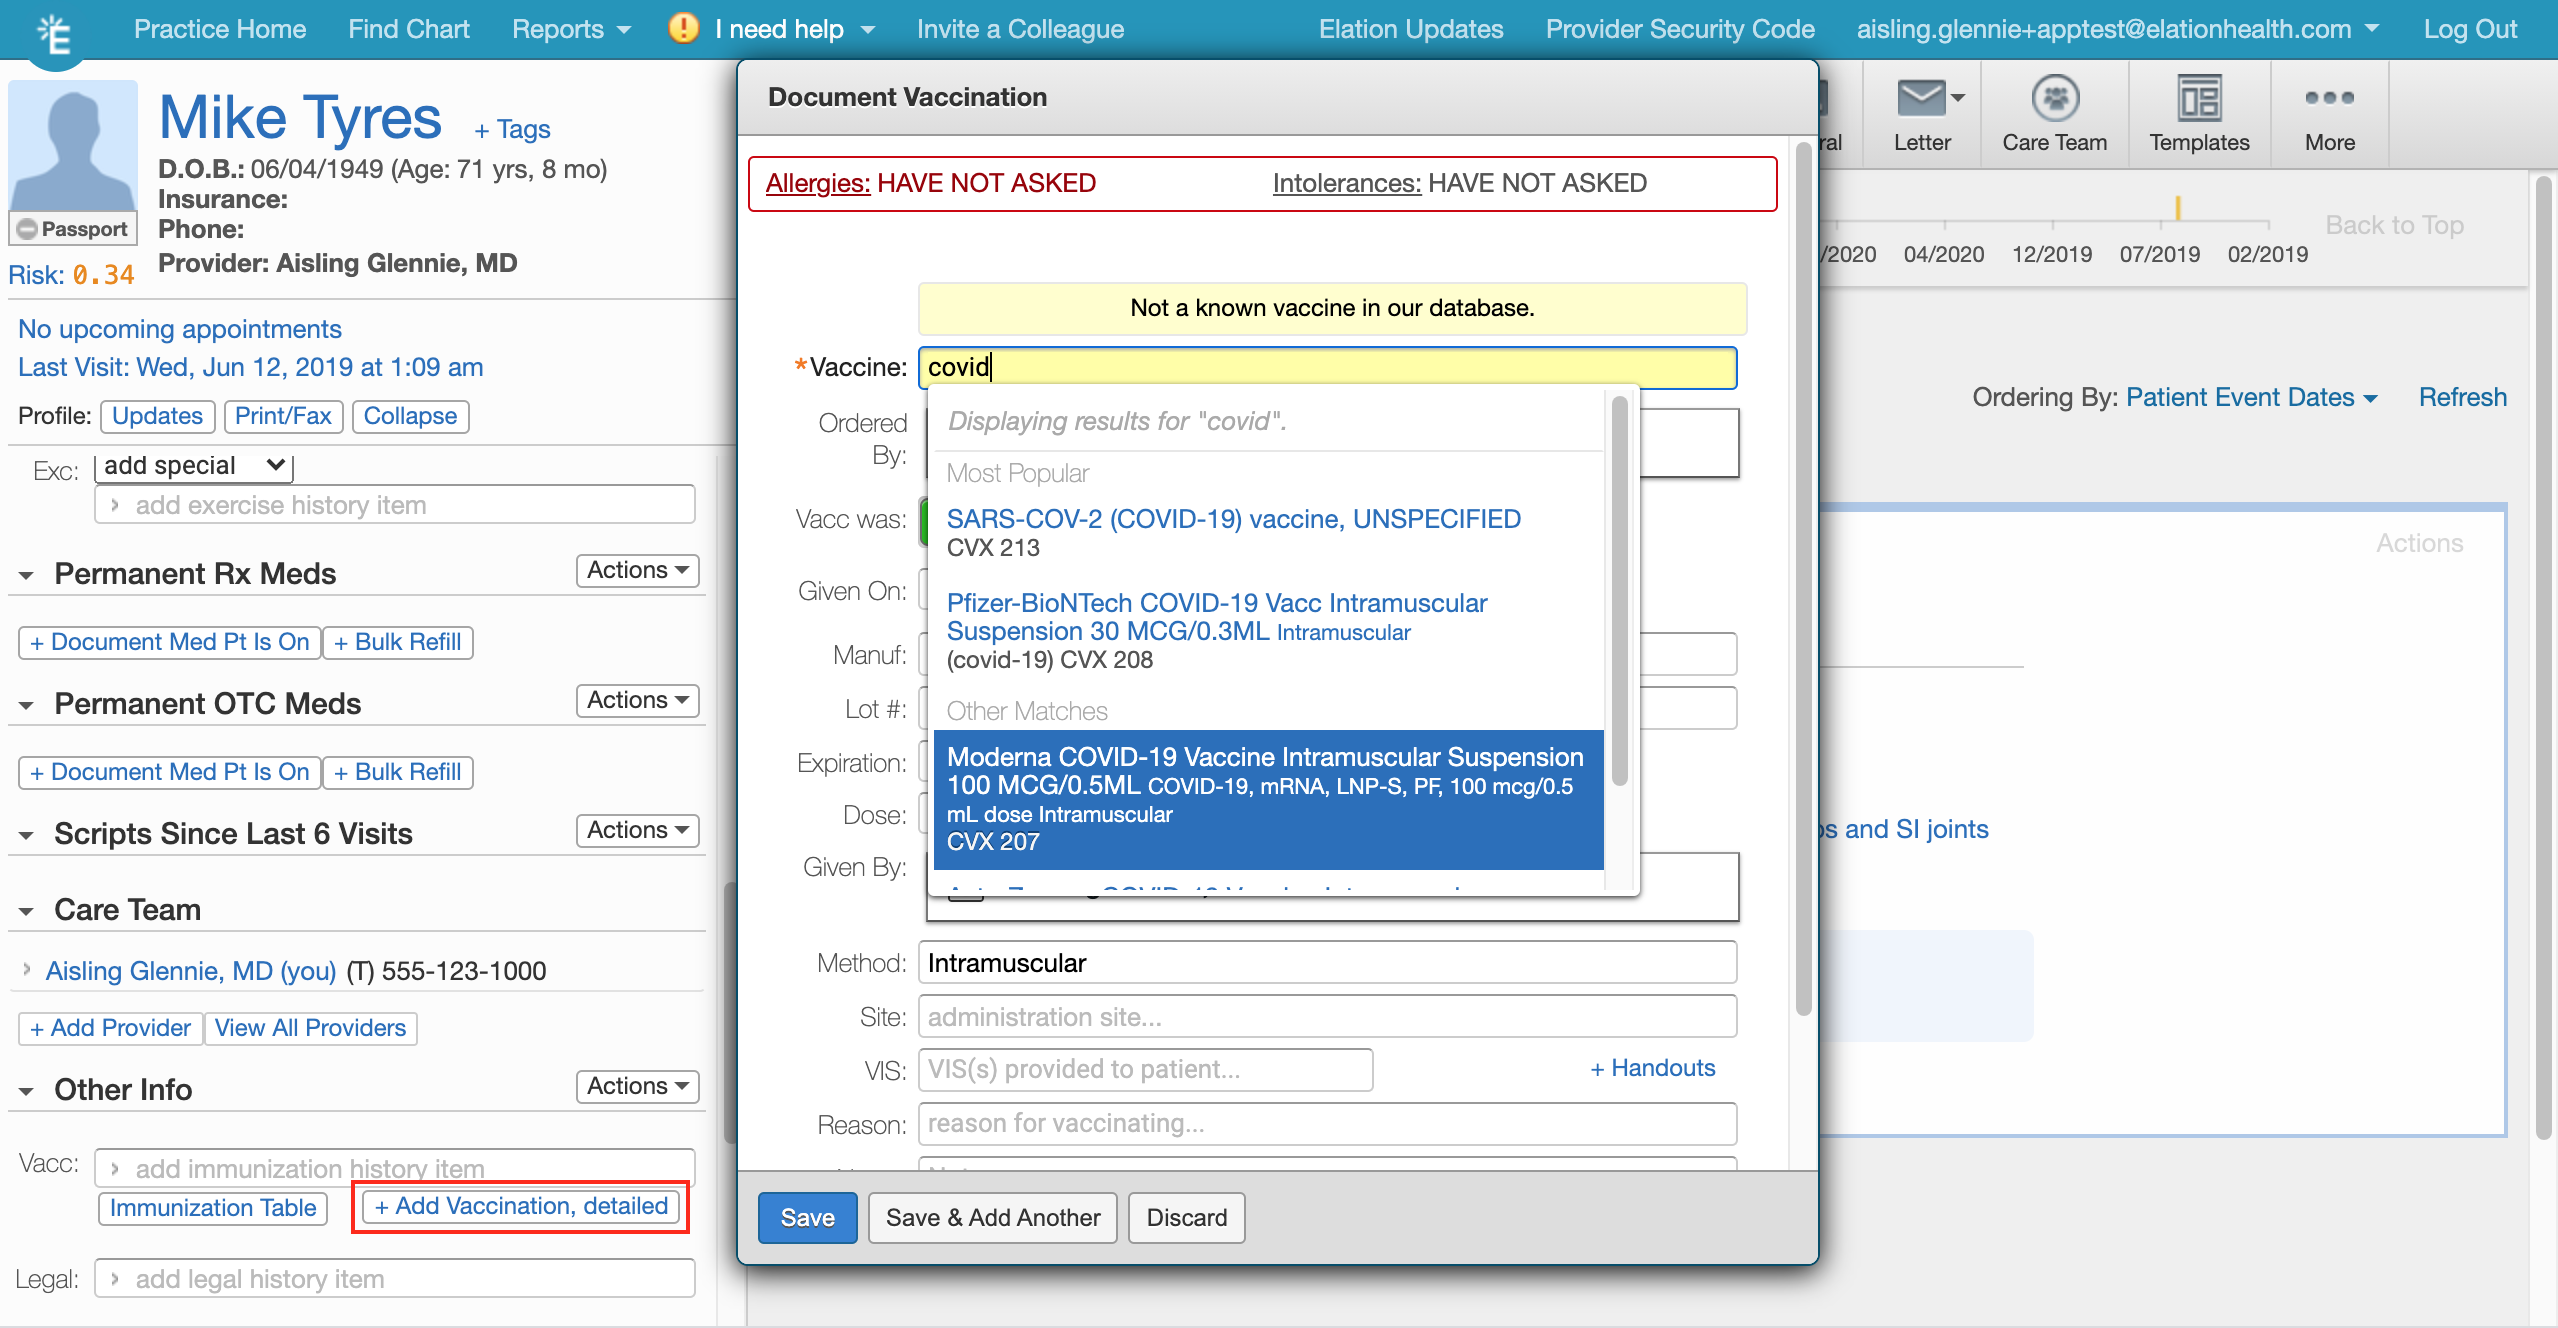
- Document the vaccine by scrolling to the Immunization section of the Clinical Profile. Click + Add Vaccination Details
- Start typing the name of the vaccine and select the vaccine from the dropdown results. This will ensure that the CVX number is documented and pulls in any pre-saved vaccine details (for your convenience, Elation pre-fills the dose, lot number, manufacturer, and expiration date after the first time you document them).
- Enter the required vaccine details in the corresponding fields.
- Click Save.
 Apply the following patient tags (by clicking on ”+ Tags” to the right of the patient’s name) to the patient’s chart.
- *C-19 IIS Pending (to identify that this vaccination needs to be reported to the IIS)
- *C-19 Due Wk month/day (use the tag that corresponds with the week the patient should return for Dose 2)
Check the appointment summary in the Clinical Profile to see if the patient has an upcoming appointment for Dose 2 by the recommended deadline. If they do not, make sure that someone in the practice schedules the patient before they leave.
5.) Reporting the vaccines you have administered to the IIS
Reporting deadlines vary by state, but it needs to be completed within 72 hours at the latest. Please follow the steps below at the end of each day, or every 2-3 days depending on your state’s requirements.
- Use the patient list to identify vaccines that have been administered.
- Click Reports >> Patient List at the top of Elation.
- On the left side, confirm which provider(s) you’re running the report for. Click the checkbox for the Patient Tag filter. Search for the *C-19 Pending IIS tag and select it.
- Click Generate Report. At the top of the results, click Download >> Download CSV to save a copy of the results. Open the CSV spreadsheet and also keep the Elation patient list results open.
- Log into your state IIS and report the vaccination details according to their requirements.
- For patient demographics: Open the spreadsheet that you downloaded from the Patient list results. Each patient’s name, ID, date of birth, sex, and address will be documented here. Transfer this information to your IIS using the workflows advised by the IIS entity.
- For vaccine details: Click the patient’s name from the Patient List results to open their chart. Scroll to the Immunization section of the Clinical Profile. Click the vaccine name to view the administration details. Transfer this information to your IIS using the workflows advised by the entity. Once the information has been transferred, click on the *C-19 Pending IIS tag. Click x to remove it from the patient’s chart to indicate that the reporting is complete.
6.) Tracking and Recalling patients for the second dose of vaccine
- Click Reports >> Patient List at the top of Elation.
- On the left side, confirm which provider(s) you’re running the report for. Click the checkbox for the Patient Tag filter. Type in the *C-19 Due Wk month/day tag that you want to filter for.
- Pick the tag that matches the current week if you want to find patients who are due this week.
- Pick tags in the future if you want to find patients who are due back soon.
- Pick tags from the past if you want to find patients who are past due for Dose 2.
- Click Generate Report. Check to see if patients have upcoming appointment dates in the report results and reach out to schedule any patients who do not.
7.) Documenting the second dose of the vaccination
Use the documentation instructions for Dose 1 to document the second dose of the vaccine for the patient.
Update the Patient tags:
- Click on the *C-19 Due Wk month/day tag, and click the x button to remove it from the chart because the second dose is complete.
- Add the tag for *C-19 IIS Pending