What is the Office Message feature?
Elation’s Office Message feature allows you to send messages about specific patients to anyone who has a user account for your EHR. Recipients of Office Messages can easily track and reply to messages on their Elation Practice Home page, and closed threads become archived in the patient’s chart for future reference.Why is the Office Message feature valuable?
The Office Message feature facilitates internal communication, allowing you to keep track of conversations and tasks that need to be completed by anyone in your office. You can also set reminders for yourself, your colleagues and your staff to follow up on action items. Since Office Messages are visible to everyone in the practice, this feature fosters transparency to ensure that nothing falls through the cracks.Sending Office Messages
Initiating a new Office Message
You can initiate an Office Message from 3 different locations in the EHR:- From the Practice Home page by clicking Message:

- From the gray navigation bar at the top of a patient’s chart by clicking Msg:

- From any Order, Report, Letter, Visit Note, or Note by clicking Actions —> Office Message:

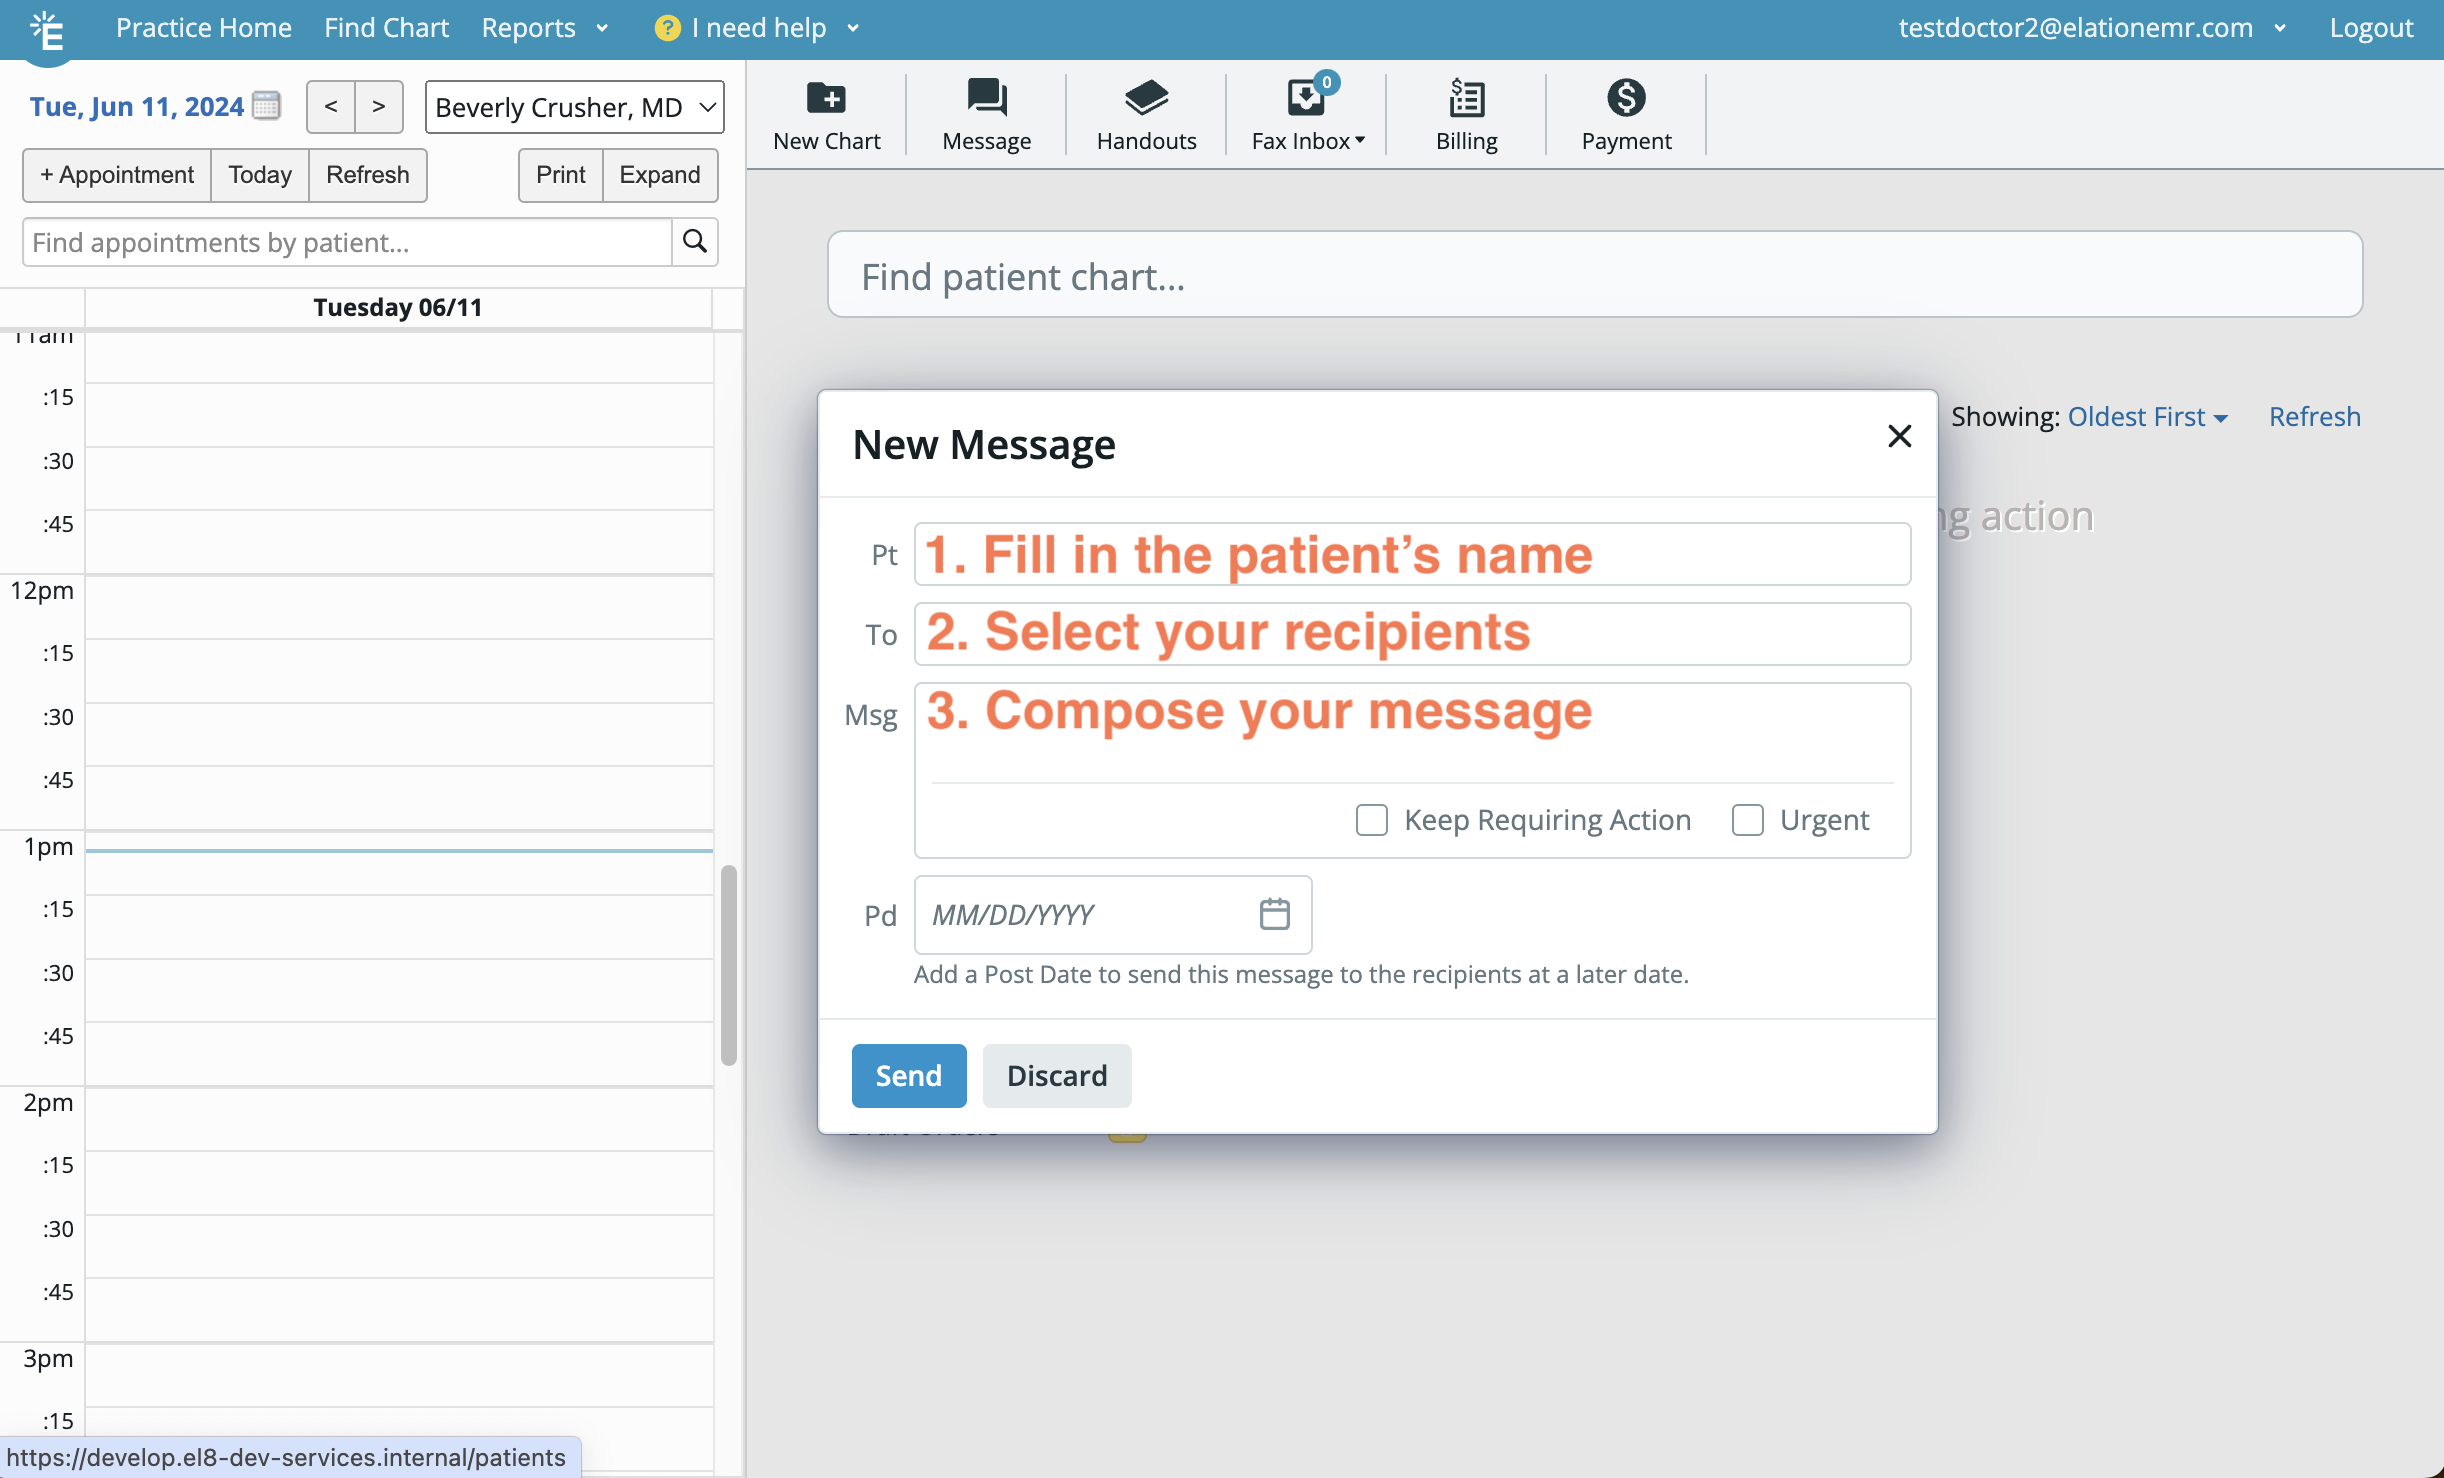
Composing a new Office Message
To compose a new Office Message:- Enter the patient’s name in the Pt box to indicate who the message is about.
- If you need to correct the name, click the Actions button next to the patient’s name followed by Remove.
- If you initiated the Office Message from the patient’s chart, the patient’s name will be automatically populated
- Search for and select recipients from the dropdown menu in the To box- choose individuals or try adding a User Group
-
If you are Premium EHR user, reference the Premium EHR features section below for important details and additional features tied to selecting recipients.
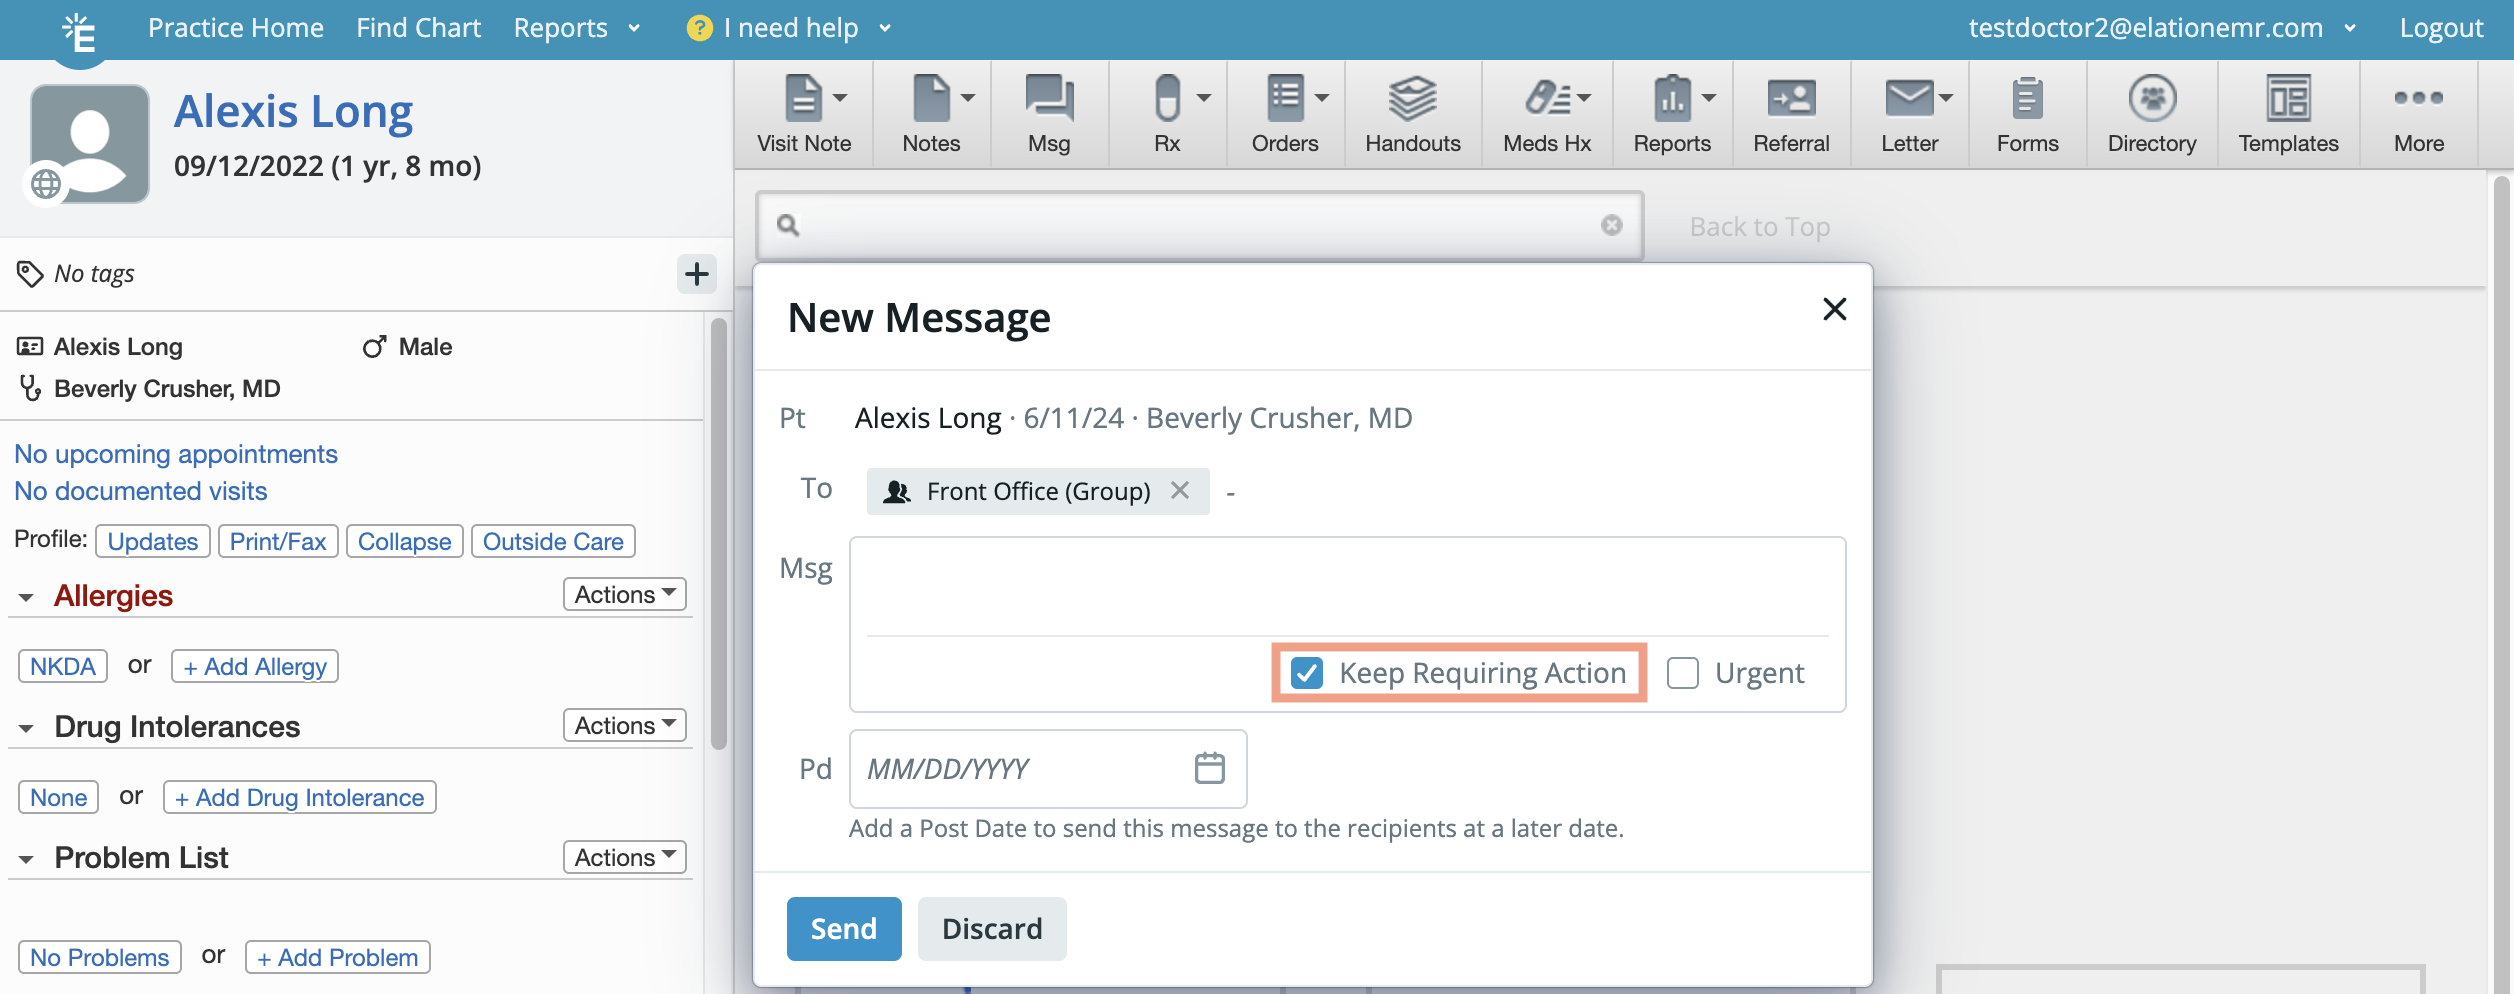
- Compose your message in the Msg box.
Additional Office Message configuration options
- The Keep Requiring Action checkbox allows you to pin Office Message threads to your Office Messages inbox in your Practice Home Requiring Action Queue, even after you’ve sent your message. Doing so allows you to quickly locate and reference high priority threads. For more information on this feature, please see the Using the Keep Requiring Action checkbox section of this article.
- Recipients will continue to see the Office Message in their own Office Messages inbox.
- The Urgent checkbox will add the office message to the recipient’s ‘Urgent’ inbox in their Practice Home Requiring Action Queue in addition to their Office Messages inbox.
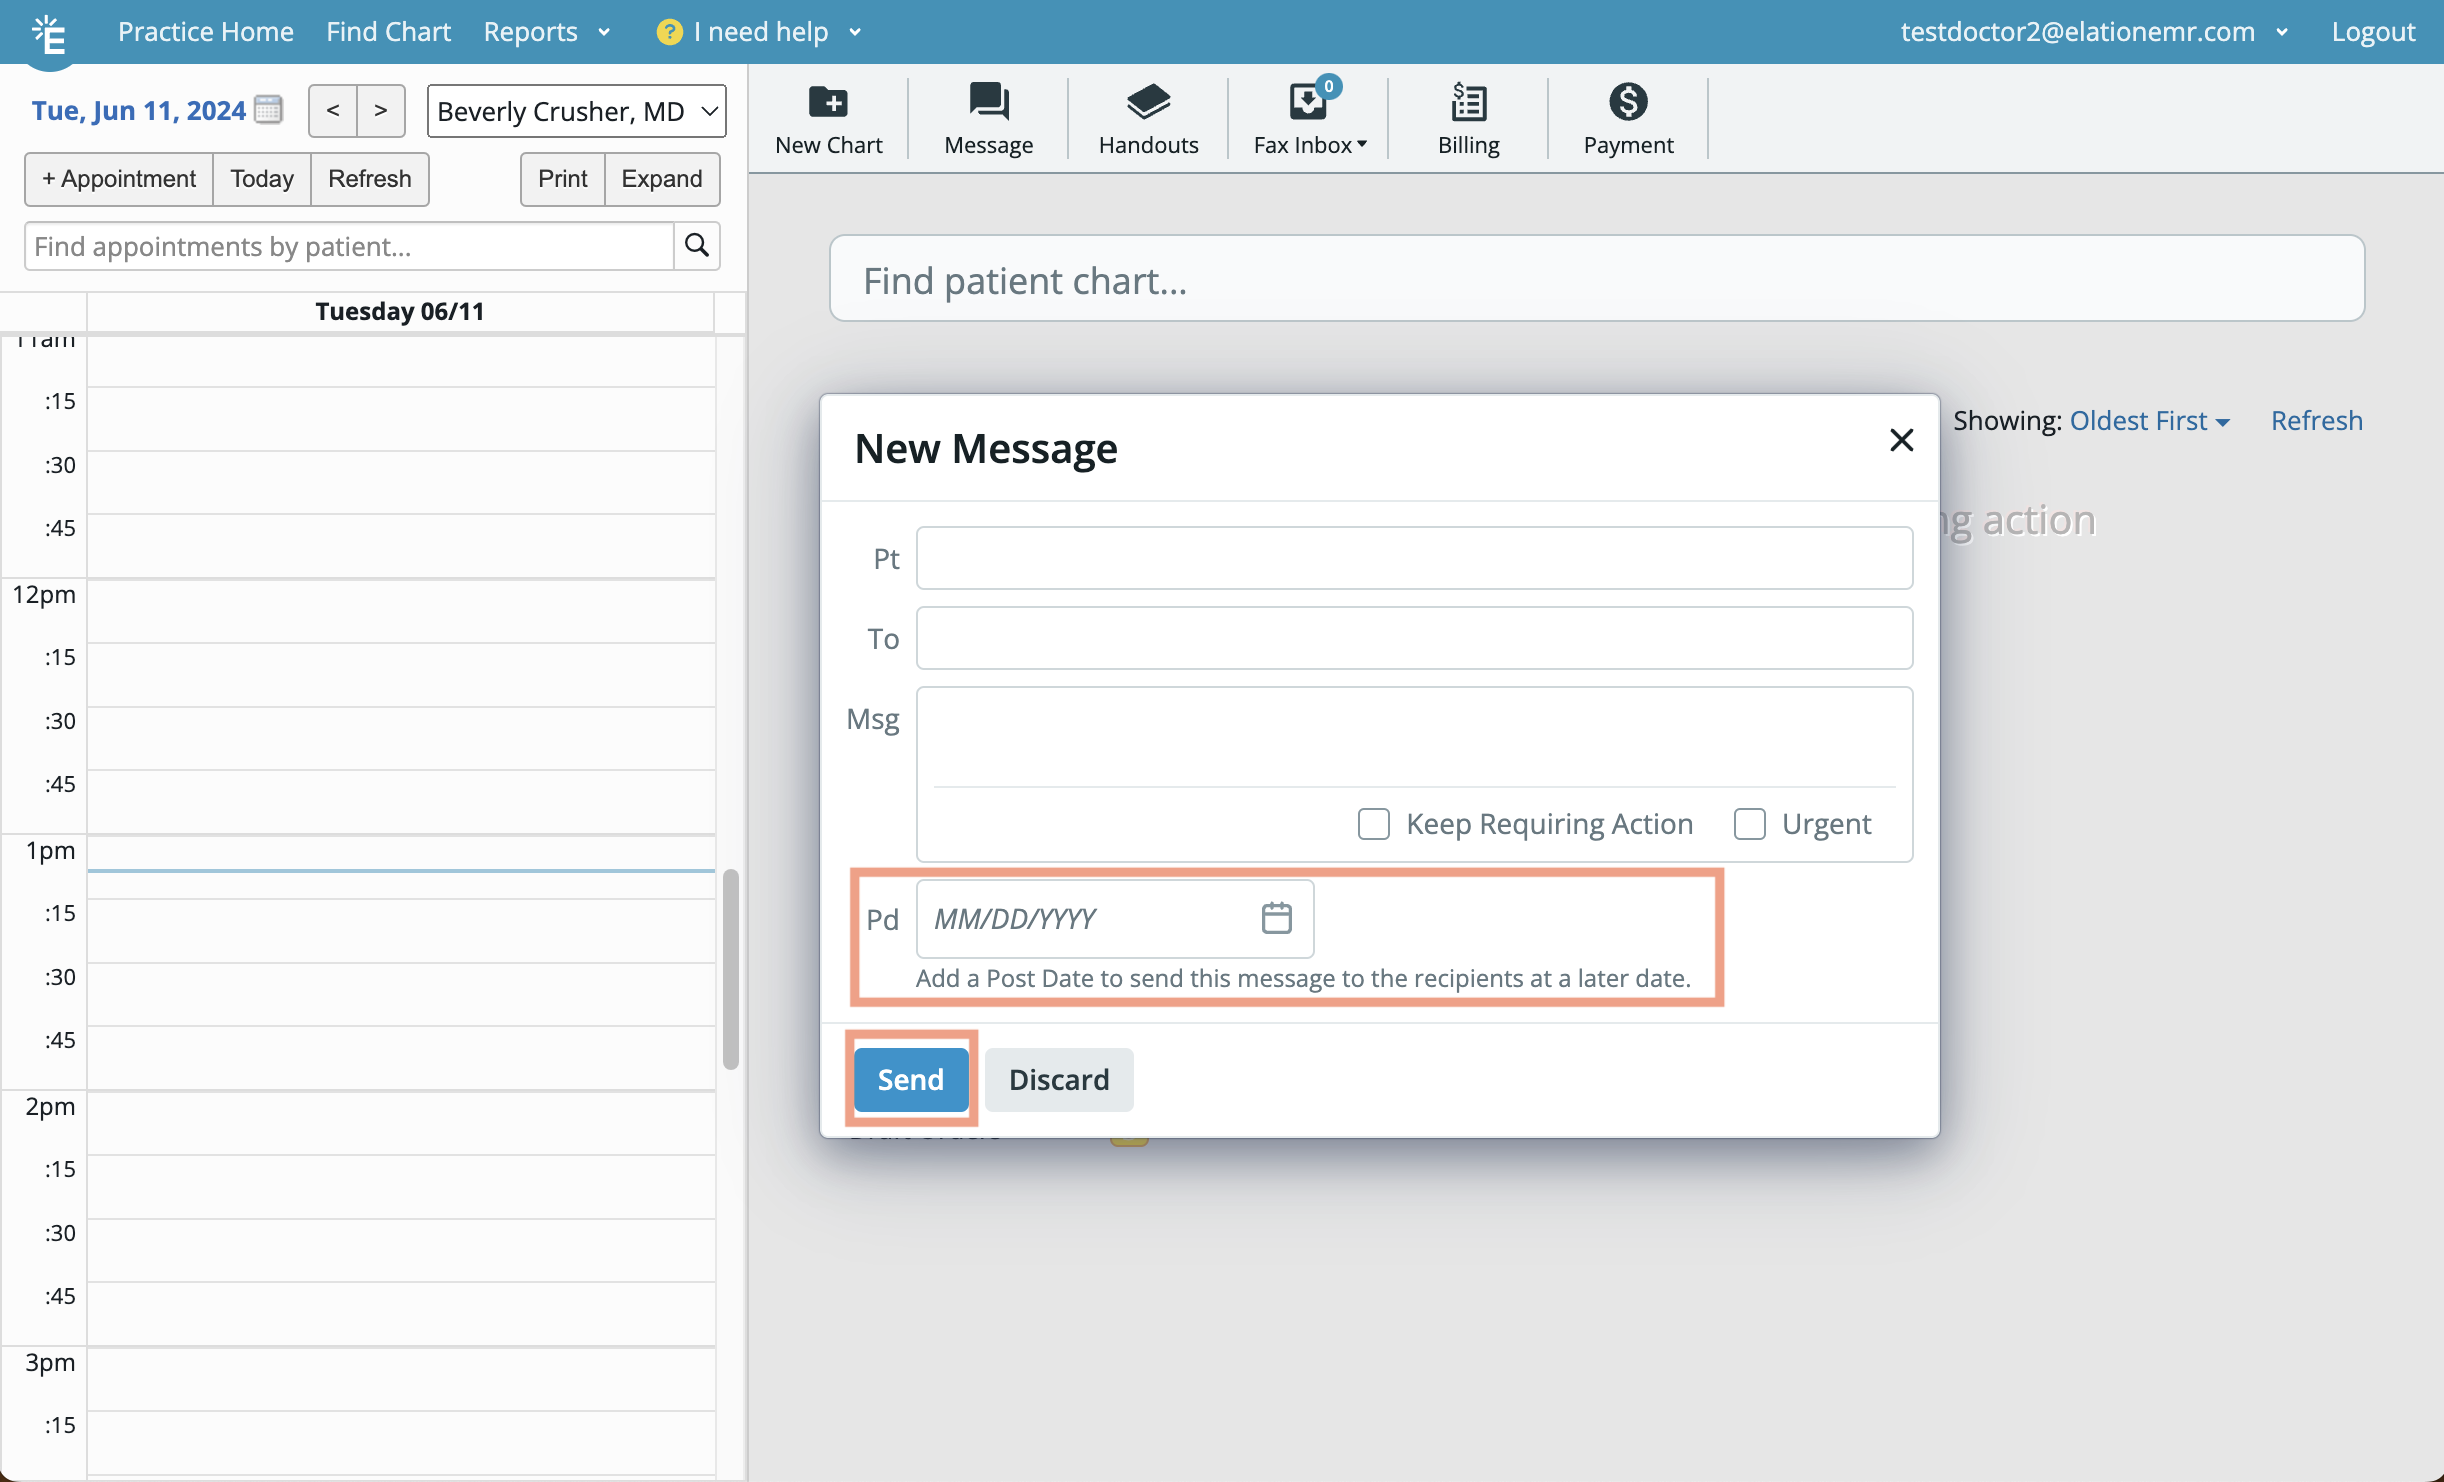
Sending new Office Messages
You have two timing options when sending a new Office Message:- Clicking Send will send the new Office Message immediately to all selected recipients.
- Entering a date in the Pd box will allow you to send the message at a later date. The message will be sent at 12:00am local time on the date selected. This option can be used to create a reminder for yourself or recipients to follow up on a specific task at a future date or time.
Viewing and replying to active Office Message threads
You can view active (unsigned) Office Message threads on Elation’s Practice Home page as well as in the patient’s chart.Viewing active Office Messages from the Practice Home Requiring Action Queue
You can find all active (unsigned) Office Messages that require your attention in the Office Messages inbox of your Practice Home Requiring Action Queue.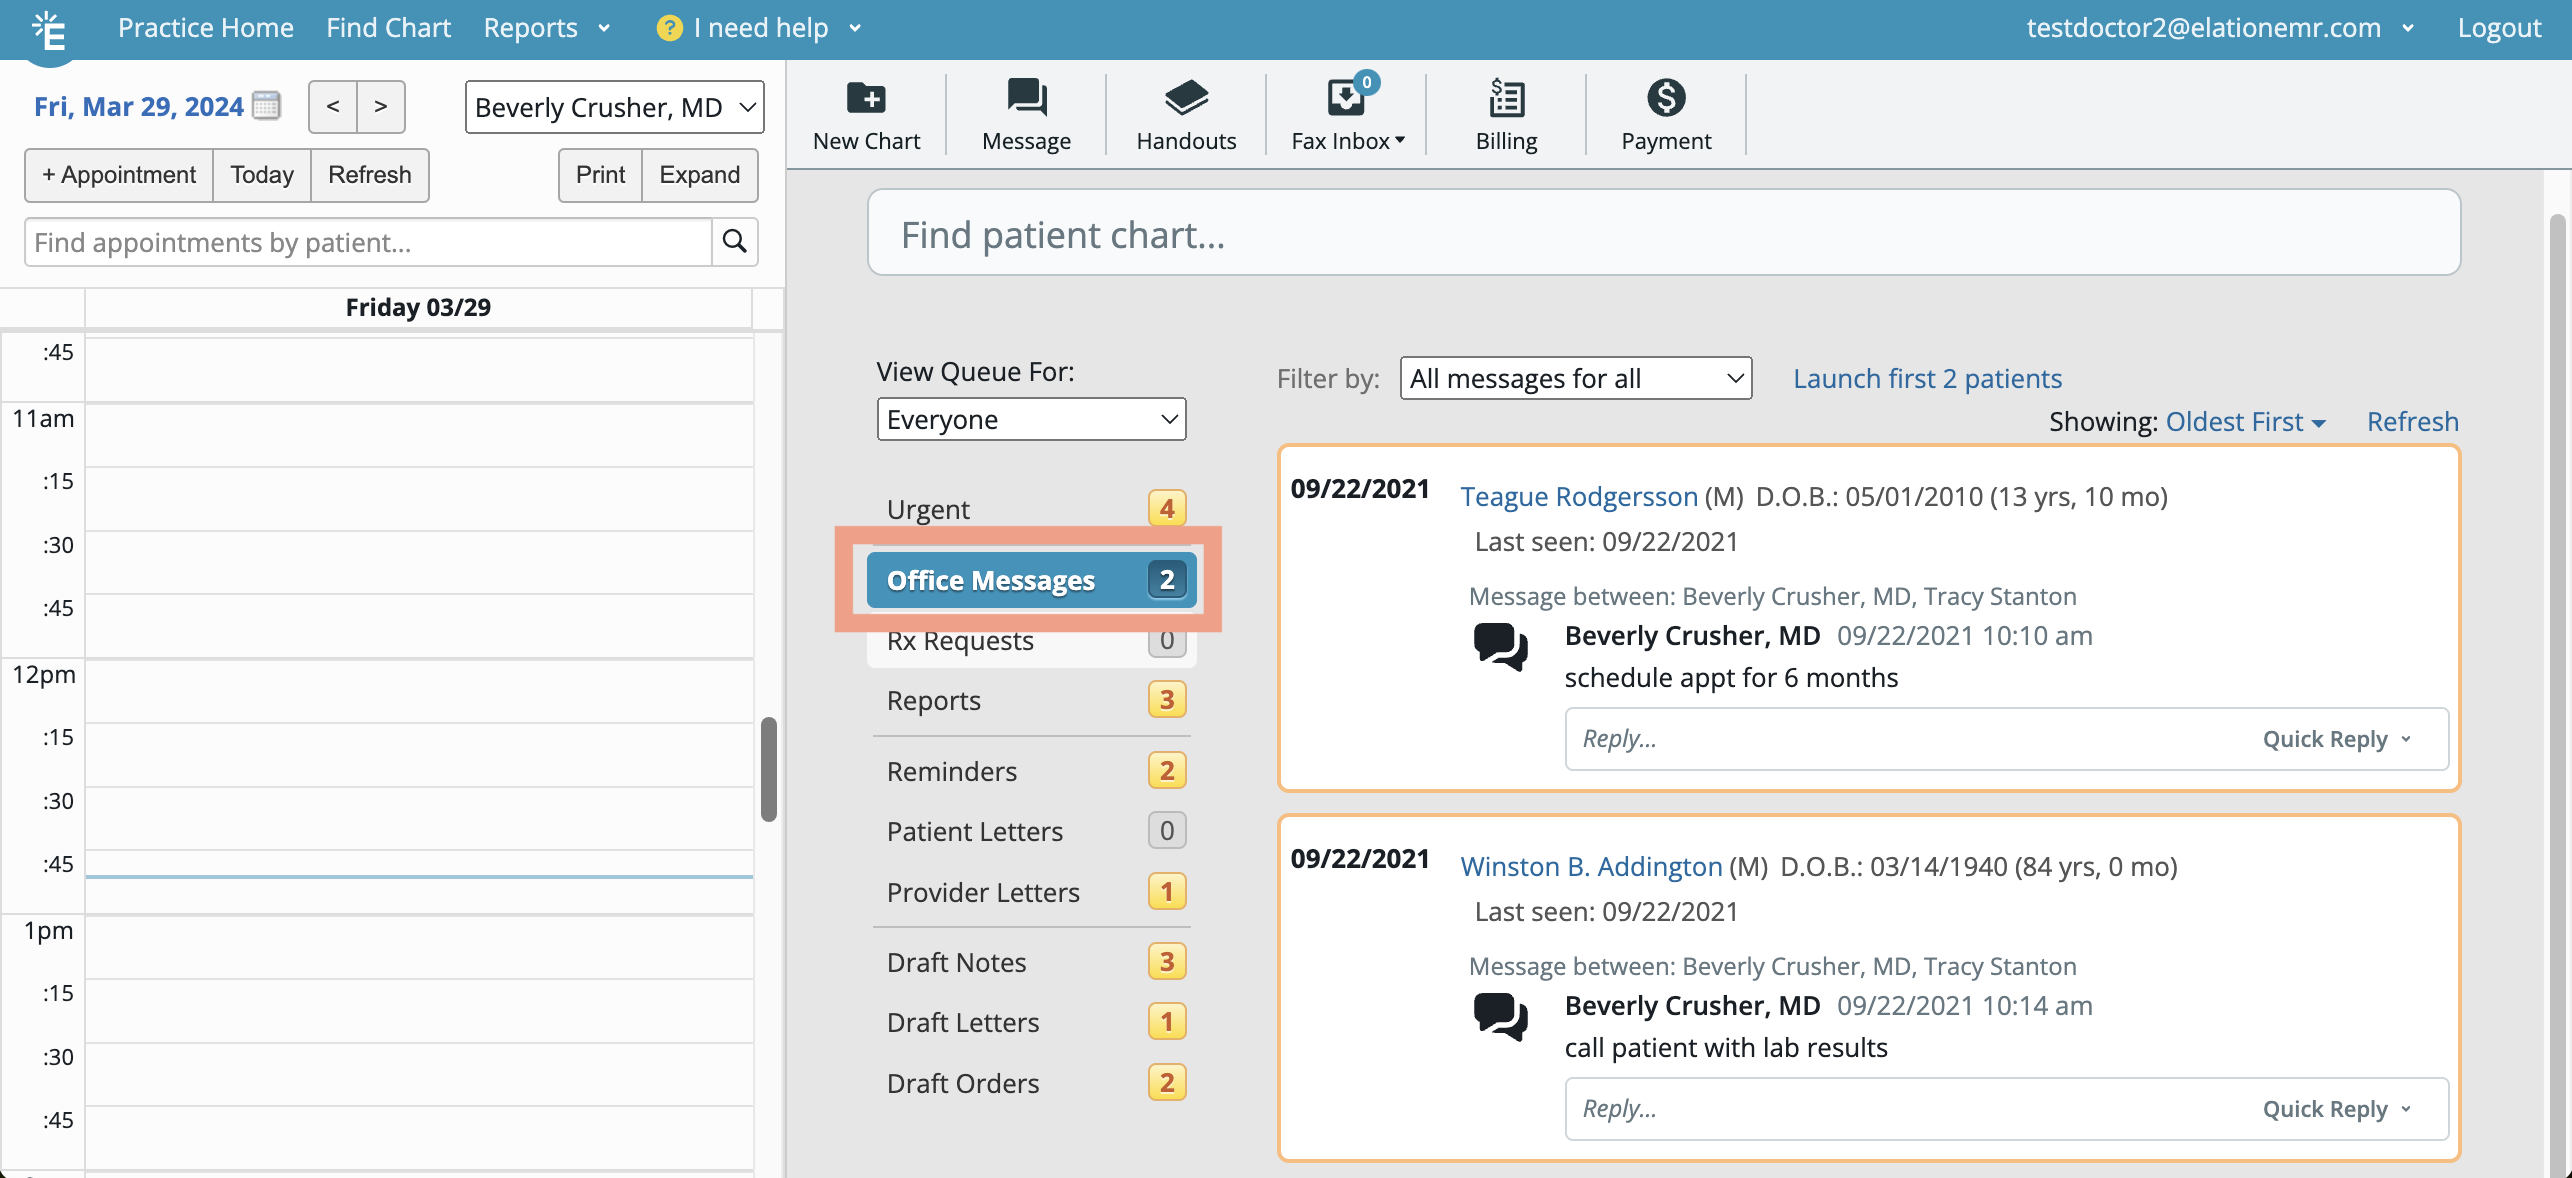
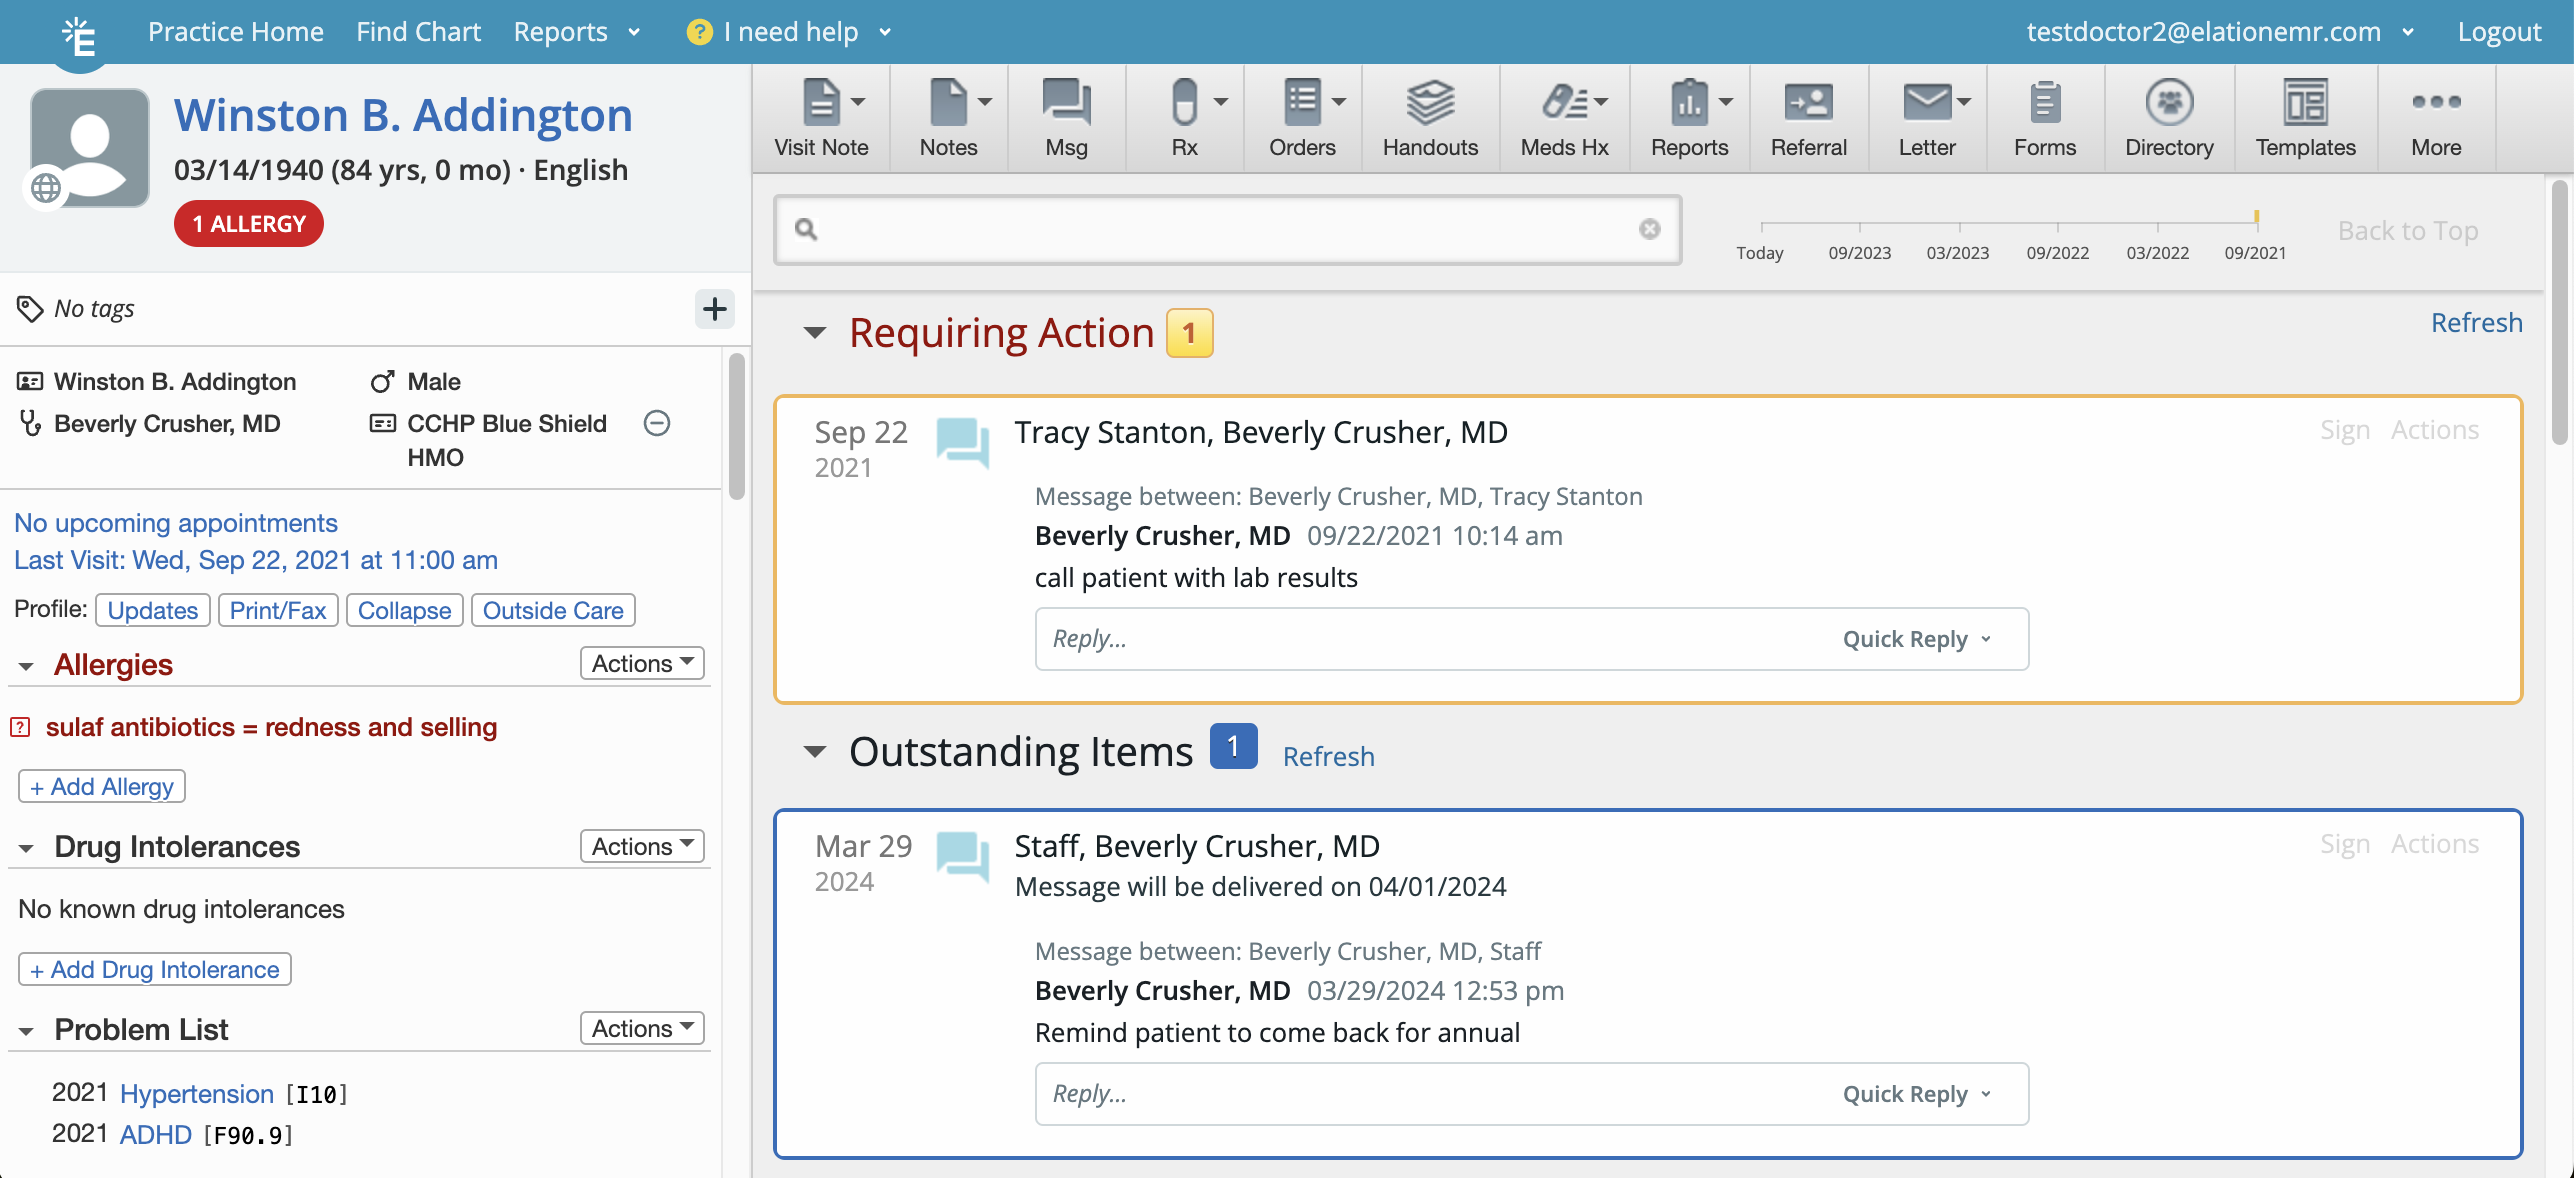
Viewing active Office Messages from the patient’s chart
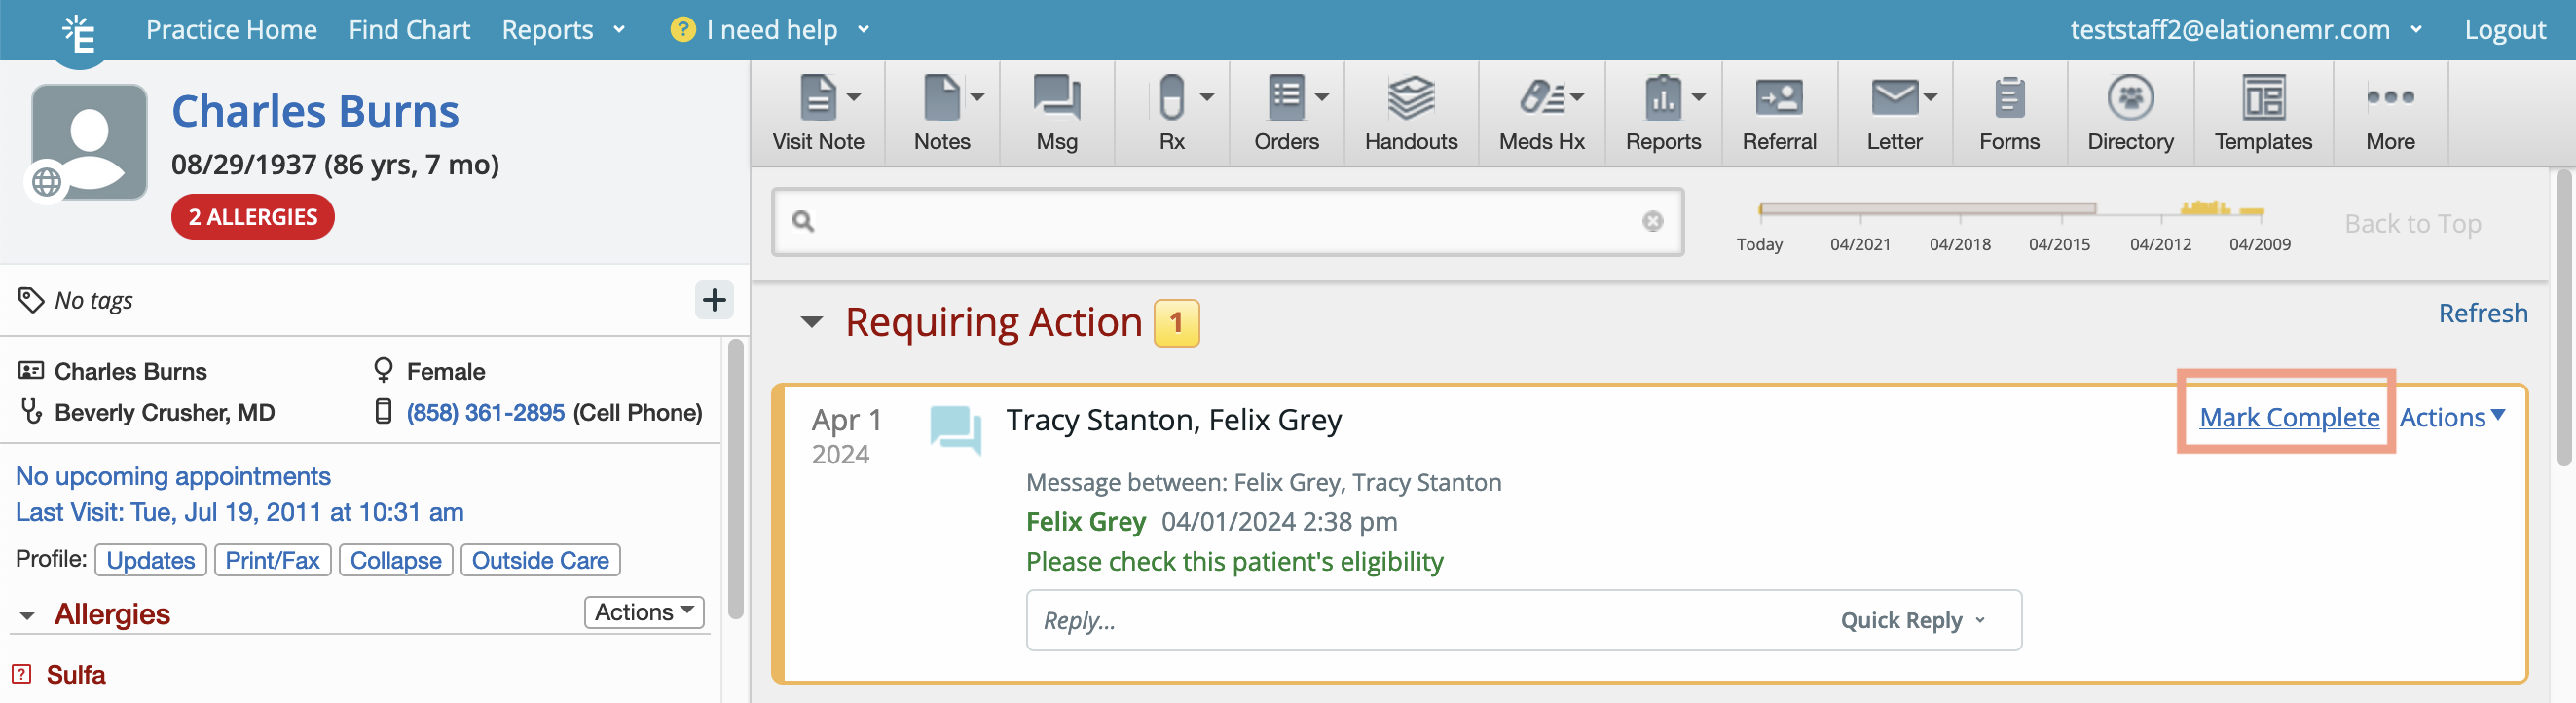
Active (unsigned) Office Messages may appear in two different sections at the top of the patient’s chart:- Any Office Messages that have been delivered to you, and presumably required your attention as a next step, will appear in the Requiring Action section of the patient’s chart.
- Any Office Messages that are waiting on a response from other members of your practice will be located in the Outstanding Items section of the patient’s chart.
Replying to Office Message threads
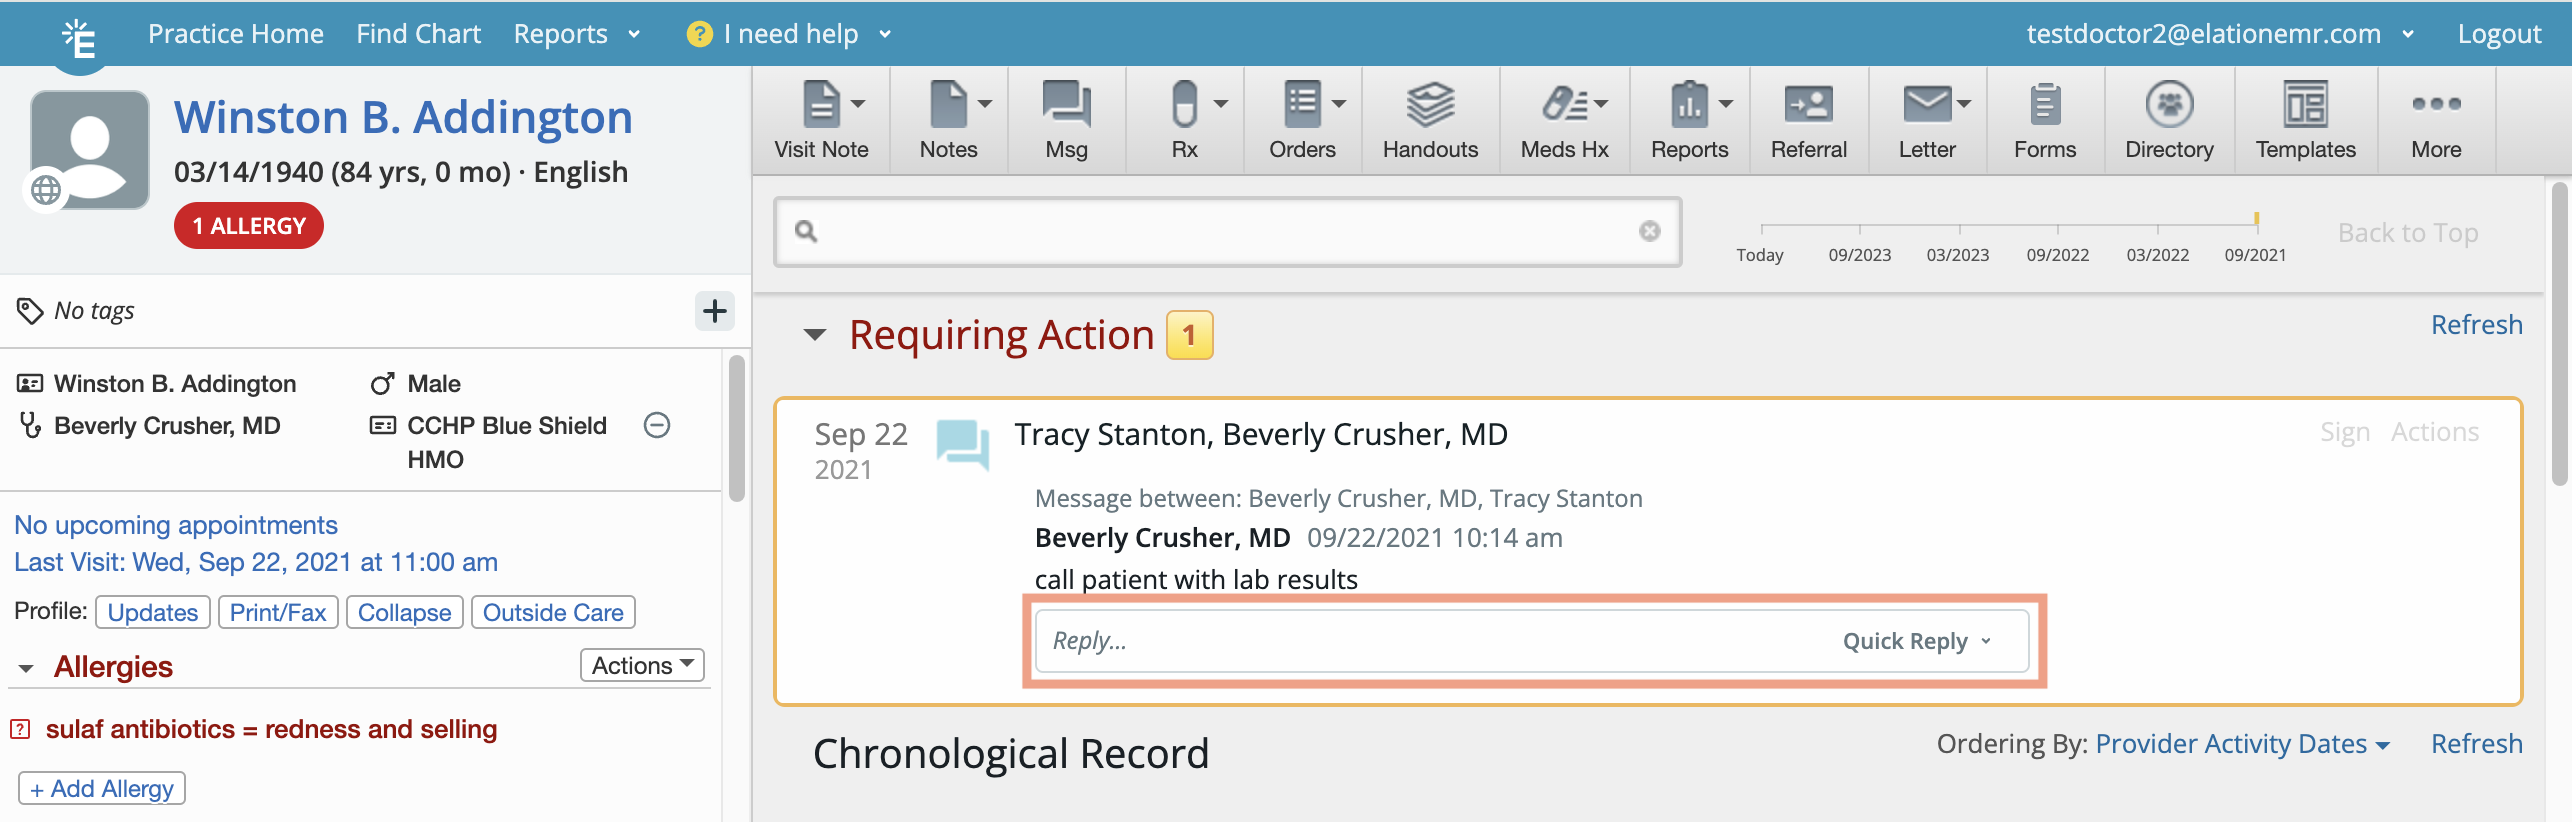
- Click the Reply box at the bottom of any active (unsigned) Office Message threads to write a custom reply.
- Your reply will be delivered to the individuals whose specific names are listed as recipients.
- If there are any User Groups listed as recipients, only the members of the User Group who have already responded to the thread will receive your reply.
- Optionally, click Quick Reply to select from a list of standardized reply templates:
- Recall patient = ‘Please call patient in for appointment.’
- Get patient on phone = ‘Please get patient on phone.’
- Information patient of results = ‘Please call and inform patient of results.’
- Should have appointment already book = ‘Patient should have appointment already booked.’
Viewing Office Message threads with multiple replies
When an Office Message thread already has a history of replies, you will see the buttons Show # reply or Hide # reply in the Office Message thread. Click on these prompts to reveal or collapse all previous replies in the Office Message thread.- By default, active (unsigned) Office Message threads will be expanded so you can optionally click Hide # reply to collapse.
- By default, closed Office Messages threads will be collapsed so you can optionally click Show # reply to expand.
Managing recipients in active Office Message threads

- have multiple team members with similar responsibilities so they should all be notified
- have team members rotating in and out of the office
- need to redirect attention to the correct team member
Adding or removing recipients
Any user can add or remove recipients from active Office Message threads to adjust the team members who need to receive the message. To add or remove recipients:- Click the Edit button next to the recipient’s list at the top of the Office Message
- Type in names of individuals or User Groups to add them to the Office Message thread
-
If you are a Premium EHR user, reference the Premium EHR features section below for important details and additional features tied to selecting recipients.
- Click the X button at the end of an individual or User Group’s name to remove them from the Office Message thread
- Click the Save button to save your changes
- If any recipients were added or removed, a note will appear in the Office Message thread to indicate this change.
![Patient chart for Charles Burns showing an Office Message thread in Outstanding Items. A reply from Beverly Crusher, MD is highlighted with a red border, displaying "[Removed: Felix Grey.]" — the system-generated note indicating a recipient was removed.](https://mintcdn.com/elationhealth/0LX5-INibjgnwk1r/images/0EMUi000002Z6iw.png?fit=max&auto=format&n=0LX5-INibjgnwk1r&q=85&s=5182c4208ad656dbcec74589f18fc328)
If at least one Provider Level User is on an Office Message thread, a Provider Level User will be required to sign the thread in order to close it.Removing all Provider Level Users from an Office Message thread means that any user will be able to close the Office Message thread.Removing any recipient from an Office Message means they will no longer be notified of subsequent replies to the thread. Take caution when removing recipients.
Using the “Keep Requiring Action” checkbox
Closing Office Message threads
To close an Office Message thread, your user type and the user type of other recipients in the thread, will determine what type of button you’ll see:- Provider Level Users will always see Sign off
- Staff Level Users will see Mark Complete if there are only Staff Level Users in the Office Message thread
Sign Off
Provider Level Users are allowed to sign any Office Message thread - regardless of whether they are part of the thread’s recipient list.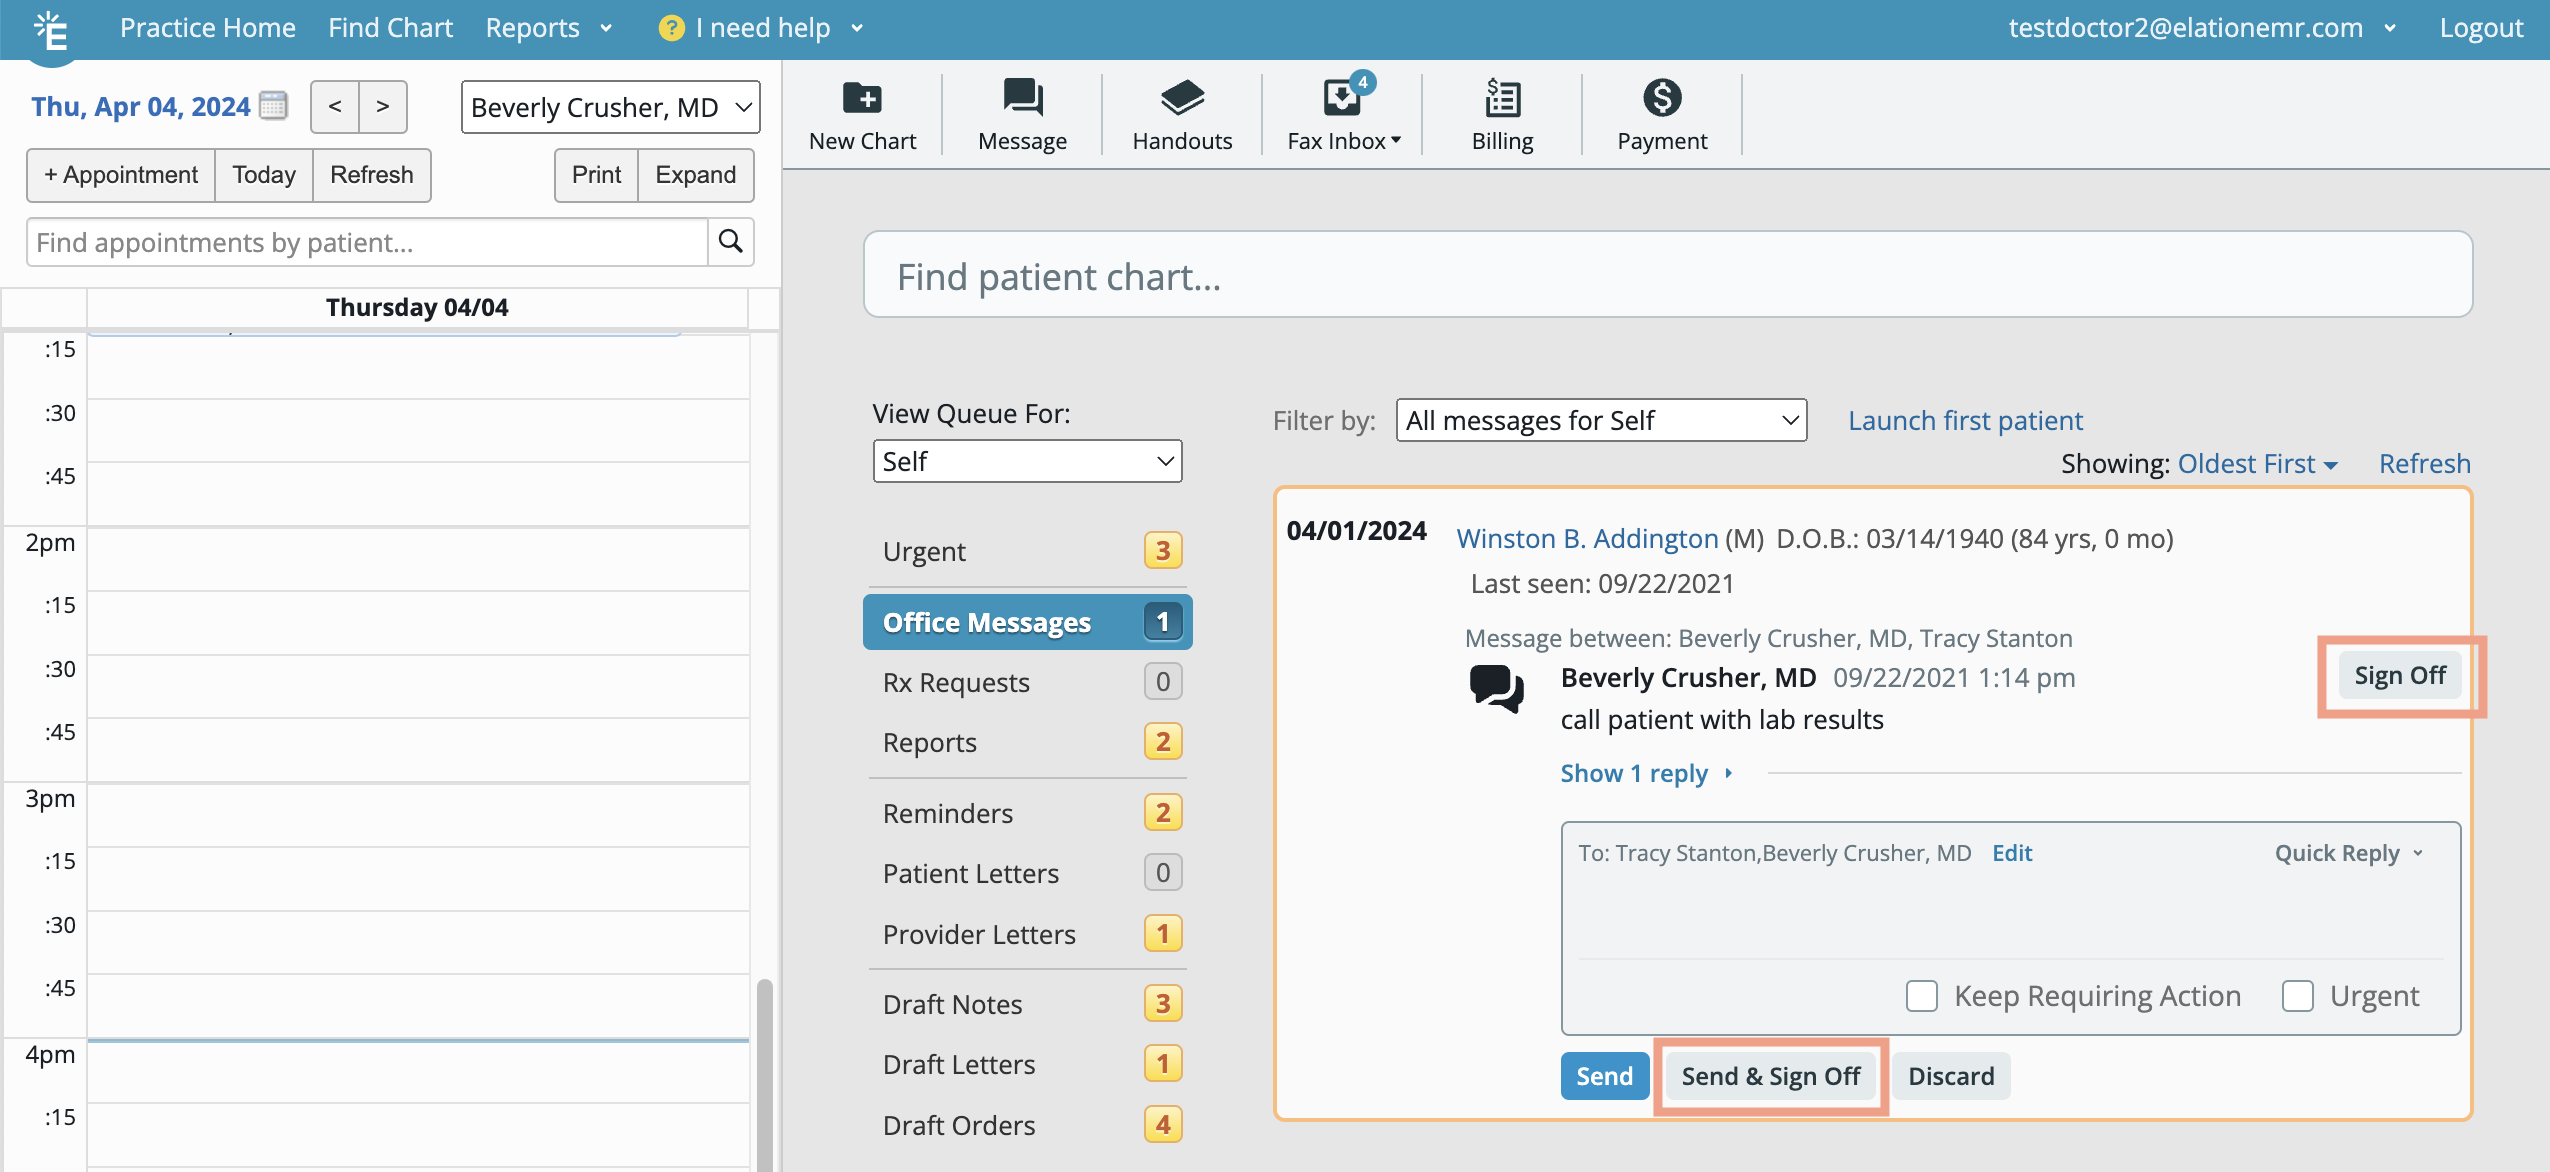
- If no written reply from the Provider Level User is necessary, they should click the upper Sign Off button.
- If the Provider Level User wishes to type a response before closing the thread, they should click the Send & Sign Off button beneath the reply box.
Acknowledge
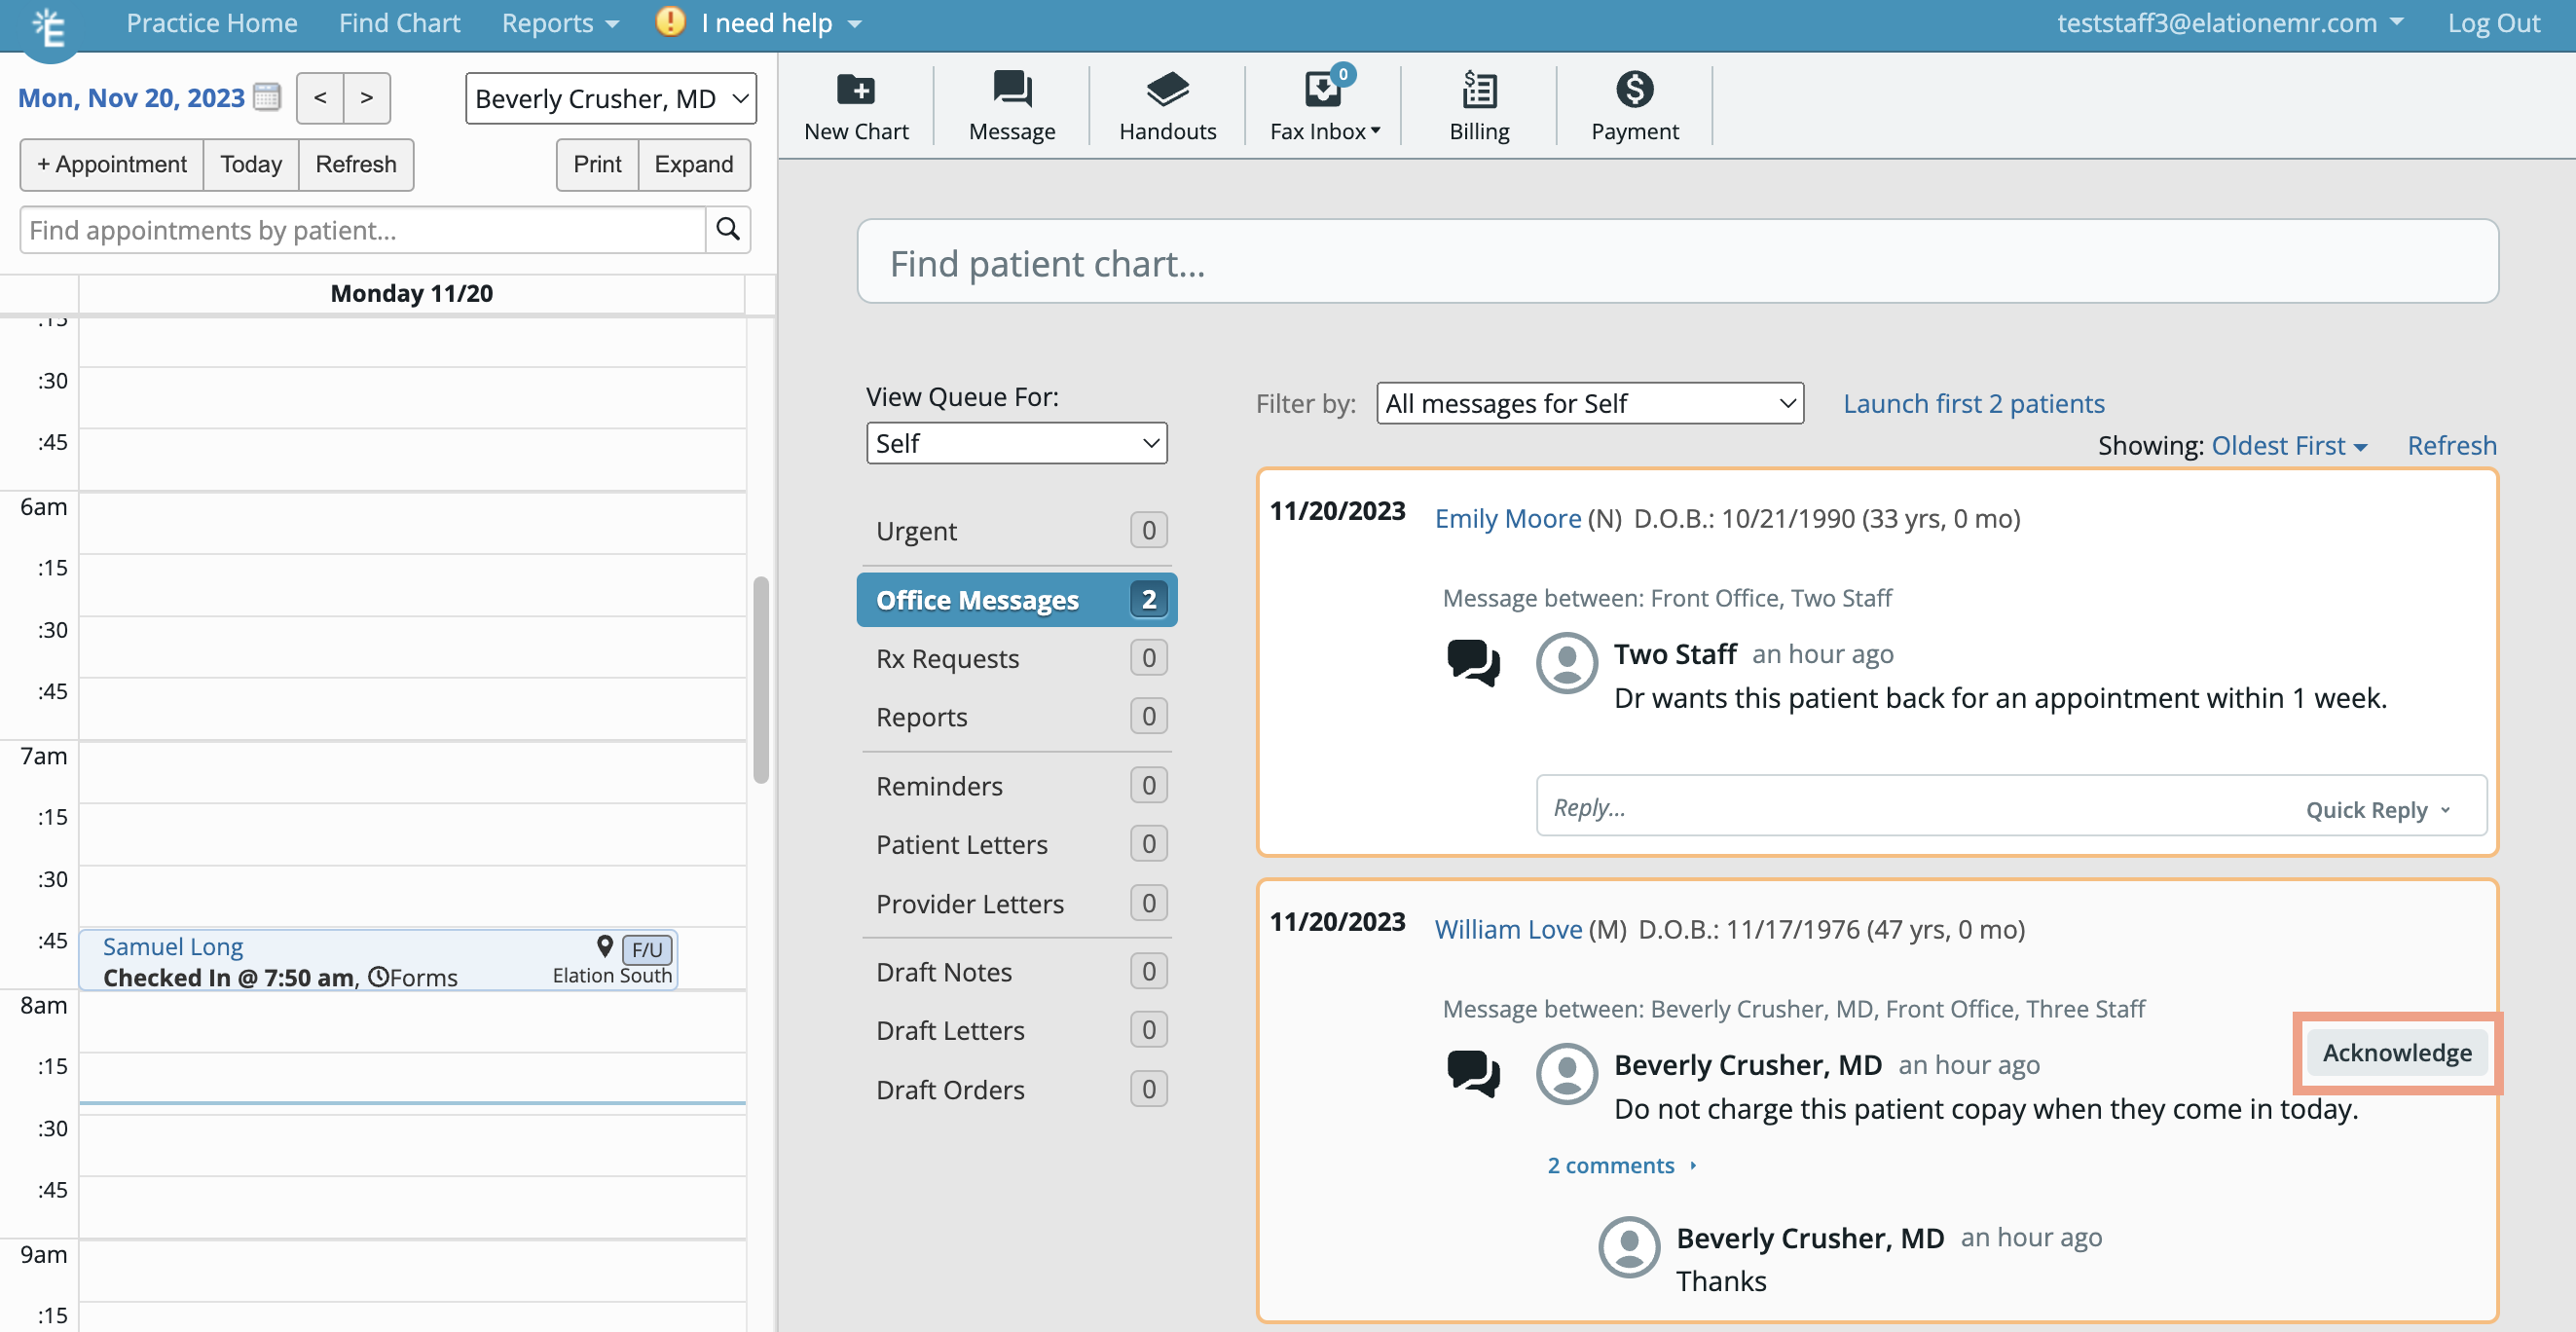
If there are multiple Provider Level Users in the Office Message thread, all Provider Level Users who did not sign the Office Message thread must click Acknowledge to dismiss the Office Message thread from their own Requiring Action Queue.
Mark Complete
This button was previously named Acknowledge for Group.
Viewing closed Office Messages in the Chronological Record
Closed Office Messages, after they are signed off or marked complete, will be stored in the patient’s Chronological Record as shown below. To reveal the history of replies on the thread, click Show # replies.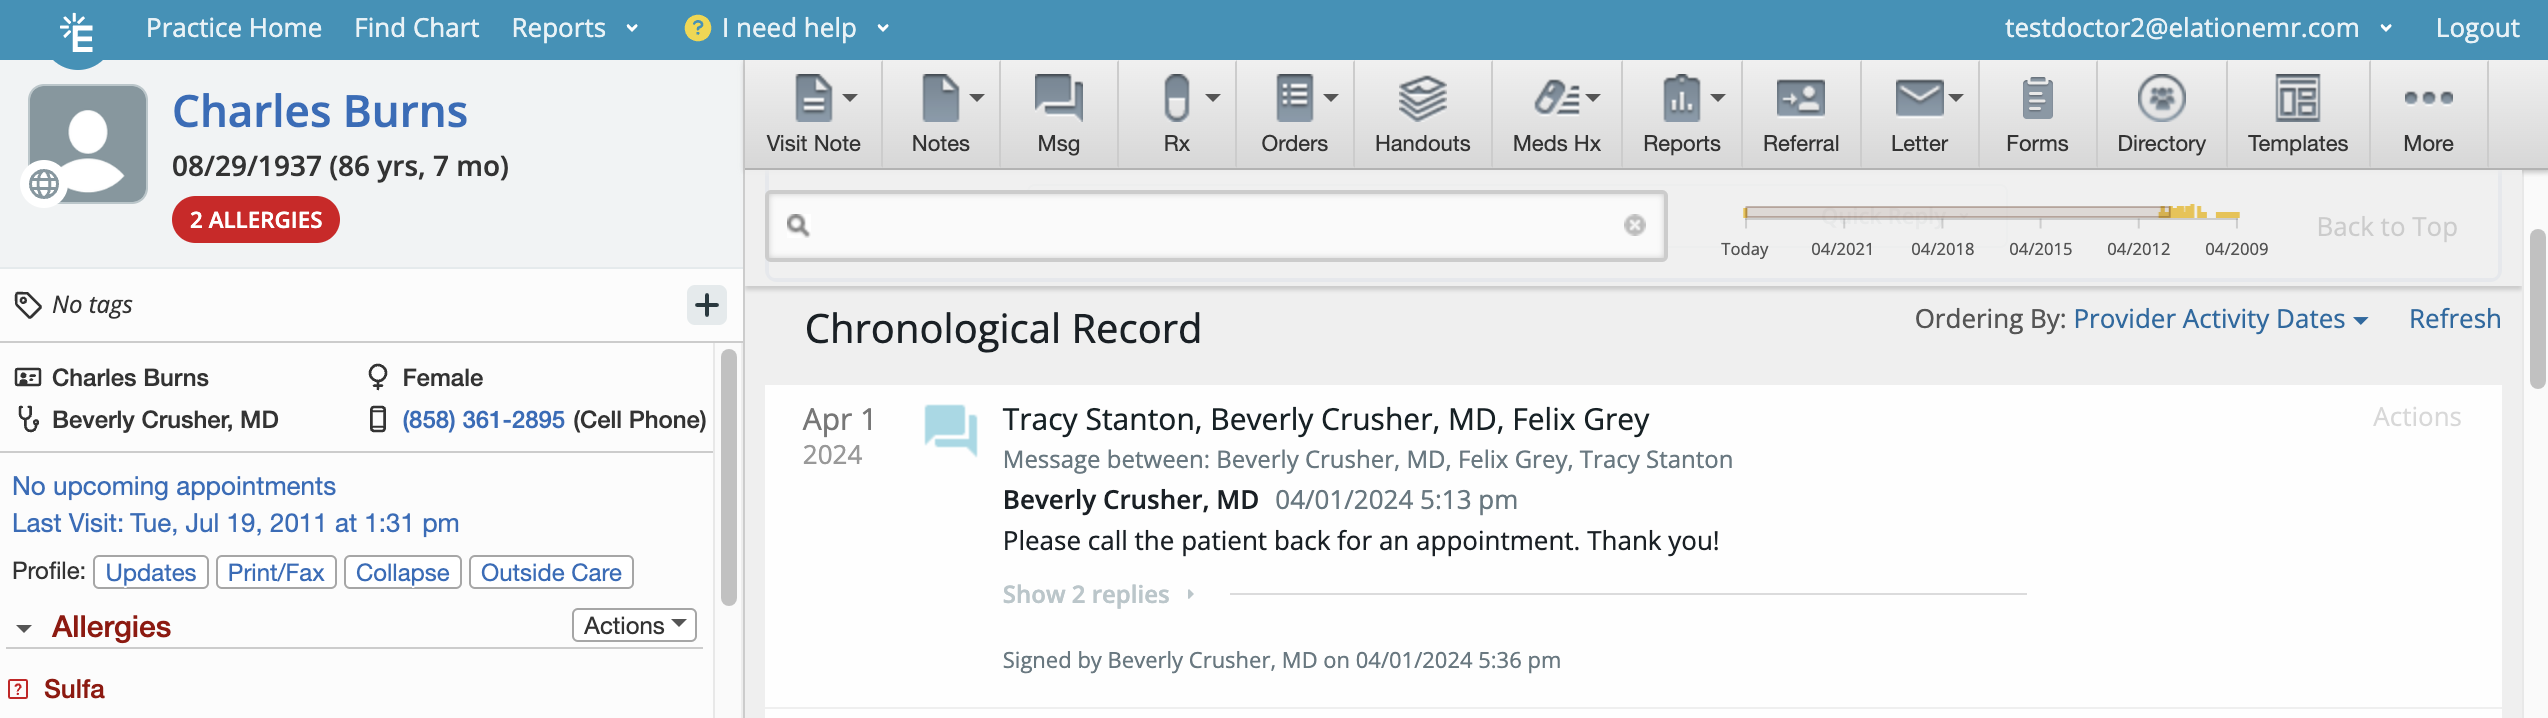
Removing or deleting an Office Message thread
You can remove an Office Message by going into the patient’s chart and clicking Actions —> Remove at the top right corner of any Office Message thread. This action will delete the thread from the patient’s record.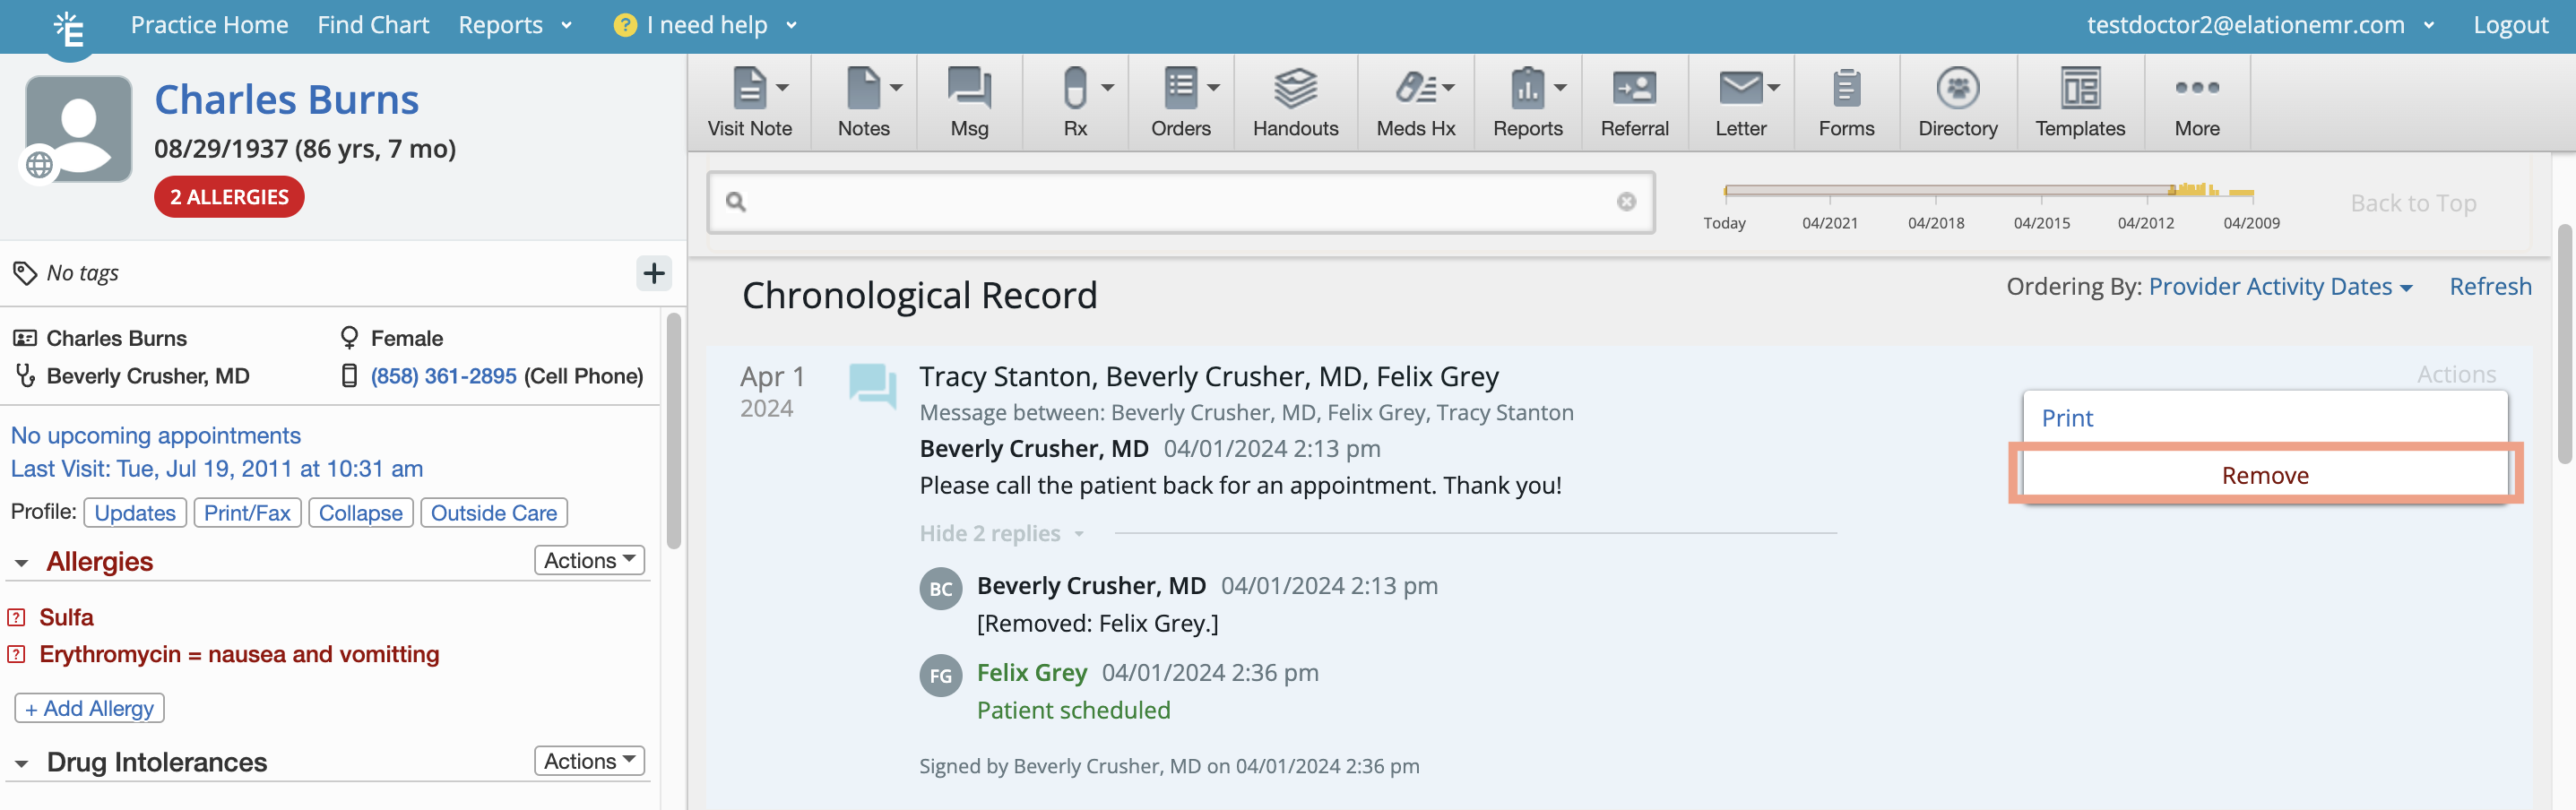
Premium EHR features
The features listed in this section are part of Elation’s Premium EHR offering. If you are already a Premium EHR user and you are interested in using any of these features, click the I need help button to notify Elation and a member of the Elation Team will activate the feature for you.If you are interested in upgrading to Premium EHR to use any of these feature, click the I need help -> Contract Elation Support button and a member of the Elation team will assist you.
Sending Office Messages to User Groups only
Premium EHR users can request a feature that customizes how Office Messages are sent. When the feature is activated, you can only select User Groups in the To: field when selecting recipients and you will not be able to select individual user’s names. This feature makes it easier to route communications and tasks to the appropriate team by sending messages to users according to their function or responsibilities.Allowing Staff Level Users to sign off messages on behalf of Provider Level Users
Premium EHR users can assign specific User Groups as office message delegates, allowing all Staff Level Users in the group to sign Office Messages on behalf of all Provider Level Users in the EHR. These Staff Level Users will have the same sign off workflows as a Provider Level User. Click here to learn more about Office Message Delegates.Workspaces
If you are using Elation’s Workspaces feature for Premium EHR users, reference this guide to ensure the correct users appear in your Workspace User Groups so that the appropriate recipients appear for selection when writing Office Messages. If you only see the Provider List Setting and you do not see the People List Setting in your Workspaces Settings, please use the I need help button at the top of your account to notify us and a member of the Support Team will assist you with enabling the People List Setting.Frequently Asked Questions
Can I send an Office Message that’s NOT affiliated with a specific patient?
Office Messages must be affiliated with a patient chart, but you can create a chart with a generic name (ex. First Name: Internal, Last Name: Office Messages), and then use that generic patient chart to send Office Messages that are not patient-specific.Can I send an Office Message to multiple team members?
Yes, you can send an Office Message to any combination of individuals by selecting their names from the drop down in the To field and/or you can use the User Groups feature to group specific office members together. For example, I may send an Office Message to all 5 medical assistants in my office by adding the 5 medical assistants to a user group called Medical Assistants and then selecting Medical Assistants (Group) from the To drop down.-
If you are a Premium EHR user, reference the Premium EHR features section above for important details and additional features tied to selecting recipients.
What’s the difference between inputting individual user names versus User Groups?
You should input individual user names if each person needs to be equally informed and involved in the message thread. When individual names are listed as recipients, each person will always be notified of subsequent replies to the thread on their Practice Home. You should use a User Group when only 1 (or a few) of the members of the group needs to take action (for example, among a team of Schedulers, once one Scheduler takes ownership of a request, the rest of the Schedulers can disregard the thread). When a User Group is listed as the recipient, every member of the User Group will receive the initial message on their Practice Home, but only people who have personally written at least one message on the thread will see subsequent replies on their Practice Home.How do I add a new recipient to an active Office Message thread?
To add recipients to active Office Message threads:- Click the Edit button next to the recipient’s list at the top of the Office Message
- Type in names of additional recipients or User Groups to add them to the Office Message thread
-
If you are a Premium EHR user, reference the Premium EHR features section above for important details and additional features tied to selecting recipients.
- Click the Save button to save your changes
- A note will appear in the Office Message thread to indicate this change.
- Afterwards you can type a reply if needed.
If a Provider Level User is added to the Office Message thread, a Provider Level User will be required to sign the thread in order to close it.
How do I add myself to an active Office Message?
Anyone can add themselves to an active Office Message thread by replying to the Office Message. When this happens, all individuals whose specific names are listed as recipients will be able to see your reply from the Office Messages inbox of their Practice Home Requiring Action Queue. If there are any User Groups listed as recipients, only the members of the User Group who have already responded to the thread will see your reply in the Office Messages inbox of their Practice Home Requiring Action Queue.If a Provider Level User is added to the Office Message thread, a Provider Level User will be required to sign the thread in order to close it.
How do I remove a recipient from an active Office Message?
To remove a recipient from an active Office Message thread:- Click the Edit button next to the recipient’s list at the top of the Office Message
- Click the X button at the end of the recipient’s or User Group’s name to remove them from the Office Message thread
- Click the Save button to save your changes
- A note will appear in the Office Message thread to indicate this change.
How can I tell who removed me from an Office Message thread I was once part of?
To see who removed you from an Office Message thread you were once part of, find the Office Message thread in the patient’s chart and then find the note about who removed you along with the date and time of the action. The note will look like this:![Patient chart for Charles Burns showing an Office Message thread in Outstanding Items. A reply from Beverly Crusher, MD reads "[Removed: Felix Grey.]" highlighted with a red border, indicating how removed recipients appear in the thread.](https://mintcdn.com/elationhealth/0LX5-INibjgnwk1r/images/0EMUi000002ZHBL.png?fit=max&auto=format&n=0LX5-INibjgnwk1r&q=85&s=dc2df7b677ec9654187a3e55063daed5)
How do I reopen a closed Office Message thread?
Once an Office Message thread is signed or marked complete, it cannot be reopened. You will need to start a new Office Message thread to continue the conversation.How do I edit recipients of a closed Office Message thread?
Once an Office Message thread is signed or marked completed you can no longer edit its recipients.I no longer see the Acknowledge for Group button in the Office Message thread. What happened?
The Acknowledge for Group button has been renamed Mark Complete. When a Staff Level User clicks the Mark Complete button, the Office Message will be dismissed from everyone’s Practice Home Requiring Action Queue and become filed into the Chronological Record of the patient’s chart.I am a Staff Level User but I cannot see the Mark Complete button in the Office Message thread. What happened?
The Mark Complete button is only available for Staff Level Users if there are only Staff Level Users in the Office Message thread. If there are any Provider Level Users in the Office Message thread then Staff Level Users will need to wait for a Provider Level User to sign the Office Message thread in order to complete it. If a Provider Level User was accidentally added to the Office Message thread, you can follow these steps to remove them from an active Office Message thread:- Click the Edit button next to the recipient’s list at the top of the Office Message
- Click the X button at the end of the Provider Level User’s name to remove them from the Office Message thread
- Click the Save button to save your changes
- A note will appear in the Office Message thread to indicate this change.