Overview
If your practice uses Elation Billing , claims are sent from the EHR Billing Home to the Elation Billing PMS for processing. If you are unable to send claims, see Can’t Send Claims from EHR Billing Home (Elation Billing) .
What is Billing Home?
Billing Home shows you all the visit notes tied to patient encounters as well as their associated billing details. Billing Home can be used as a checklist for monitoring and updating your bills.Why is Billing Home useful?
The layout of Billing Home is designed to allow for easy scanning of bill information. The new grid layout for the dashboard adds predictability for where you can expect to find certain details. Each row is one bill and you can easily scroll through the dashboard to find the specific detail you are looking for. Quick filters allow you to easily access bills that correlate to common billing workflows. You can also use our custom filters for more advanced workflow.How to access Billing Home
Click on the Billing Home option under Reports in the blue navigation bar at the top of any page in Elation to access Billing Home.Workflow Instructions
How to use Billing Home
General Layout
The layout of Billing Home is designed for easy access to information. Each page of the dashboard will show up to 25 bills based on the filters selected. Here is a breakdown of the layout: A. Quick Filters - See the bills tied to specific statuses with the click of a button. B. Customer Filters - Apply your own custom filters for bill details. See the Using Filters section below for more details. C. A column for each bill detail| Column Name | Description |
|---|---|
| Date of service | Shows the date of the visit note tied to the bill. |
| Patient | Shows the name and date of birth of the patient.
|
| Status | See the Custom Filters section below for more details. |
| Provider | If you are a Provider Level User, the dashboard will default to only showing your bills. Use the Providers filter to see bills of other Providers in your practice if needed. If you are a Staff Level User, the dashboard will default to showing bills for all Providers. Use the Providers filter to see bills of specific Providers only if needed. |
| Service location | Shows the Service Location (Practice Location) tied to the bill. |
| POS | Shows the place of service code tied to the bill. |
| Billing ref. # | You can type your own billing reference number (e.g. a Claim #) when choosing to manually “Mark as Billed”.
|
| Primary insurance | Shows the patient’s Insurance and Plan Name, Group ID and Member ID |
| Secondary insurance | Shows the patient’s Insurance and Plan Name, Group ID and Member ID |
| Codes | Displays all procedural and diagnostic codes, including modifiers.
|
| Charges, Quantity, and Total | Displays the charge, quantity and total amount tied to the procedures in the bill.
|
| Patient Payment | For customers to record payment received from the patient.
|
| Billing Notes | For any additional notes required for billing. |
- Select Compact View if you want to minimize the white space in each bill line.
- Select the columns you wish to display in the Billing Home by checking off the corresponding column names.
- Rearrange the order in which each column appears as needed.
- The Actions button, Date of service column and Patient column are always On and pinned by default.
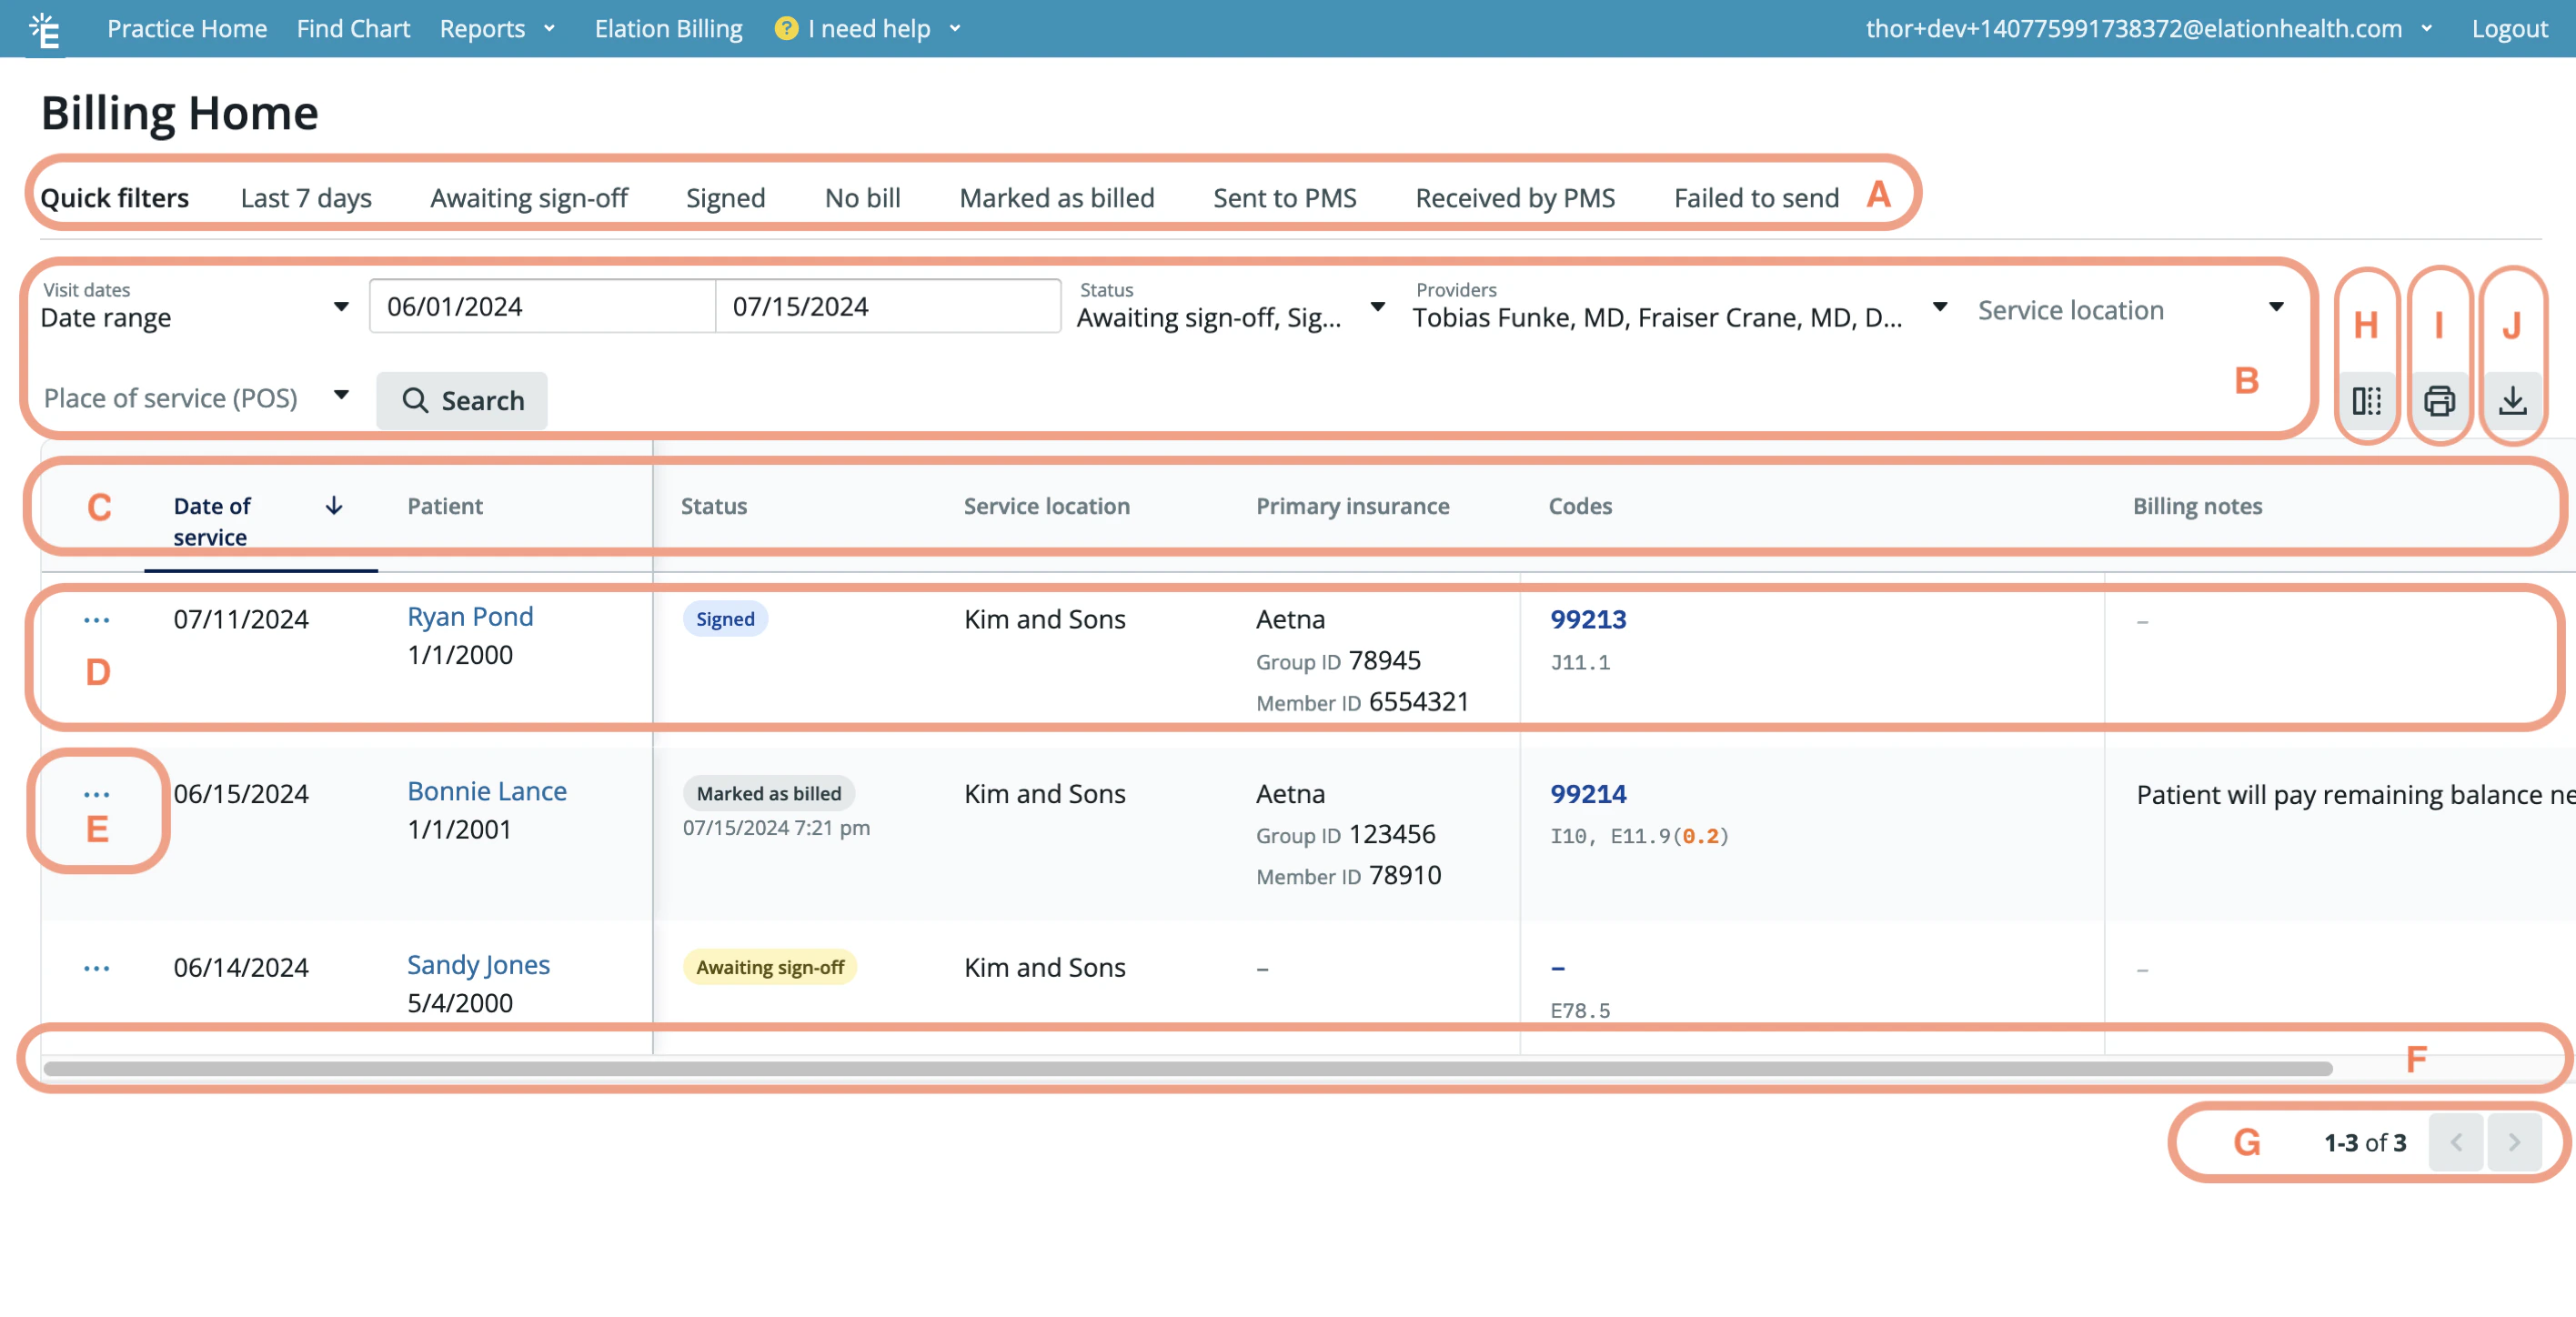

Using Filters
A. Quick Filters - These buttons allow you to see the bills tied to specific statuses with the click of a button. B. Customer Filters - You can now apply your own custom filters for the following bill details:- Visit dates - Filter by predefined date ranges or a custom date range of your choice. The default is Last 7 Days.
- Status - Filter for claims by specific statuses. Reference the following chart for more information:
| Previous Status Name | New Status Name | Description |
|---|---|---|
| --------------------- | No bill | Visit notes without any billing information |
| Unbilled | Awaiting Sign Off | Unsigned visit notes with billing information |
| Unbilled | Signed | Signed visit notes with billing information |
| Billed Manually | Mark as Billed | Someone in the practice used the Mark as Billed action to manually update the status of the bill. |
- Providers - Filter for bills signed by specific providers.
- If you are a Provider Level User, the dashboard will default to only showing your bills. Use the Providers filter to see bills of other Providers in your practice if needed.
- If you are a Staff Level User, the dashboard will default to showing bills for all Providers. Use the Providers filter to see bills of specific Providers only if needed.
- The filter will also allow you to search for bills tied to deactivated Providers.
- Service location - Filter by the Service Location (Practice Location) selected for the bill (including deactivated Service Locations).
- Place of service (POS) - Filter by the Place of Service selected for the bill.
- Primary Insurance - Filter by the Primary Insurance company listed in the patient’s demographics.
Editing the Patient payment or Billing notes fields
You can click into the Patient payment or Billing notes field of any bill in Billing Home to add information directly into those fields. Any data entered into the Patient payment or Billing notes field will automatically save once you click away from the field.Actions Menu
Depending on the status of your bill, you may see one or more of the following actions you can take when clicking on the Actions Menu button:| Action | Description | Only available for the following statuses |
|---|---|---|
| Add Bill | Opens the billing window in Billing Home | No bill |
| Open Bill | Opens the billing window in Billing Home | Awaiting Sign Off |
| Open Visit Note | Opens the patient’s chart and visit note draft | All statuses |
| Mark as Billed | Marks the status of the bill as Billed and allows you to enter a Billing Reference # | Awaiting Sign Off and Signed |
| Edit Billing Ref. # | Allows you to edit the stored Billing Reference # | Marked as billed |
| View Bill History | Shows the history of status changes on a bill and displays the date of the change *(For PMS integration users, if a bill fails to be sent to your PMS and an error message is provided to us by your integrated PMS, we will display the error message in the Bill History log.) | All statuses except No bill |
| Send to PMS | Pushes the bill to your integrated PMS. *(Only available for customers with PMS Integrations) | Signed |
| Resend to PMS | Re-pushes the bill to your integrated PMS *(Only available for customers with PMS Integrations) | Sent to PMS and Failed to send |
Practice Management System (PMS) Integration users
If you use a Practice Management System (PMS) Integration alongside Elation, you will see clearer filters, statuses and actions that detail or drive the synchronization of bills from Elation to your integrated PMS.- Filters & Statuses
| Previous Status Name | New Status Name | Description |
|---|---|---|
| Pushed | Sent to PMS | Bill sent to PMS |
| Pushed | Failed to Send | Bill sent to PMS and PMS sent notice of a failure to receive |
| Billed | Received by PMS | Bill sent to PMS and PMS confirmed receipt |
- Sent & Received details
- Underneath the Sent to PMS and Received by PMS statuses you will see a date and time indicator of when the bill was sent to or received by your integrated PMS
Sending bills to your PMS
There are three ways to send bills from Billing Home to your integrated PMS:- Send individual bills — In the Actions Menu next to each bill, click Send to PMS or Resend to PMS to send or resend a single bill.
- Bulk Send Bills to PMS button — When enabled in your Billing Settings, the Bulk Send Bills to PMS button at the top of the dashboard sends all bills of a specific status to your integrated PMS. Go to the Additional Billing Settings section of this article to learn more about configuring this setting.
- If you have applied additional filters to Billing Home, click Send … filtered bills if you want to only send filtered bills to your PMS.
- Select individual bills using the checkboxes next to each row in Billing Home. After selecting the bills you want, click Send … selected bills.
- The following actions can be made available when enabling this button:
- Send all Signed — sends all bills in the Signed status to your integrated PMS.
- Resend all Sent to PMS — resends all bills in the Sent to PMS status to your integrated PMS.
- Resend all Failed to send — resends all bills in the Failed to Send status to your integrated PMS.
Consult the User Manual for your integrated PMS for full details on how to push bills from Elation to your integrated PMS.
Example of the journey of a bill for PMS users
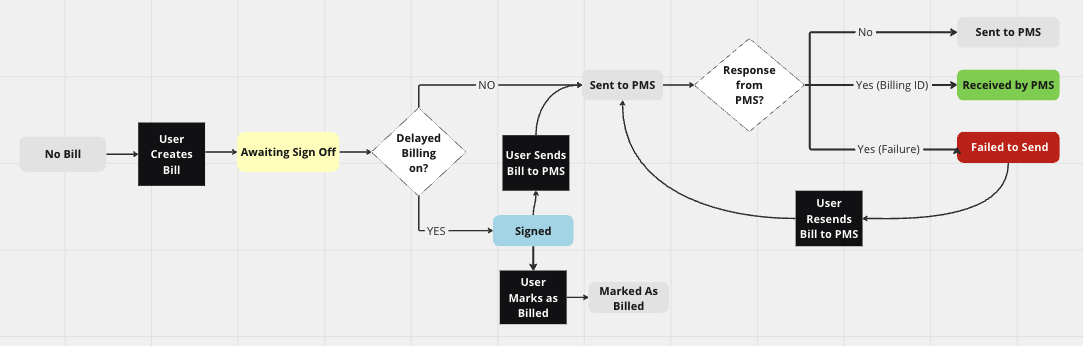
Best Practices for PMS users
When Elation pushes a bill to your PMS the bill will be placed in the Sent to PMS status. This does not mean that the PMS received your bill as not all PMS integrations notify Elation when they successfully receive a bill or if they fail to receive a bill. Consult your PMS Integration Manual for full details on what kind of statuses your PMS integration supports.- PMS Integrations that support a confirmation of receipt will place the bill in the Received by PMS status and return a billing reference number which Elation will store in the Billing ref. # field.
- PMS integrations that support a failed receipt notification will place the bill in the Failed to Send status. Failed bills will also appear in the Requiring Actions queue for Providers to review.
Consult your PMS Integration Manual for full details on what kind of statuses your PMS integration supports and what actions you can take for bills in Elation.
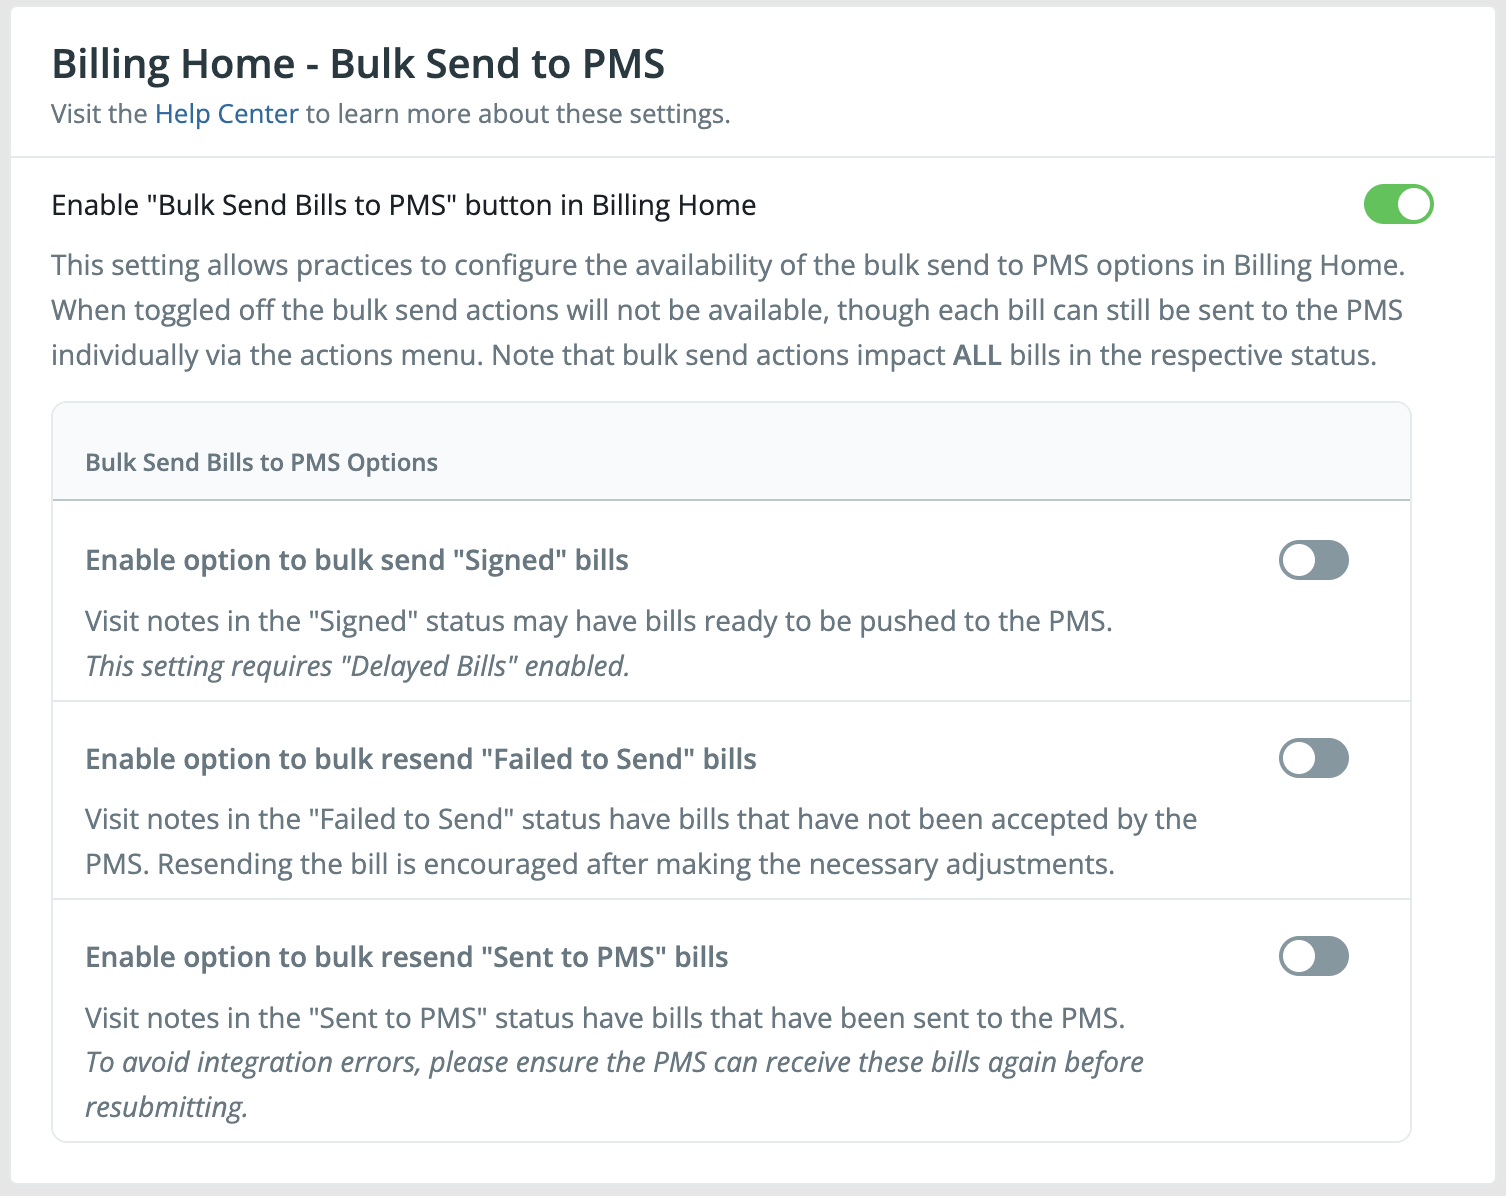
Additional Billing Settings for PMS users
The Billing Home - Bulk Send to PMS setting in your Billing Settings will allow you to enable or disable the Bulk Send Bills to PMS button in Billing Home. When toggled on, the Bulk Send Bills to PMS button allows you to bulk send filtered bills or all bills of a specific status to your integrated PMS. When toggled off the Bulk Send Bills to PMS button will not be available. Note that bulk send actions impact ALL bills in the respective status you select.Even if the Bulk Send Bills to PMS button is toggled off, you can still multi-select individual bills in Billing Home and send them to your PMS in bulk using the bulk action bar. The Bulk Send Bills to PMS setting only controls the status-based bulk send button.
- Enable option to bulk send Signed bills
- This Setting requires the Delayed Bills setting to also be enabled in your Billing Settings. A Send all Signed action will be available under Bulk Send Bills to PMS to allow you to send all bills in the Signed status to your integrated PMS.
- Enable option to bulk resend Failed to Send bills
- A Resend all Failed to send action will be available under Bulk Send Bills to PMS to allow you to send all bills in the Failed to Send status to your integrated PMS.
- Enable option to bulk resend Sent to PMS bills
- A Resend all Sent to PMS action will be available under Bulk Send Bills to PMS to allow you to send all bills in the Sent to PMS status to your integrated PMS.
How to print a report of my bills
To print a copy of the bills displayed (filtered view), click on the Print filtered bills button at the top of Billing Home. The printed report will separate the filtered bills by the status of the bill.
How to download a report of my bills
To download a copy of the bills displayed (filtered view), click on the Download filtered bills button at the top of Billing Home.
Common use cases
Following up on incomplete bills
Billing Home can be used to follow up on incomplete bills to make sure coding is complete before generating a claim for services rendered. You can use the following Quick Filters to quickly view all your incomplete bills:- No Bill
- Awaiting Sign Off
Worklist for generating claims
Billing Home can be used by a biller to make sure a bill is submitted to the Payer for processing. Billers can use the Signed Quick Filter to view all the signed bills and create claims from the details listed for each bill. Once a claim is sent, they can click on the Actions MenuFollowing up on unbilled claims
Billing Home can be used to follow up unbilled claims to make sure a bill is submitted to the Payer for processing. You can use the Signed Quick Filter to view all your signed bills and then look at the Billing ref. # column to see which bill is missing a billing reference number. That claim could potentially be unprocessed.Get yearly totals for each CPT code
You can use Billing Home together with a spreadsheet software (e.g. Excel or Google Sheets) to get yearly totals by CPT code for your practice’s accounting needs.| 1 | Open Billing Home In Elation, go to Reports -> Billing Home . |
|---|---|
| 2 | Set the date range to the desired year Use the Visit dates filter to set a custom range for the full year you want to review (for example, Jan 1–Dec 31). |
| 3 | Download the filtered results as a CSV At the top of Billing Home, click Download filtered bills to export the filtered view of your bills. |
| 4 | Create a pivot table in a spreadsheet software Open the CSV in a spreadsheet software (e.g. Excel or Google Sheets). • Insert a pivot table. • Configure the pivot: • This gives you a yearly CPT summary. |
Use the same pattern for other summary questions
You can repeat the same instructions — filter in Billing Home -> Download filtered bills -> Build a pivot table — to answer many other operational and accounting questions that require aggregate answers, such as:- Totals by Provider - Filter by the date range you care about in Billing Home, download the filtered CSV, then build a pivot table with Provider as rows and sum of charge amounts (and/or count of bills) as values.
- Totals by Payer - Filter by Visit dates and insurance, download the filtered CSV, then pivot on your payer field (for example, Primary Insurance) as rows, with sum of charge amounts and/or count of bills as values.
- Monthly trends - After downloading the CSV, derive a month column from Date of Service and use it in the pivot table as rows or columns with sum of charge amounts as values to see volume and revenue trends across months in the same year.
Frequently Asked Questions (FAQ)
Can I edit my bill details from the Billing Home?
Yes, click on the Actions MenuCan I customize the quick filters available?
The available Quick Filters cannot be customized at this time. We will notify you if this feature becomes available in the future.Can I save frequently used filters?
The ability to save commonly used filters is not available at this time. We will notify you if this feature becomes available in the future.Can I customize the columns available in the Billing Home?
You can click the Edit Columns button to select which available columns you want displayed in the Billing Home for your entire practice. However, you cannot add columns that are not available.
Can I set permissions around which users can take which actions?
The ability to permissions around which users can take which actions is not available at this time. We will notify you if this feature becomes available in the future.Can I restrict Billing Home access for certain staff, like billers?
Billing Home does not yet offer detailed, per-user permission controls - selective hiding of CPT codes, diagnoses, payments, or insurance information for individual users is not currently possible. To manage who can view and edit billing data, consider the following approach:- Limit User Access – Only grant access to users in your practice who can have full visibility into billing metrics.
- Use Staff Level accounts for billers – Staff Level users can enter and edit billing information before a visit note is signed. For editing billing information on signed visit notes, providers can designate specific staff as Billing delegates through their Provider Managed Delegates settings.
- Keep Admin access restricted to owners and managers – Admin Level privileges should be assigned only to practice owners or managers who need to configure settings and manage user accounts.
Can I send bills from a specific date range to my integrated PMS?
To send bills from a specific date range to your integrated PMS, use the date filter to filter by the date range you want to send. Then you can:- Click the Actions Menu
 next to an individual bill and select Send to PMS.
 - Use the checkboxes to multi-select the specific bills you want to send from the filtered results, then use the bulk action bar to send them all at once.
- Click the Bulk Send button to send all filtered bills of a specific status to your PMS.
Related Articles
- Billing Guide- Creating a Super Bill & coding for your visit
- Billing Guide- Navigating Billing Settings
- Billing Guide- Frequently Asked Questions
- Practice Locations Guide- Listing your service locations
- Billing Guide- Patient Invoicing- Generating invoices to patients for services rendered
- Elation Billing- Using Elation’s all-in-one billing solution to manage your claims
- Patient Payments Guide- Securely collect payments digitally from patients
- Billing Guide- Delayed Billing
- Can’t Send Claims from EHR Billing Home (Elation Billing)
- Using the Claims Manager (Elation Billing)
- Claims Queue (Elation Billing)