
For practice staff · 5 min readYou’ll need staff-level access to patient charts in Elation EHR. Use the scenario cards below to jump directly to the workflow that matches your situation.
Overview
Invitation Methods
For flexibility, there are several ways to invite patients to the patient portal. Options include:- Sending a stand-alone invitation.
- Sending an invitation while sharing records or communications.
- Sending an invitation automatically after the patient books an appointment on the Booking Site.
- Sending invitations to multiple patients at a time.
- If the patient’s email is not linked to an active patient portal account, your invitation will prompt the patient to register for a new account.
- If the patient’s email address is linked to an active patient portal account (e.g., they have an account with another Elation doctor or for a family member), your invitation will prompt them to link the new account to their existing one.
New patient invitation
Send a first-time invitation to a patient without an existing account
Patient with existing account
Link a new chart to a patient portal account that is already active
Family and friends access
Bulk invitations
Send invitations to multiple patients at once
Patient’s Invite Experience
Patients need an invitation from your practice to register for a patient portal account. The invitation is sent to the patient’s email. When the patient clicks the link, they enter their name, create a password, and agree to the Terms of Service. After registering, they complete a short verification step to confirm their relationship to the chart and set their notification preferences.A phone number is not required to send an invitation. Patients can optionally add a phone number after registration from their Account Settings.
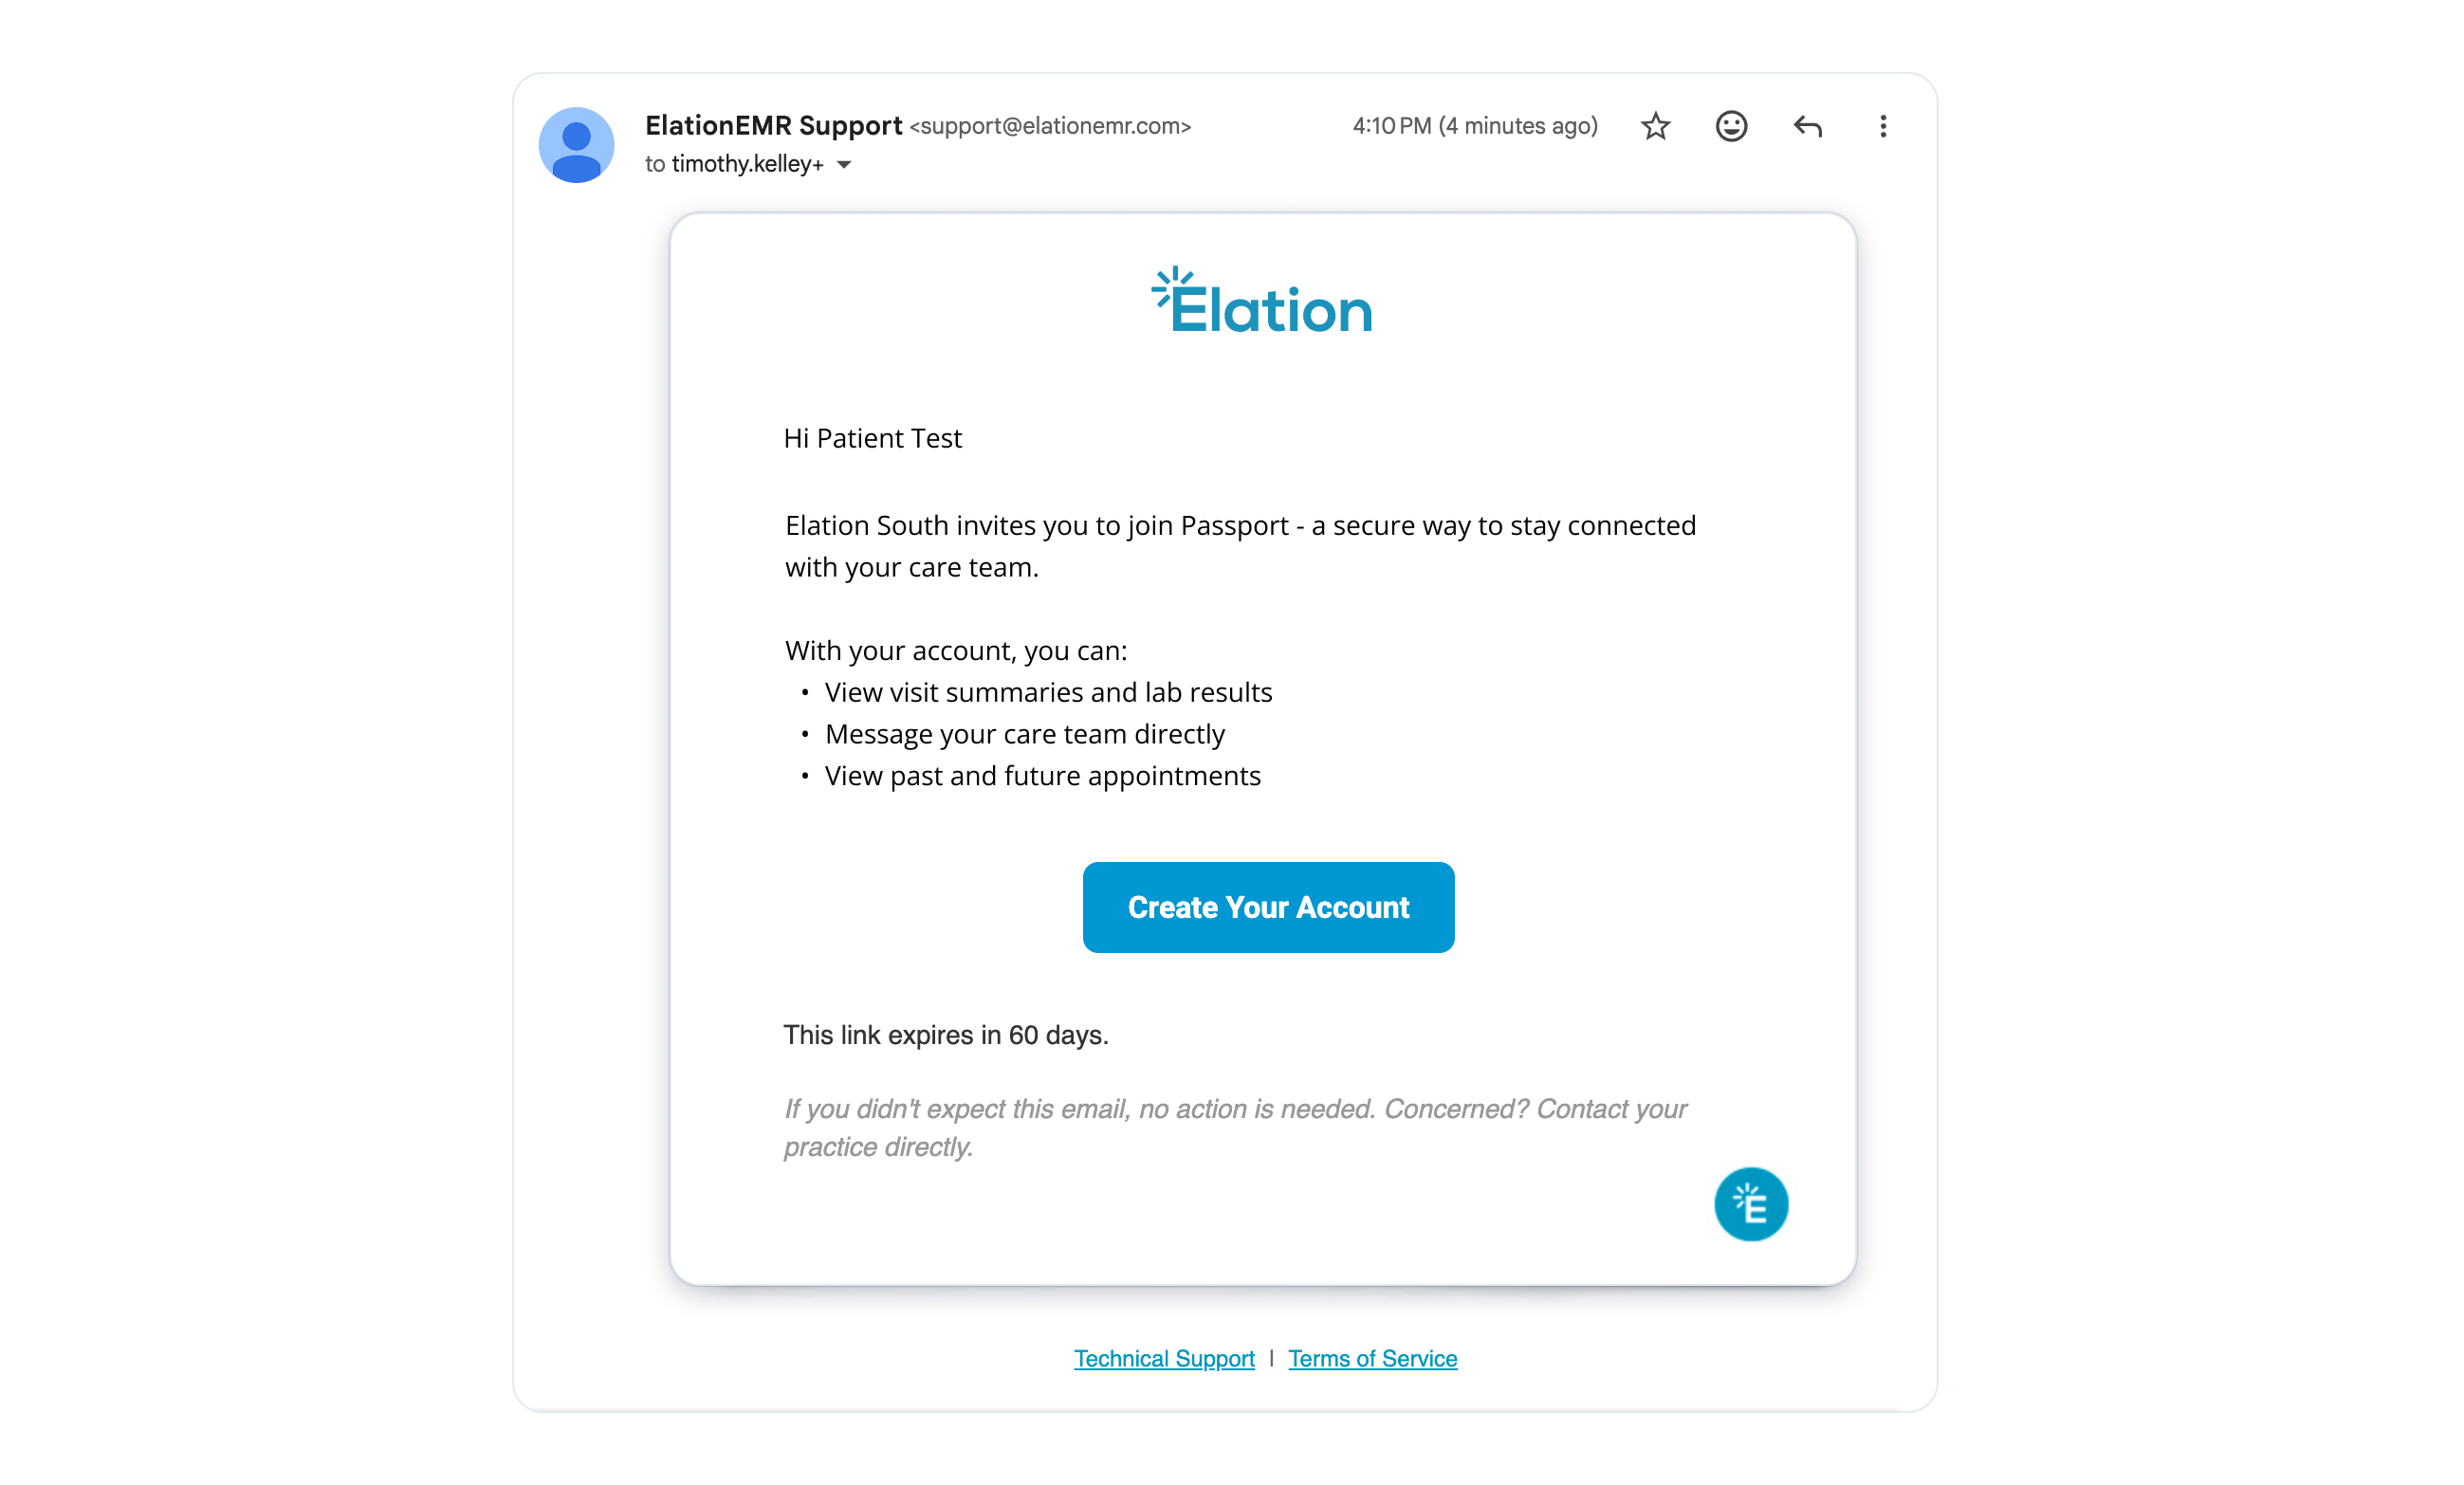
The invitation email
When you send a patient portal invitation, the patient receives an email from Elation. Here is what they will see:From: ElationEMR Support Subject line: Passport Account Registration Email body: Hi [Patient or proxy name] Elation South invites you to join Passport - a secure way to stay connected with your care team:
General Workflow Instructions
Inviting patients one by one to the patient portal for the first time
Sending a stand-alone invitation
1
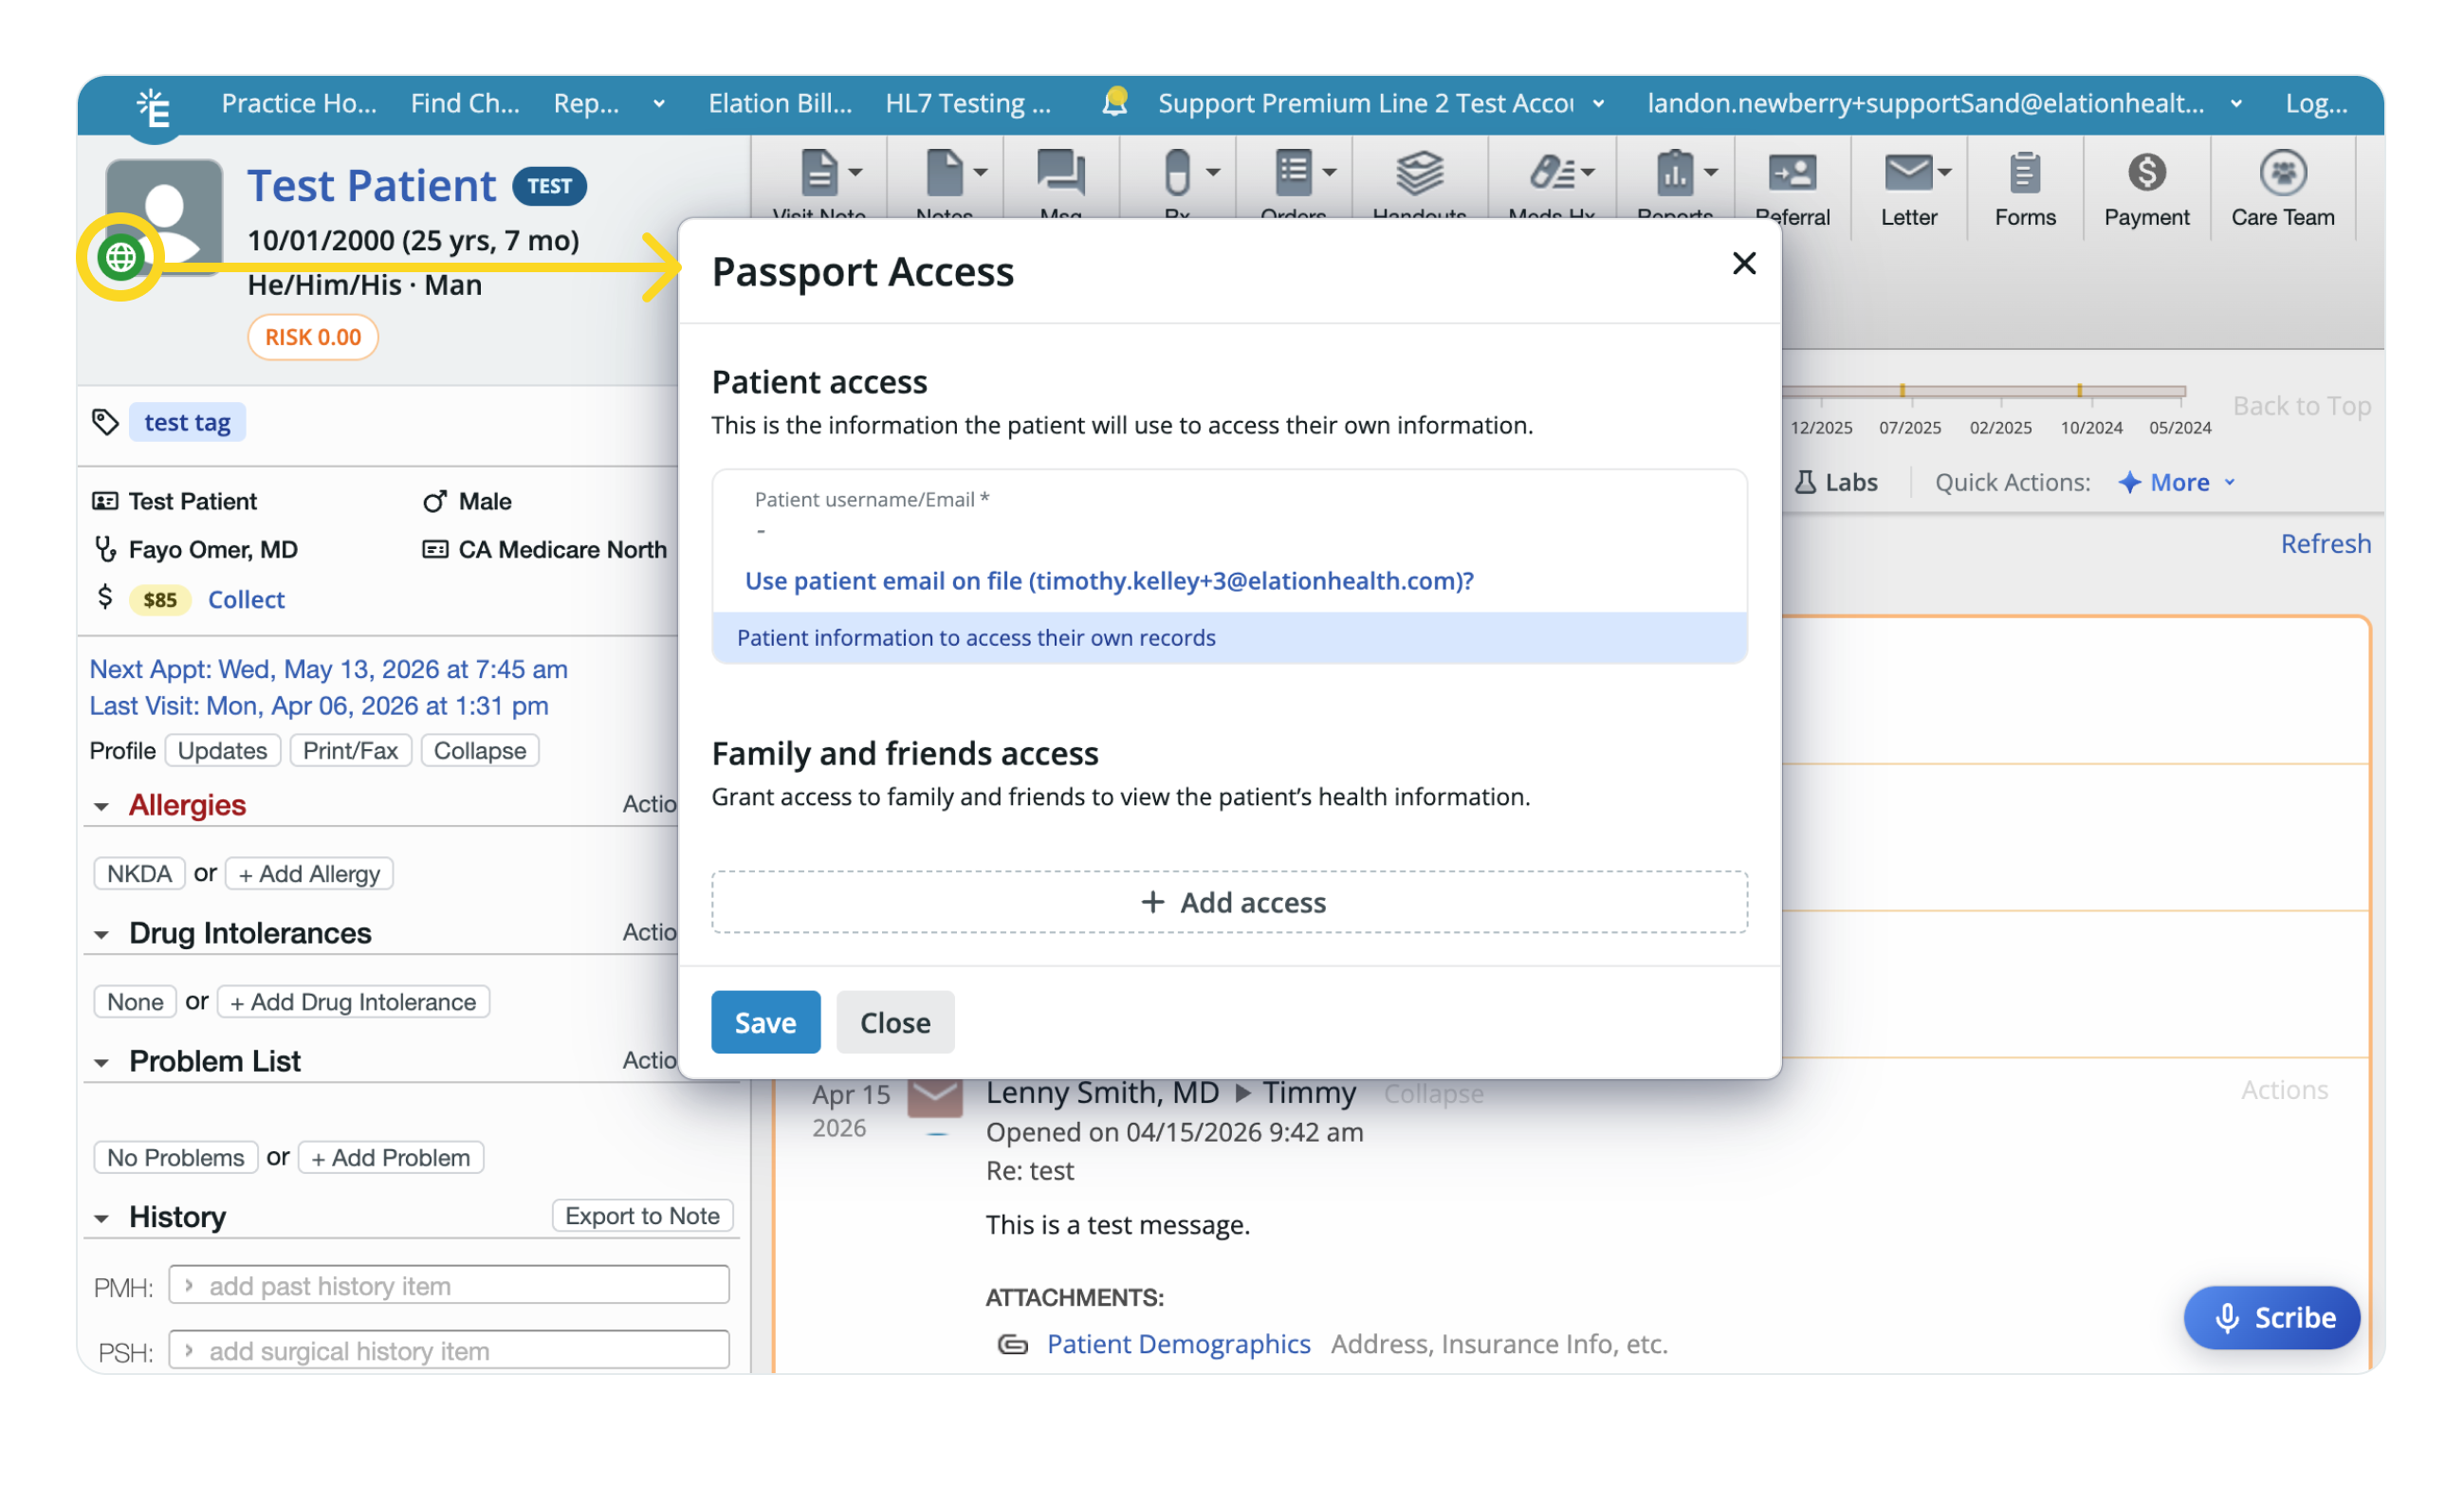
In the patient’s chart, click on the Passport icon (the globe) at the corner of the patient’s profile picture.
2
Select who you are granting access to:
- Patient access — Enter the patient’s email address, or click Use patient email on file… if one is already stored in their demographics.
- Family and friends access — Click + Add access, then enter the person’s First name, Last name, and Email. See the Granting Family and Friends Access guide for additional details.
3
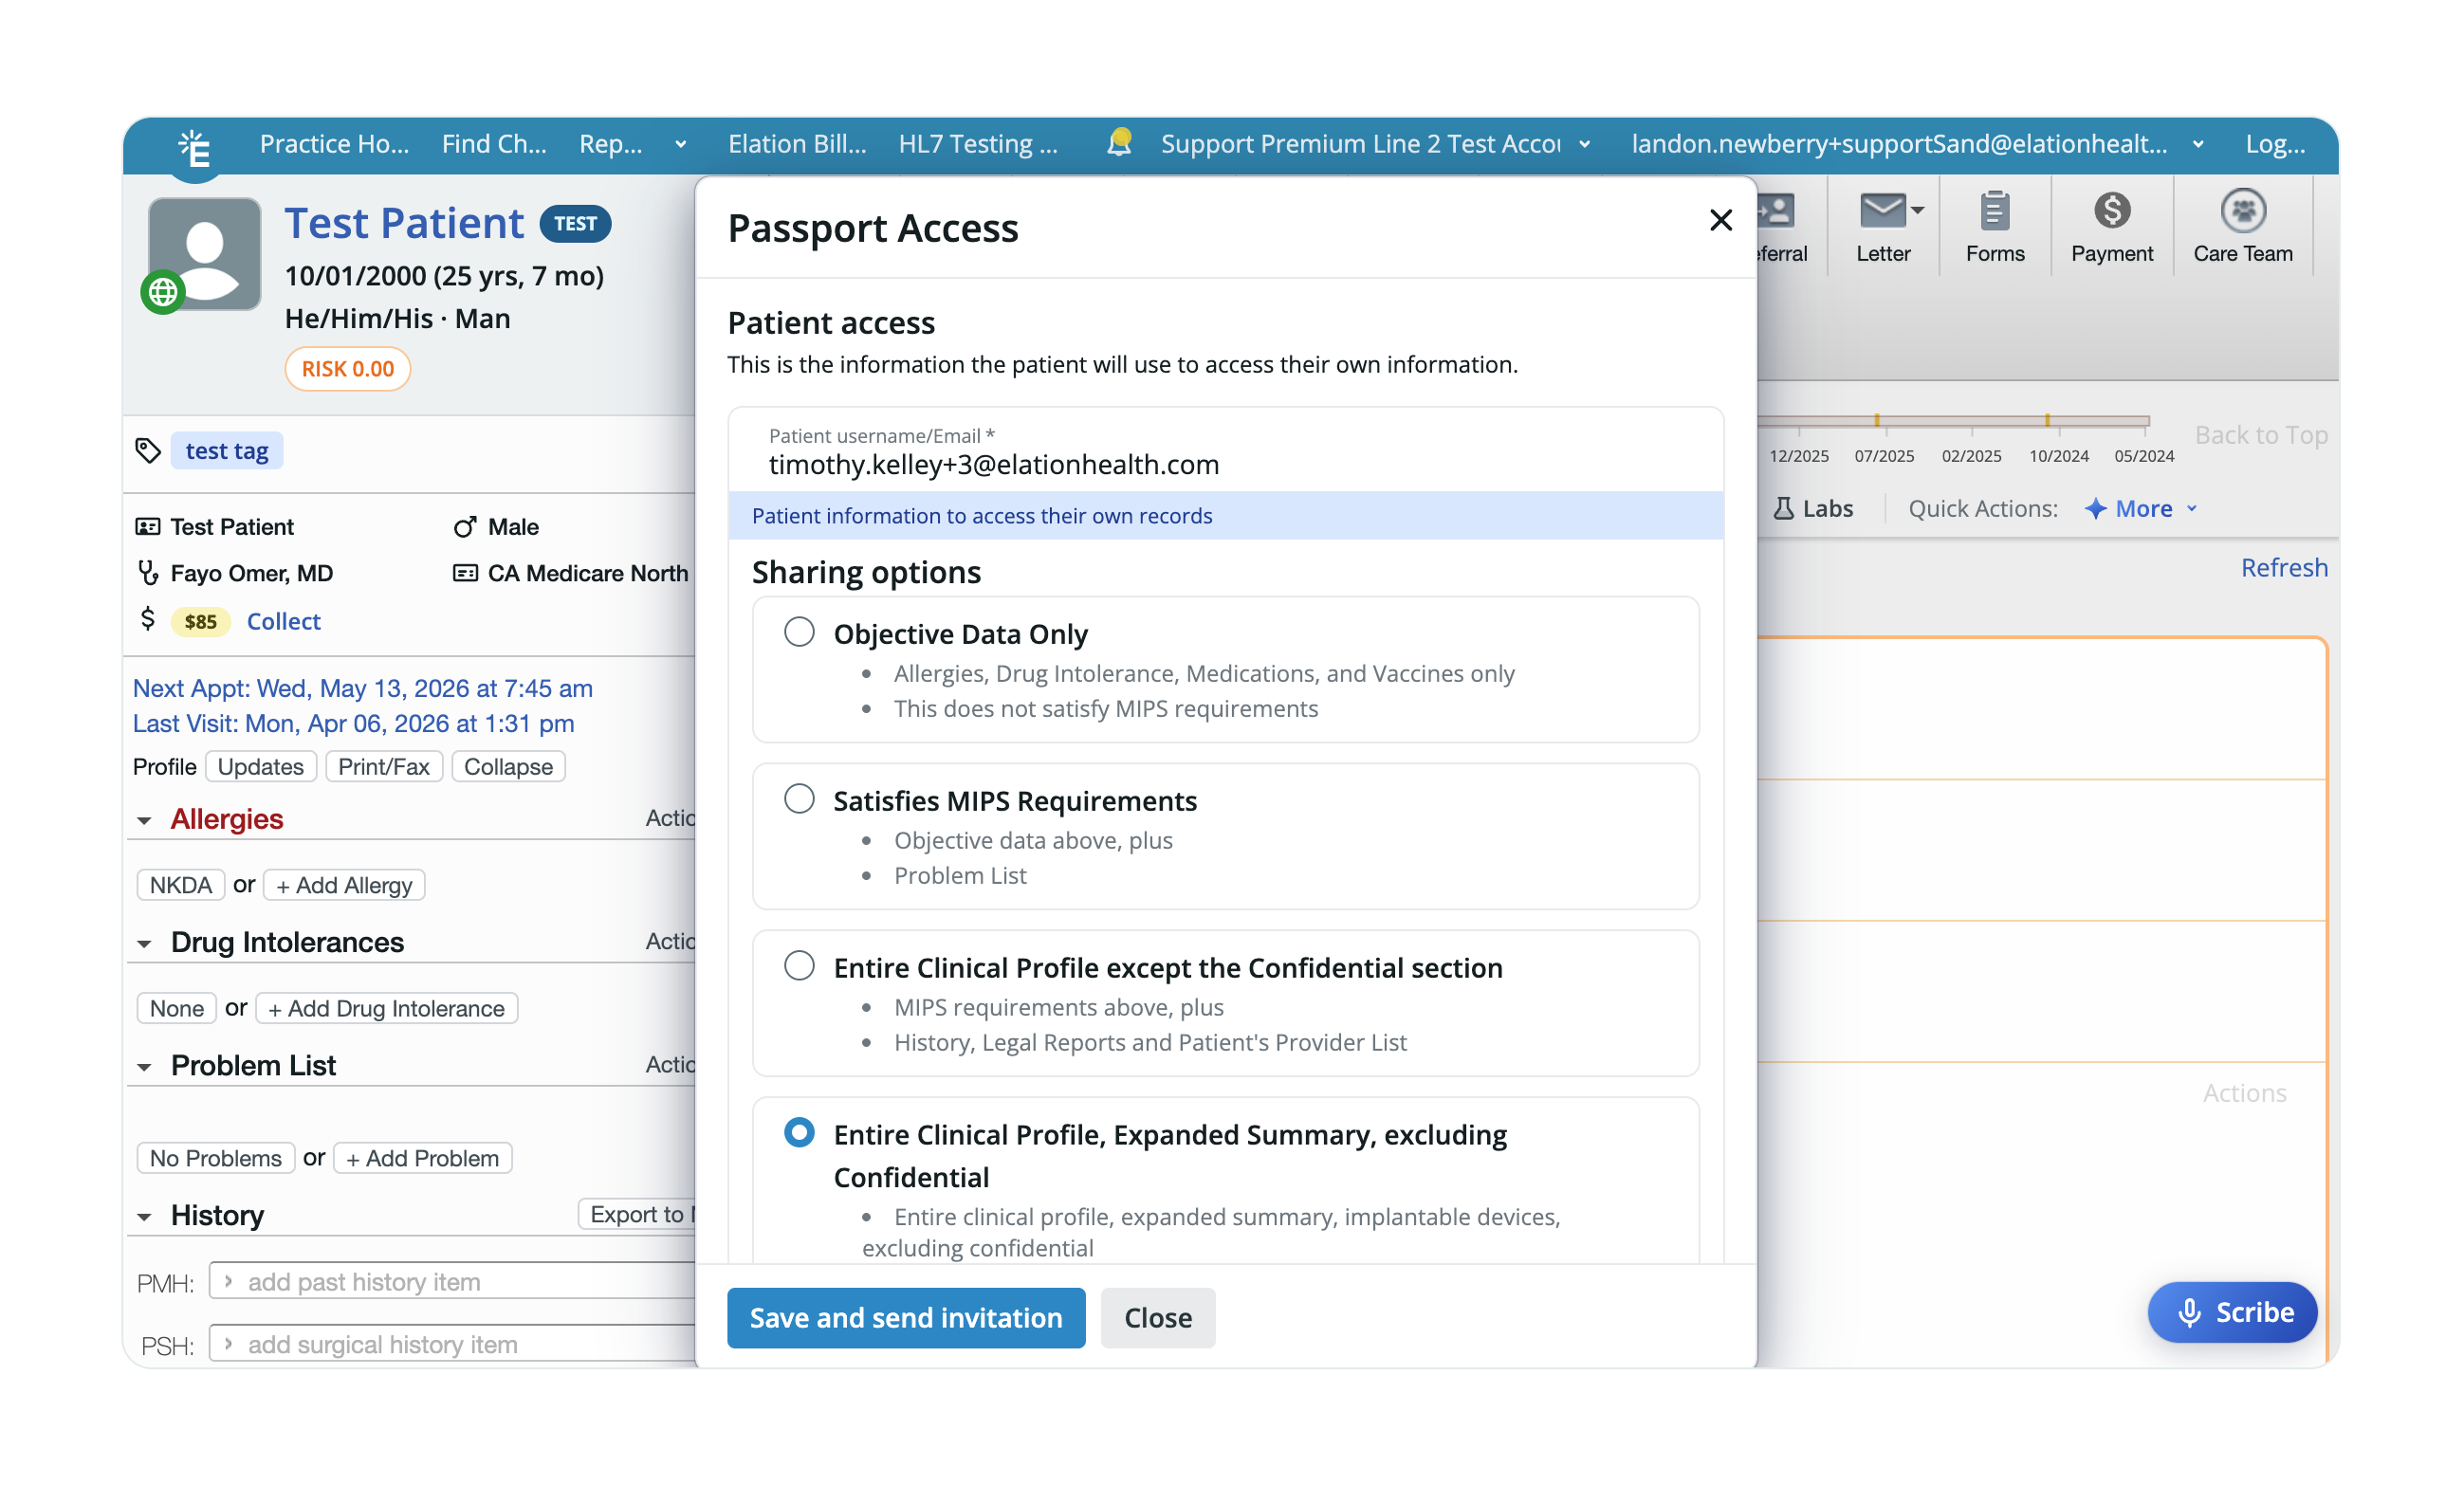
Review Sharing Options to adjust how much of the Clinical Profile the person can see. By default, it uses the settings configured under Patient Sharing Defaults.
4
Click Save & send invitation.
Sharing Options only control visibility of the patient’s Clinical Profile. They do not grant access to uploaded chart documents, lab reports, or imaging results — those are only shared with the patient if manually attached to a Patient Letter.
Inviting patients through a Patient Letter
When you send a Patient Letter to a patient who doesn’t have a patient portal account yet, you’ll be prompted to invite them to register. This will allow them to access the letter and other information you’ve sent.Managing invitations
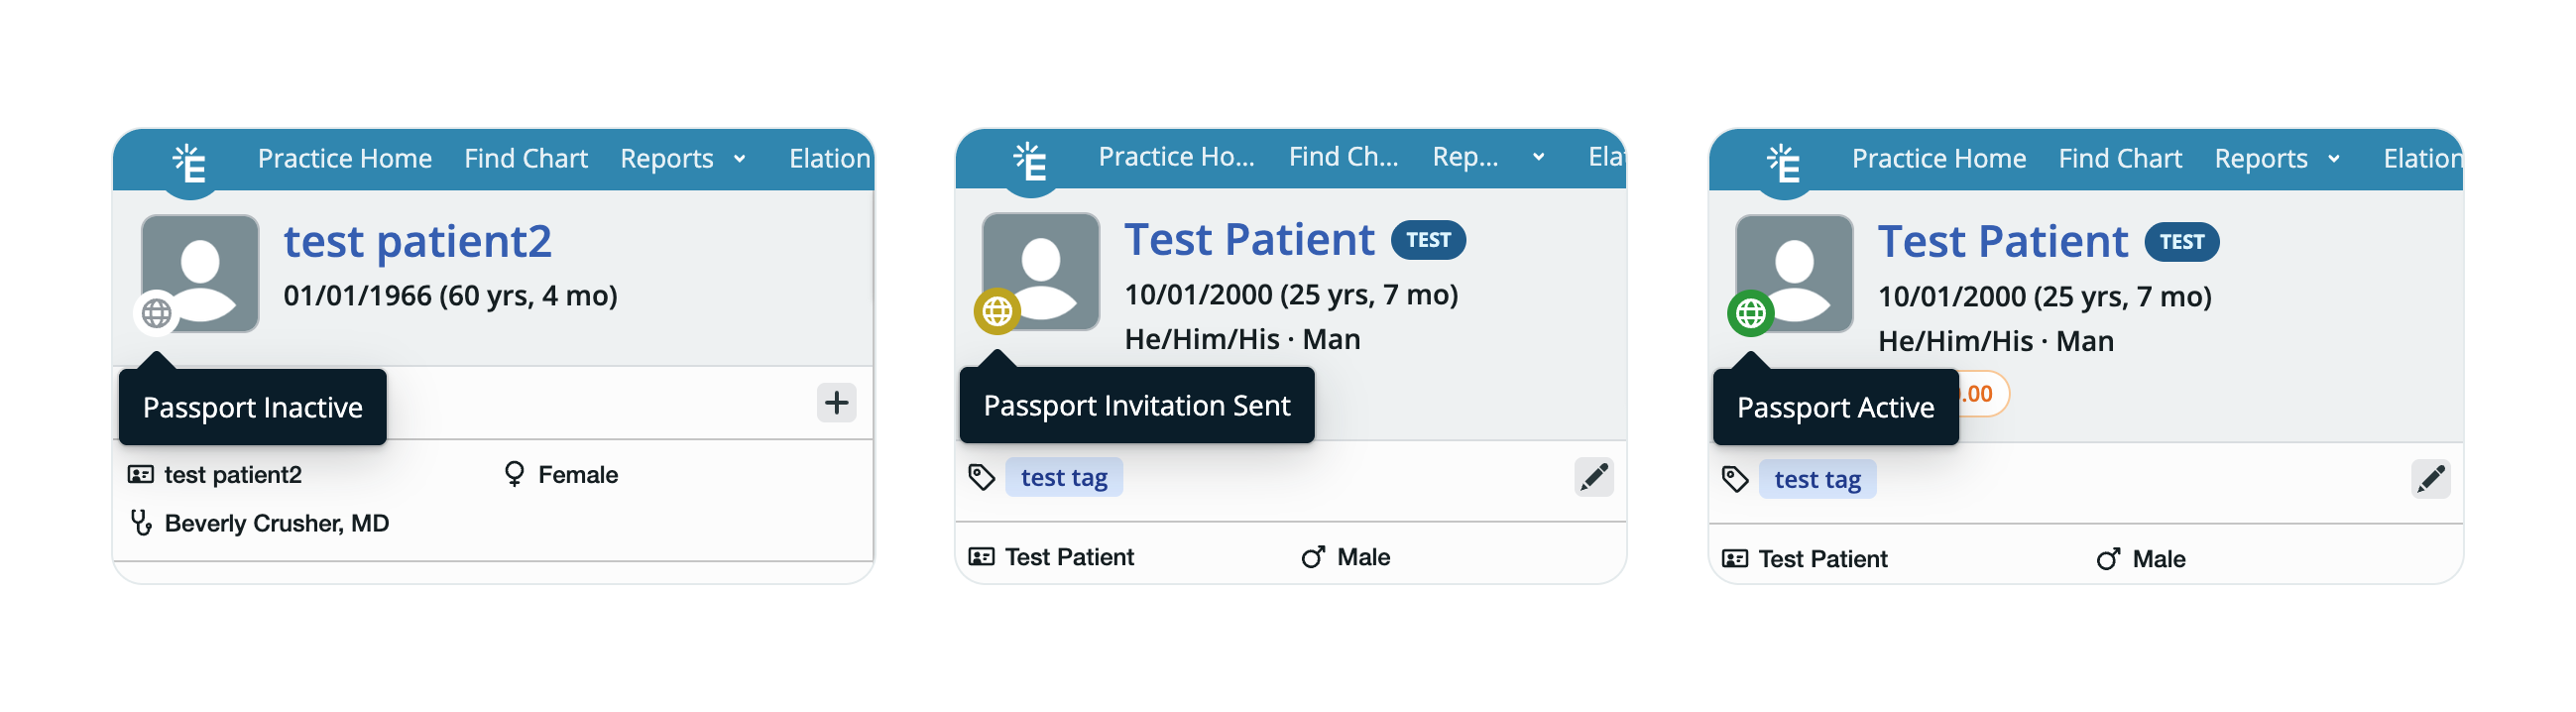
Checking the status of invitations
Here are the possible statuses for a patient portal invitation:- Green = Registered/active
- Yellow = Invited but not registered
- Gray = Not invited
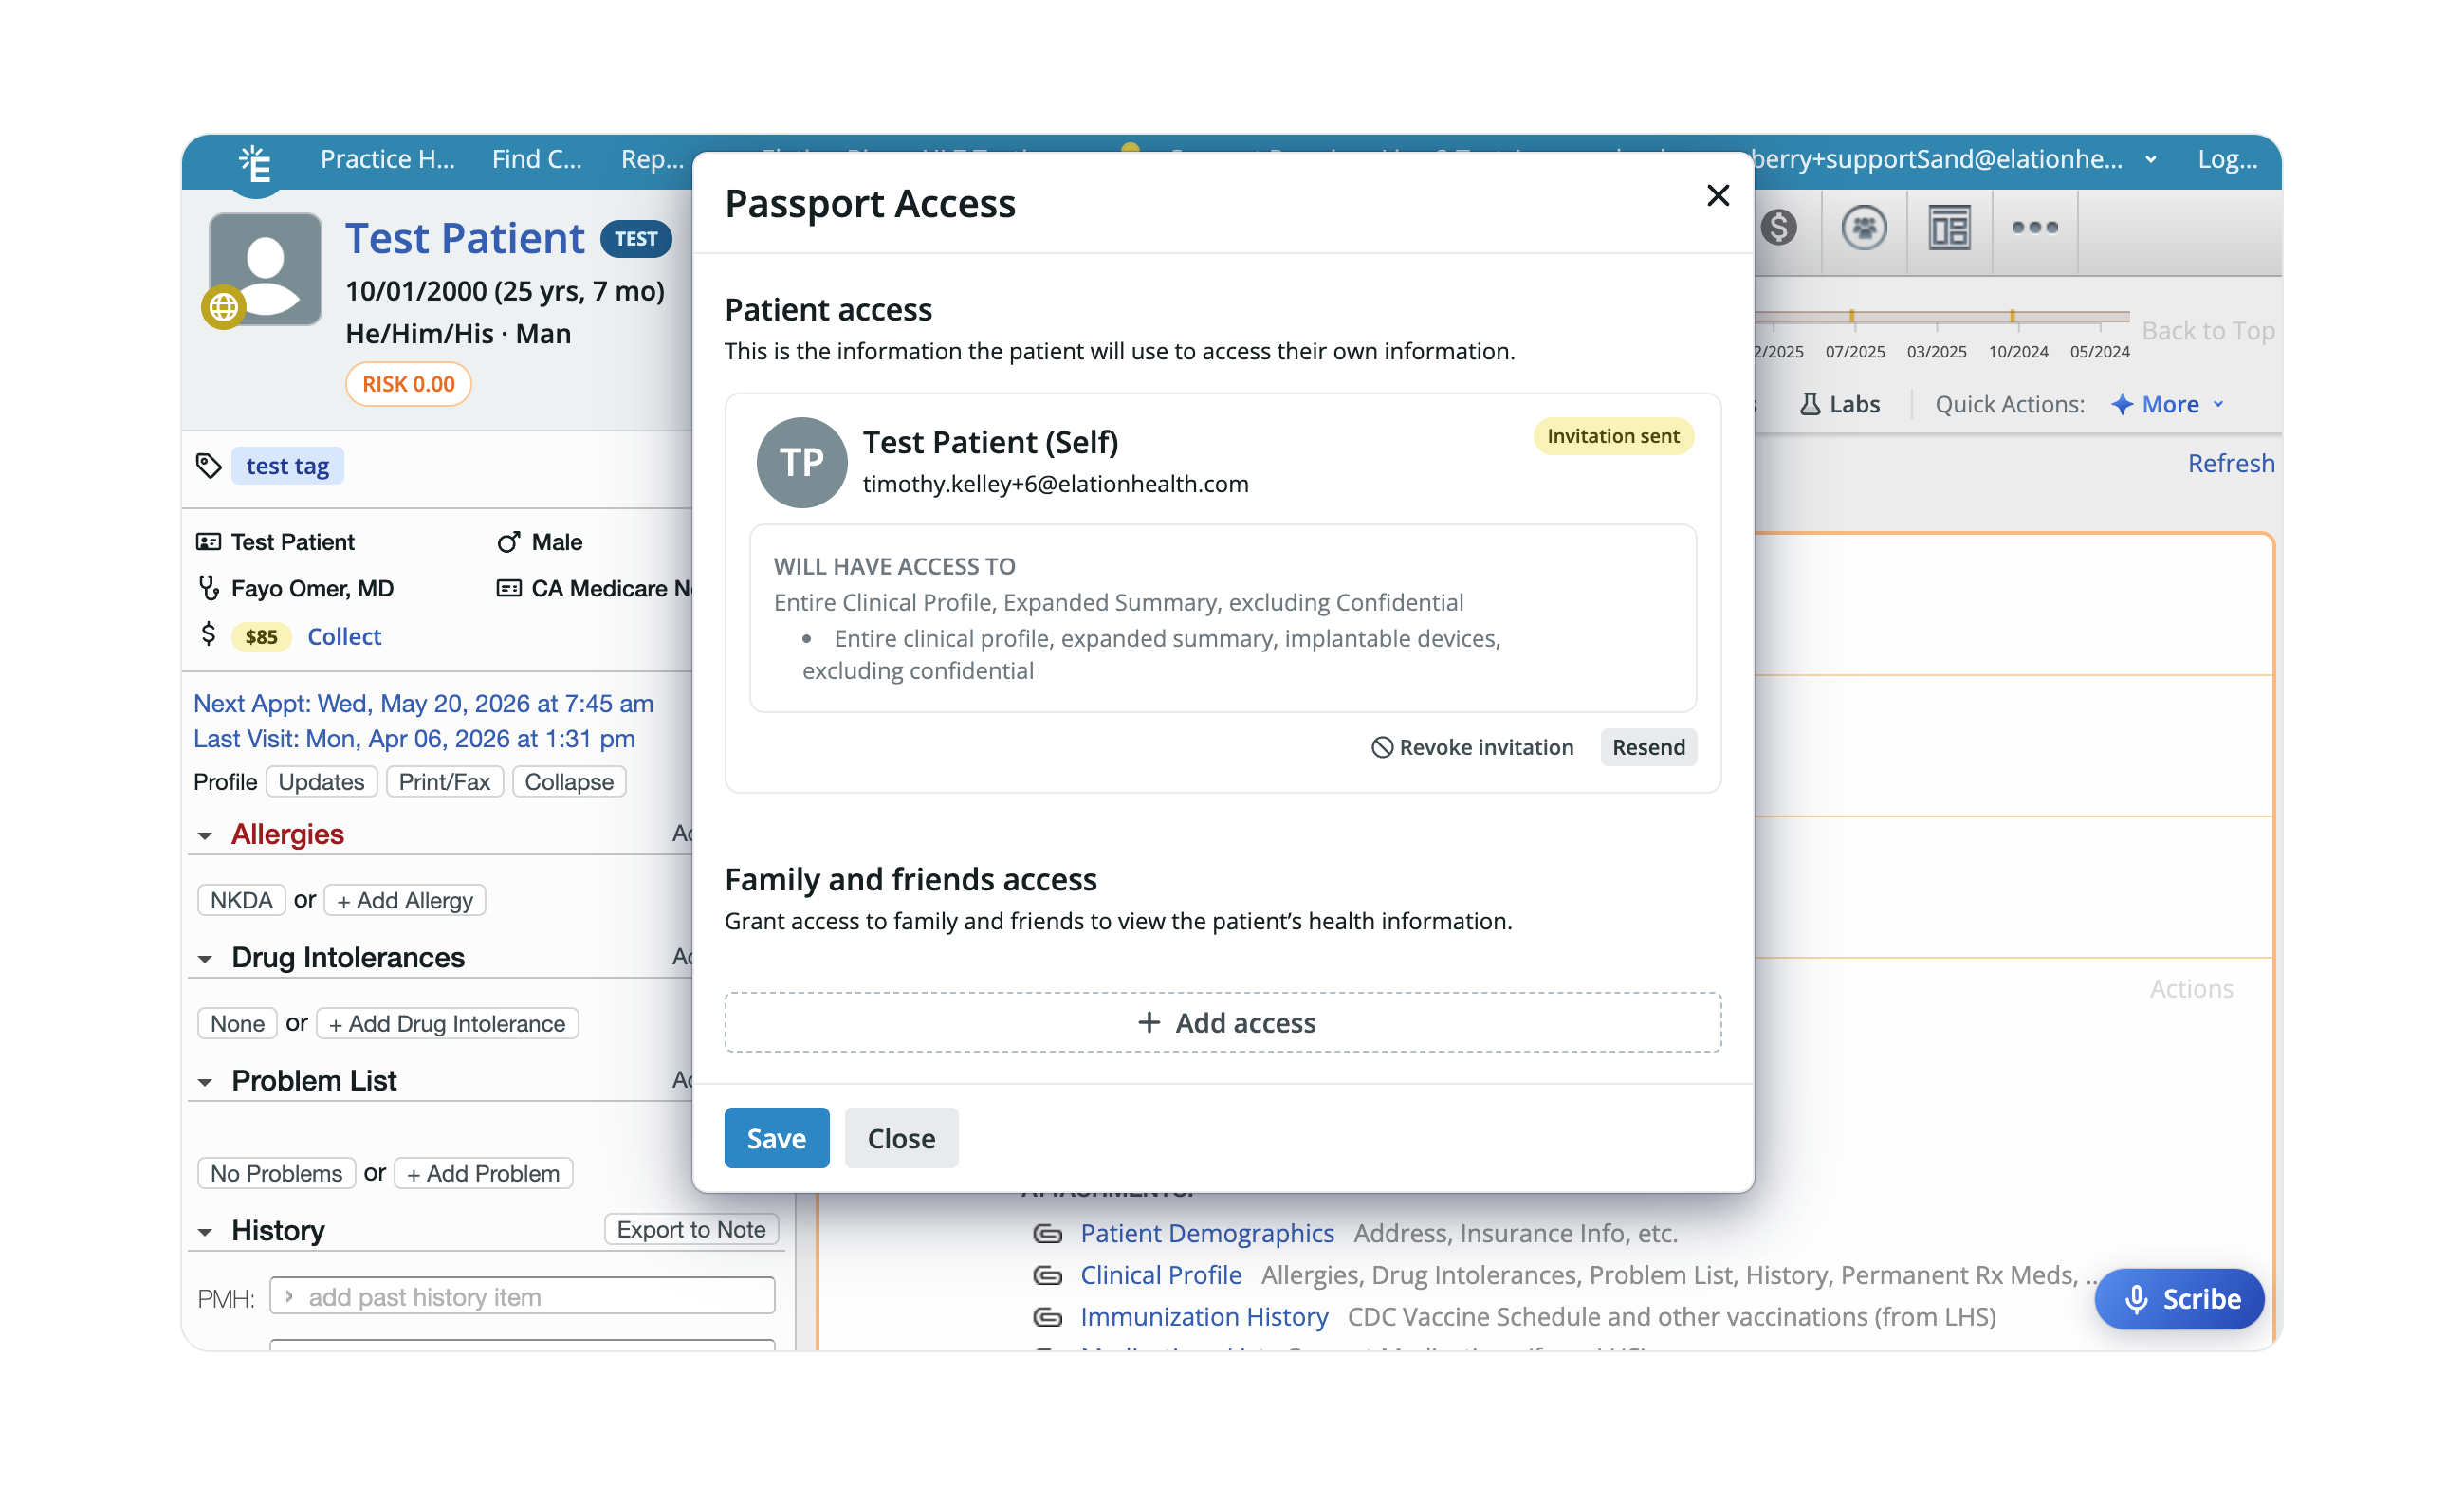
Re-sending invitations
1
In the patient’s chart, click on the Passport icon (the globe) at the corner of the patient’s profile picture.
2
Click Resend next to the patient’s name.
3
Click Save.
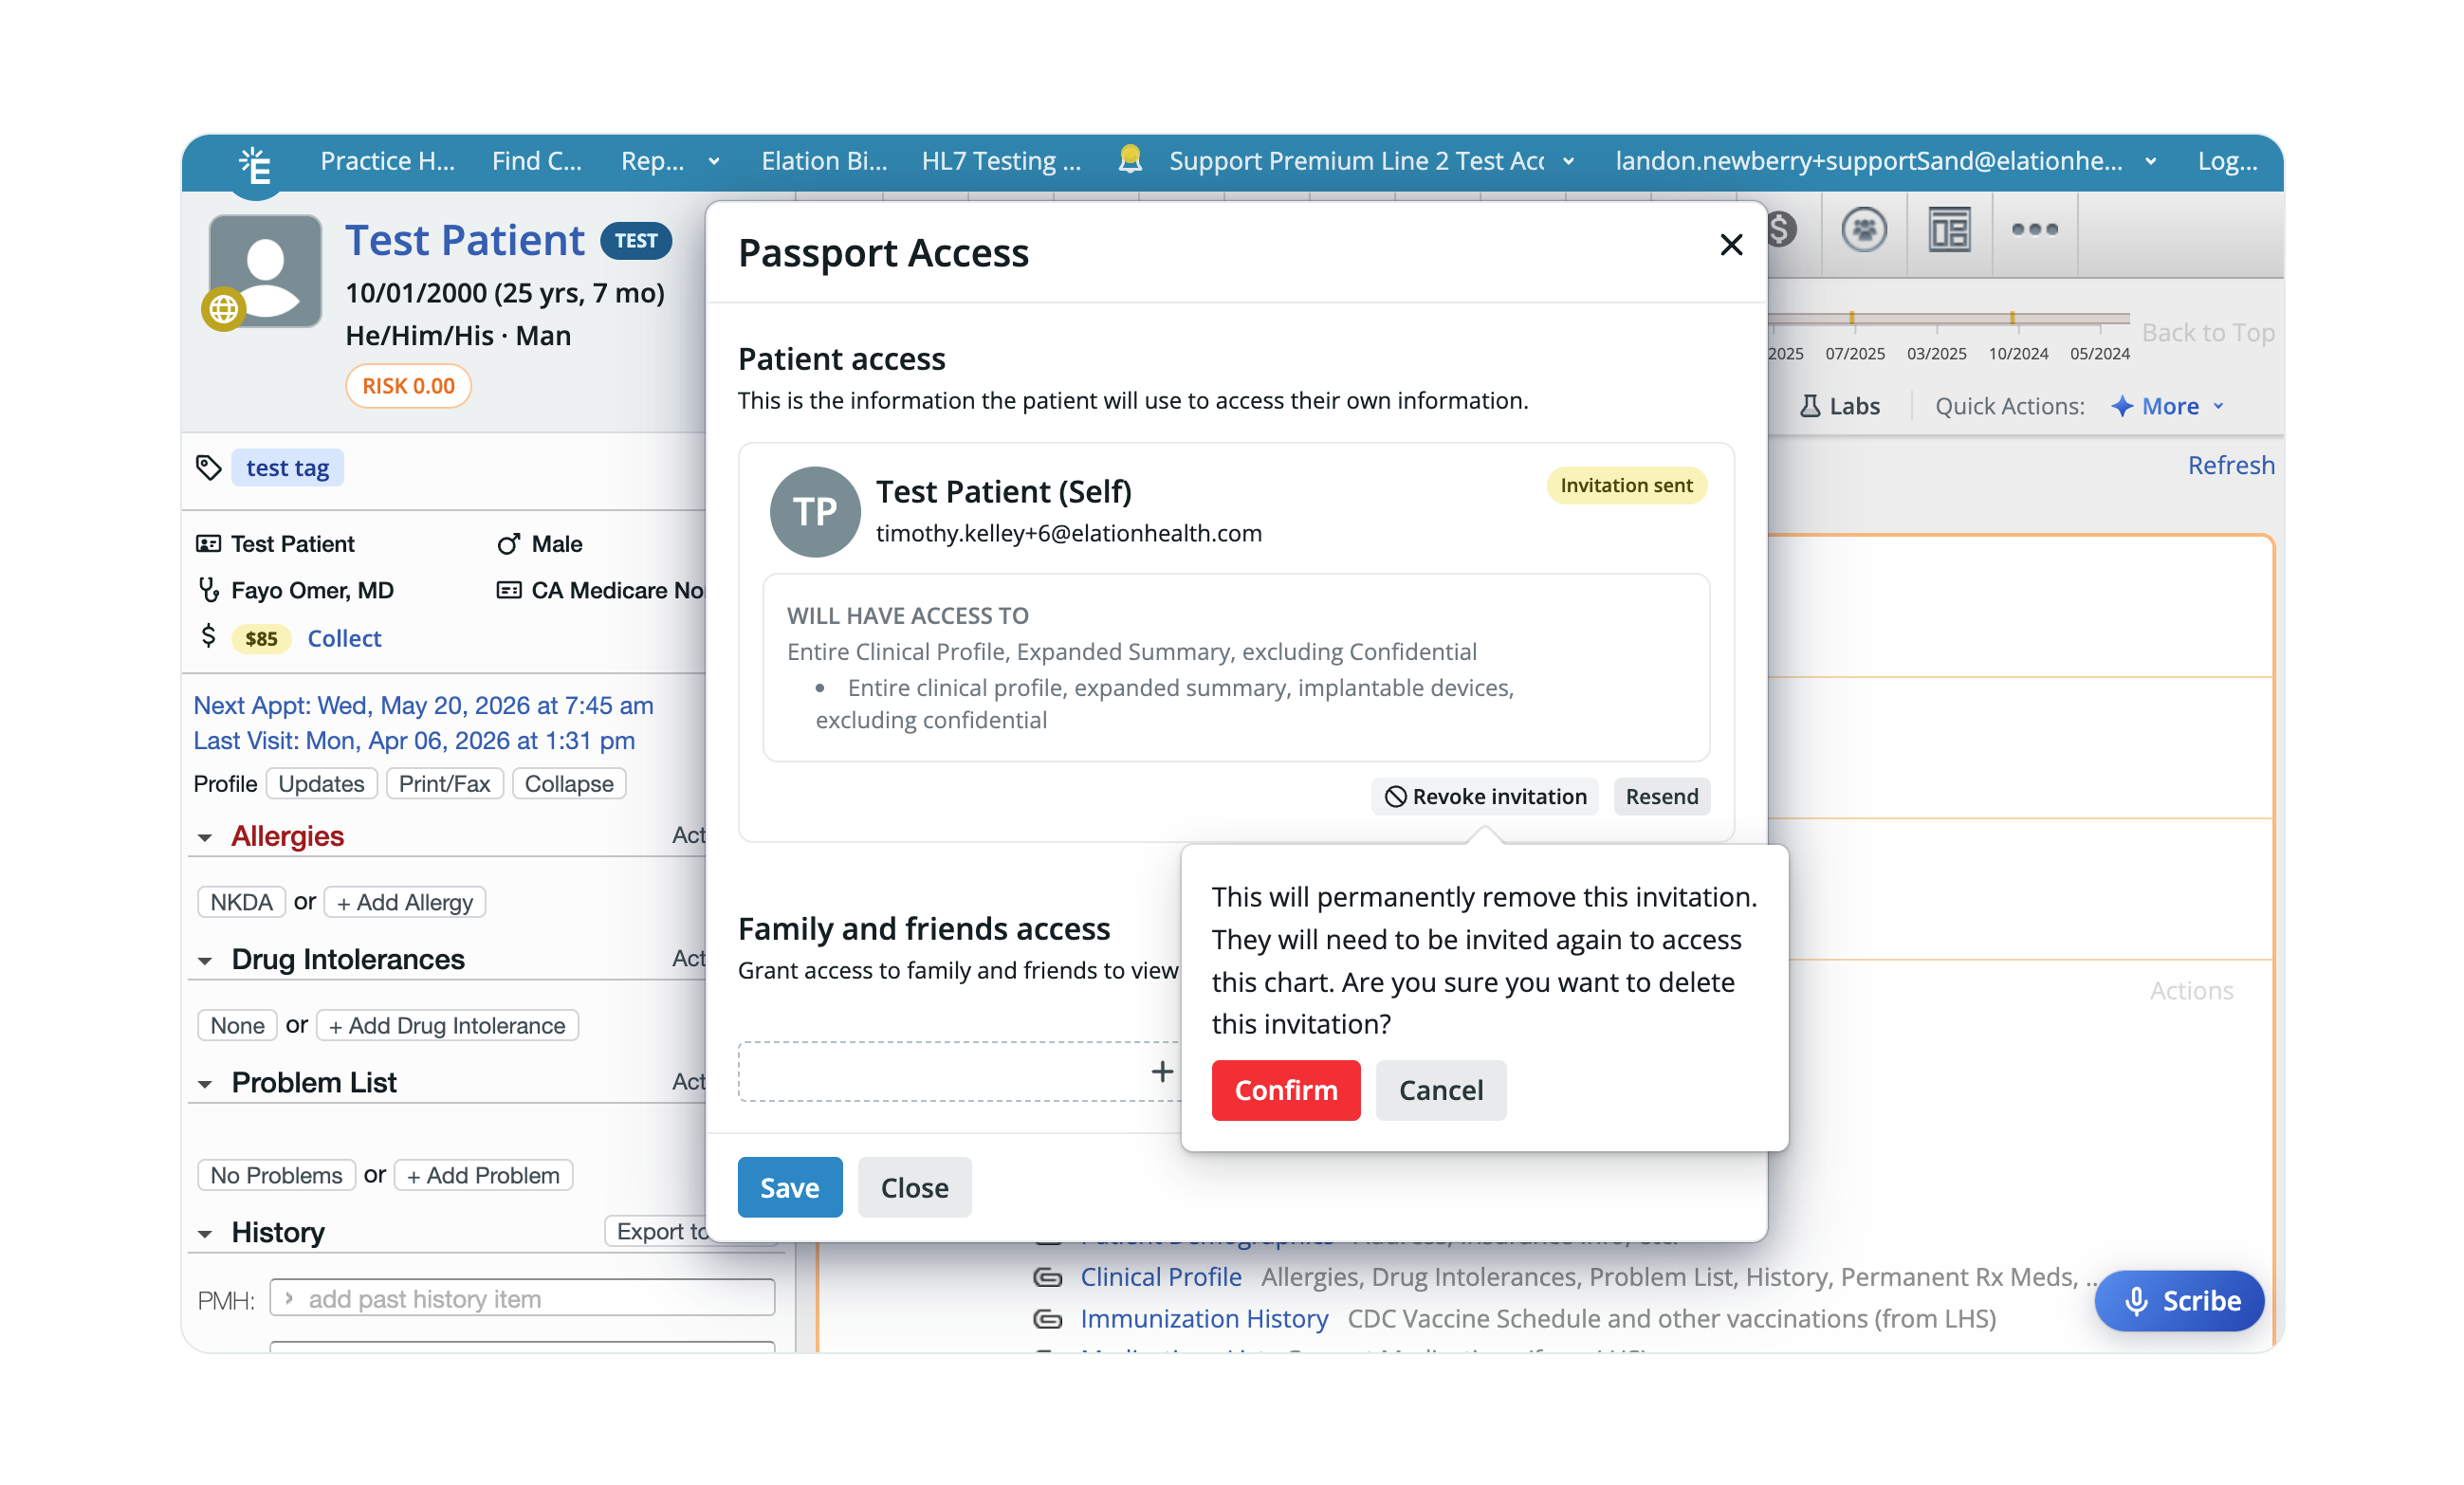
Revoking invitations
To cancel or revoke a patient portal invitation:1
In the patient’s chart, click on the Passport icon (the globe) at the corner of the patient’s profile picture.
2
Click Revoke invitation next to the patient’s name.
3
Click Save.
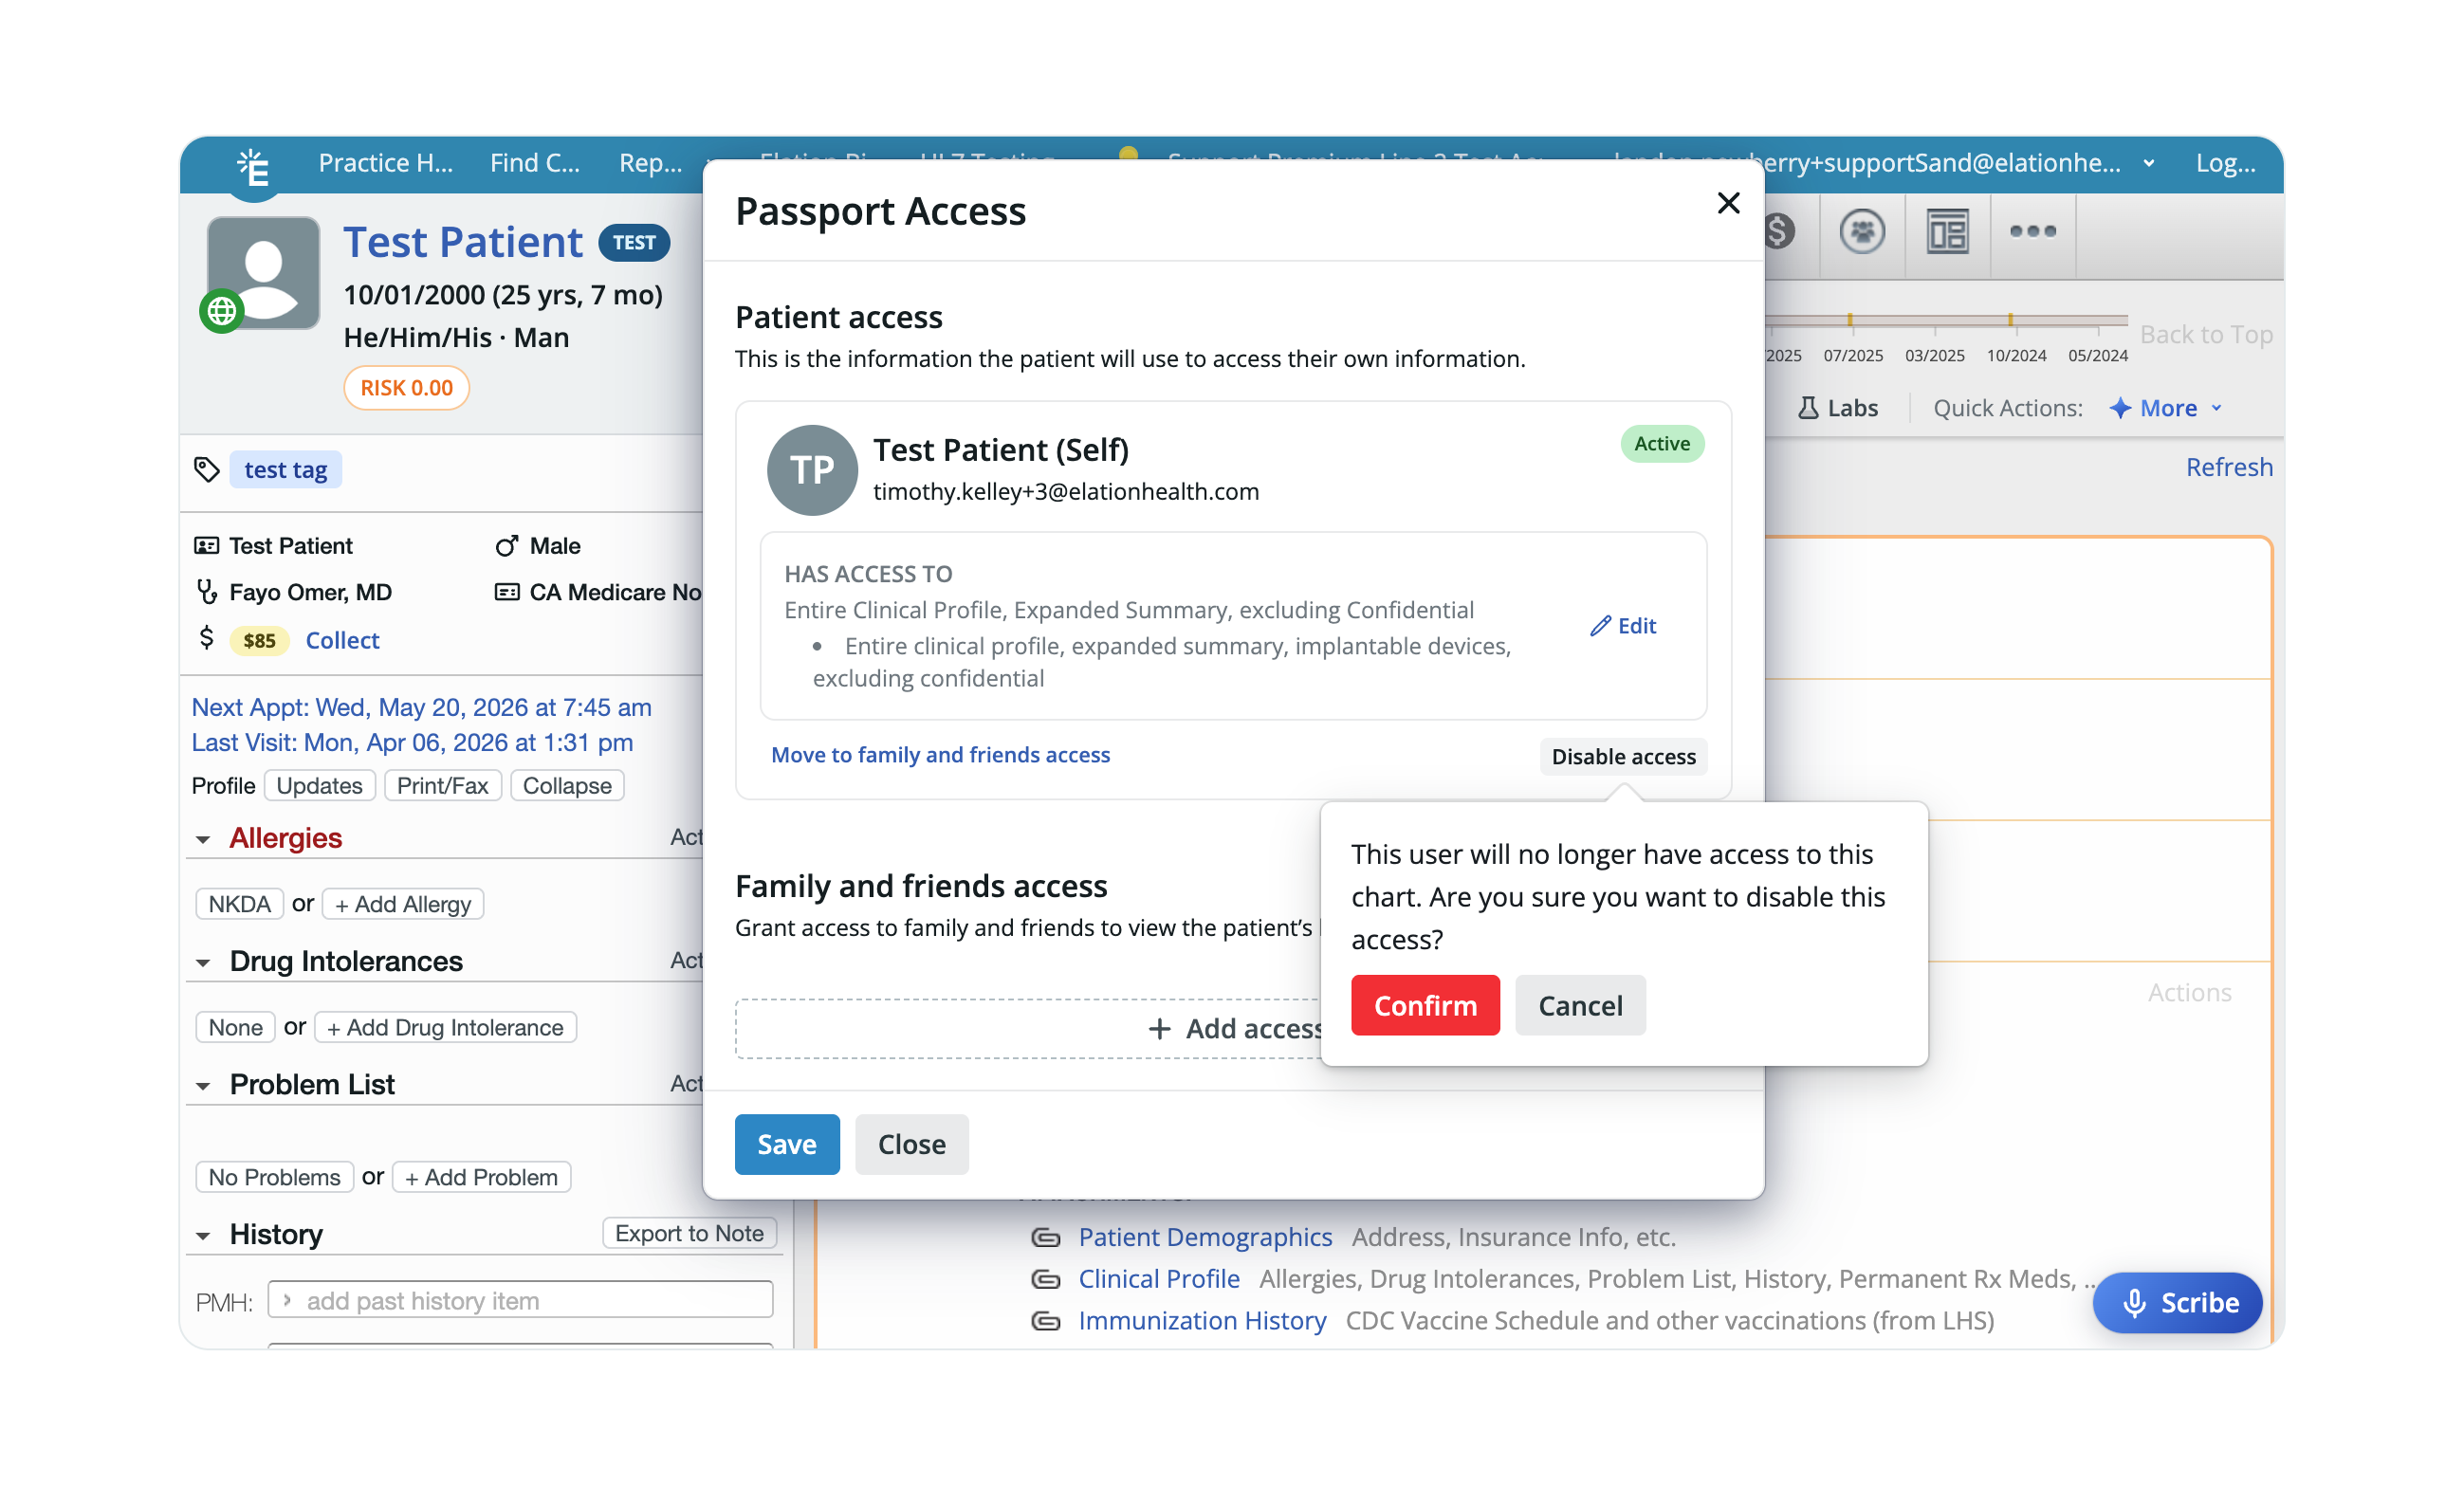
Disabling a patient portal account
1
In the patient’s chart, click on the Passport icon (the globe) at the corner of the patient’s profile picture.
2
Click Disable access next to the patient’s name.
3
Click Save.
Currently, Elation does not support disabling Patient Passport accounts in bulk. Each account must be disabled individually using the steps above. If you’re closing your practice or transitioning to a different EHR, see the Offboarding Guide – Data Export & Patient Communication Checklist for guidance on communicating with patients before their accounts are disabled.
Re-enabling a patient portal account
To re-enable an account, simply send the patient a new invitation, and they can register again.Switching a patient’s access to family and friends access
If a patient’s account was originally set up as individual patient access and needs to be changed to family and friends access — for example, a parent who should be managing a child’s chart — update the access type from the Passport Access window by clicking Move to family & friend access. See the Granting Family and Friends Access guide for additional details about family and friend access.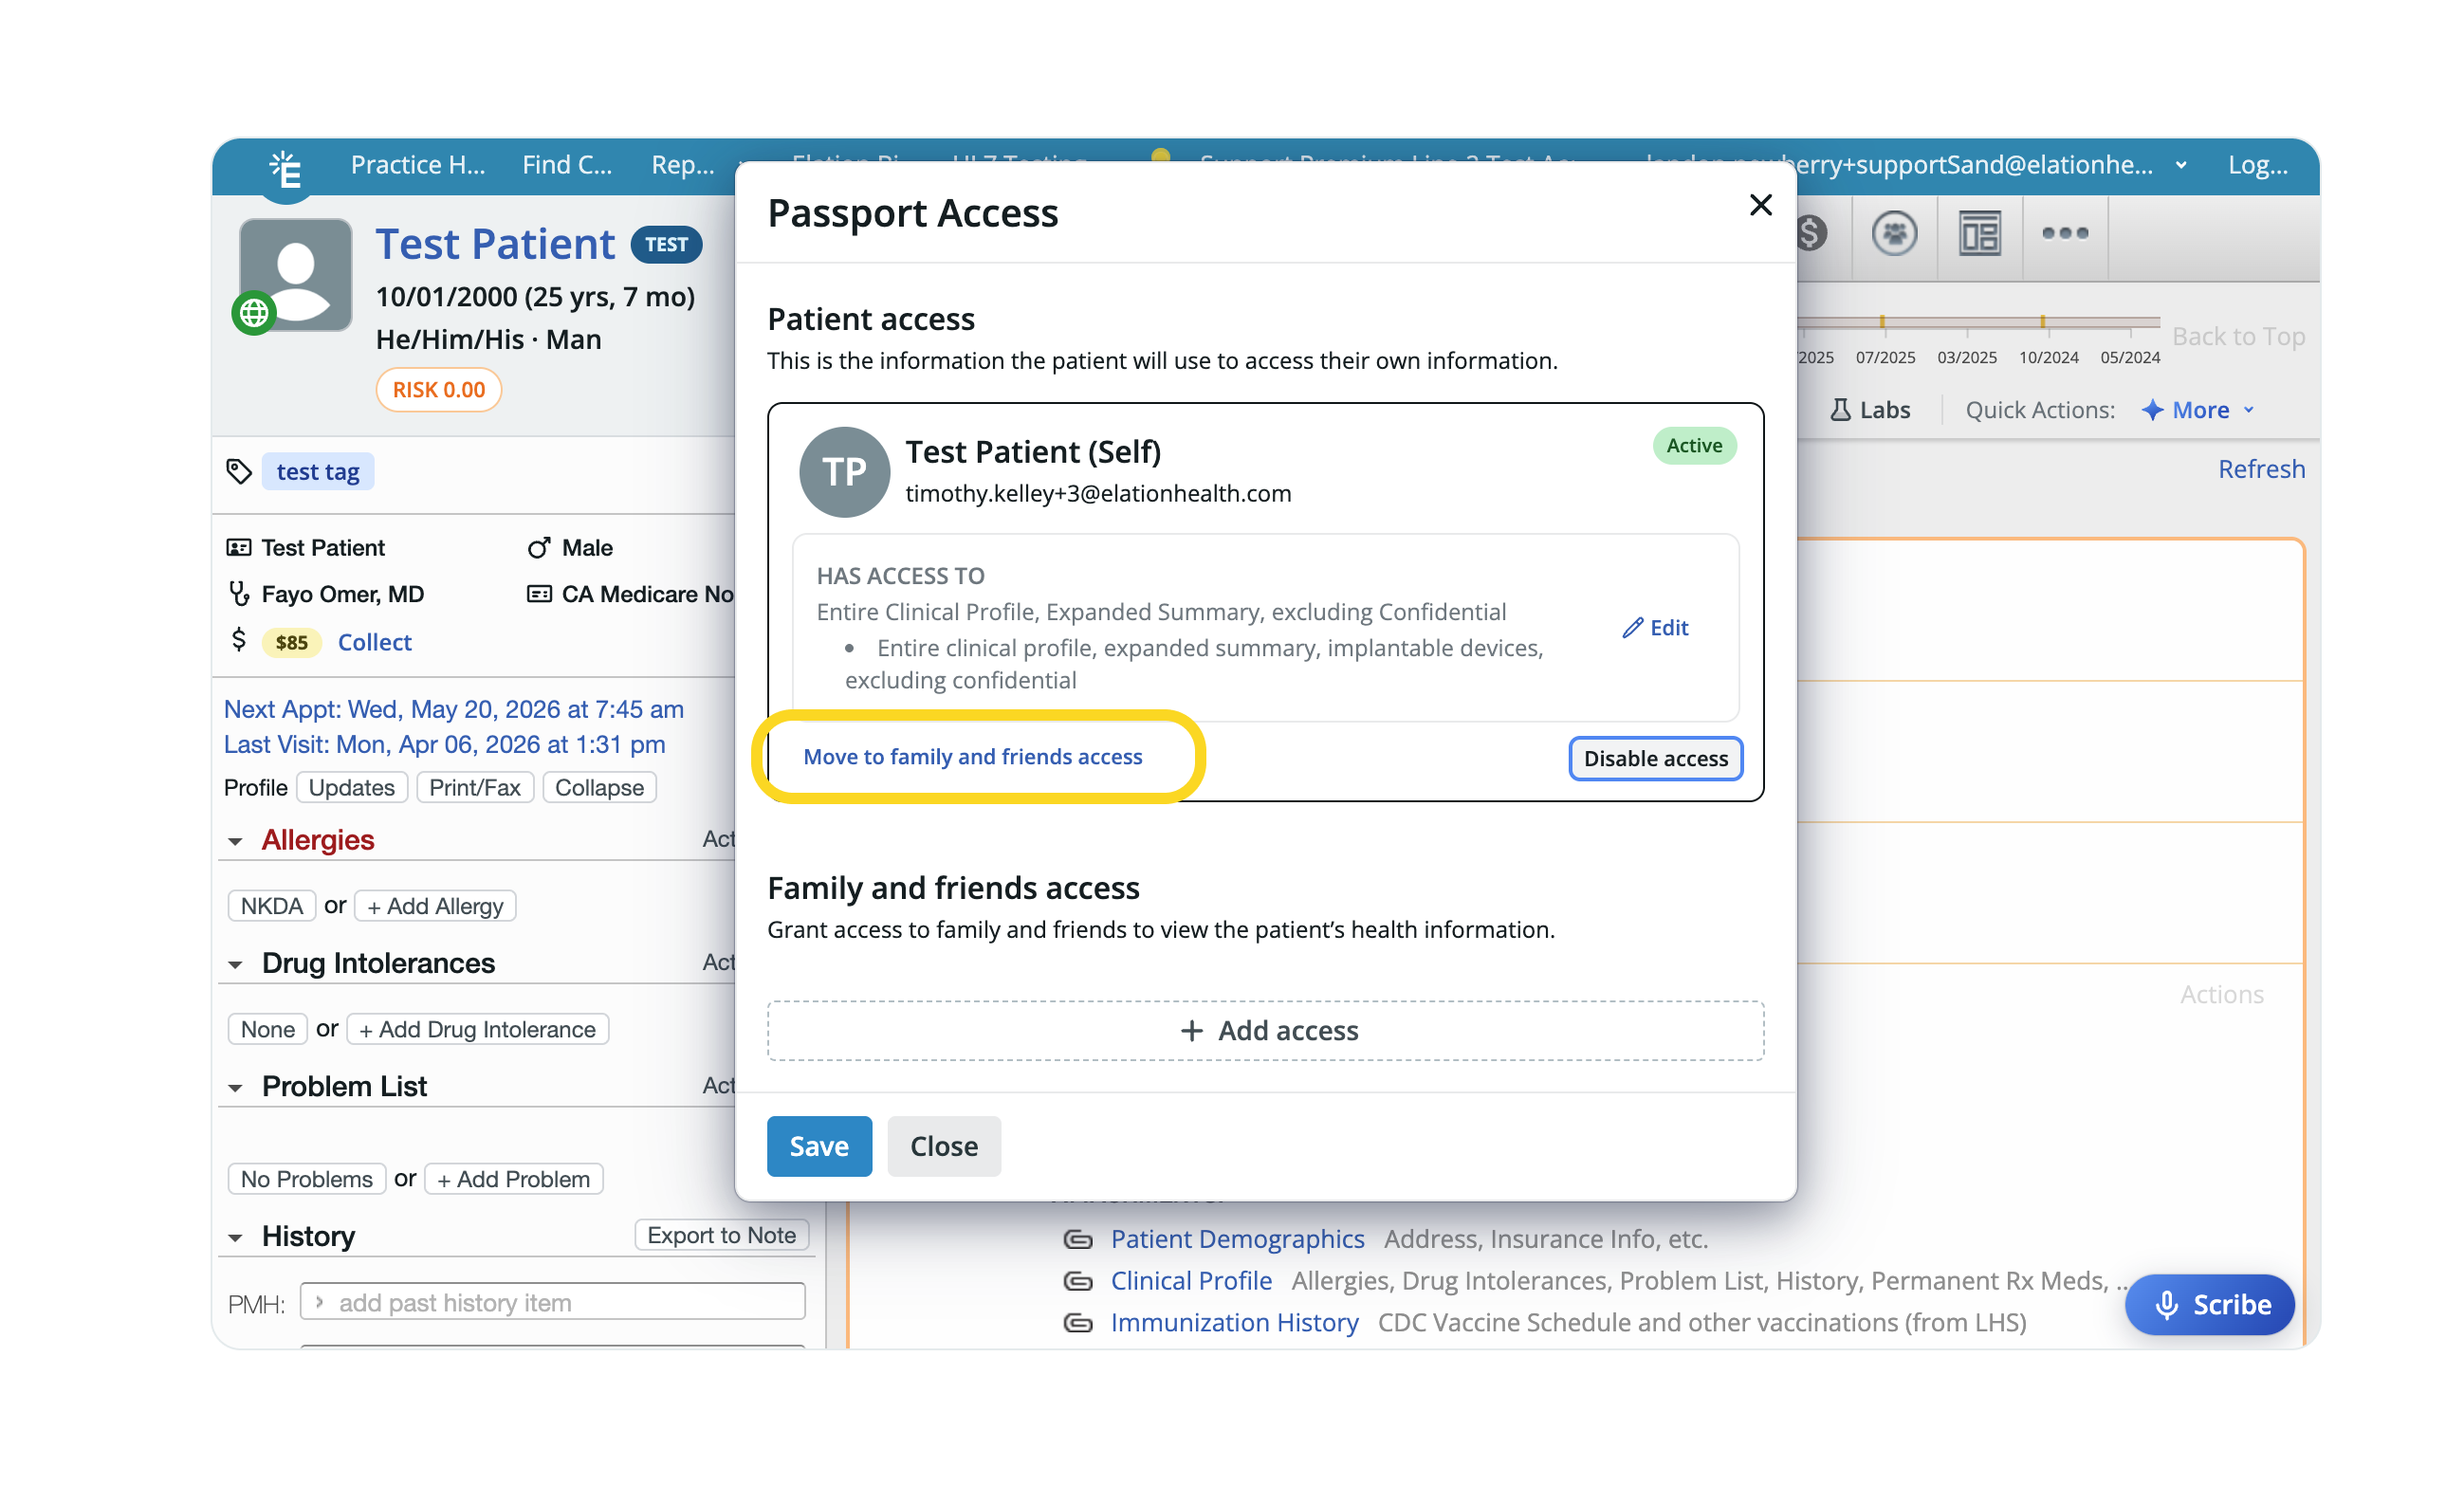
Switching a family or friend’s access to patient access
If an account was originally set up as family and friends access and needs to be changed to individual patient access — for example, a patient who was initially invited through a caregiver’s account but now needs their own direct access — update the access type from the Passport Access window by clicking Move to patient access.Advanced Invitation Workflows
Inviting patients in bulk
Click here for instructions on how to invite patients in bulk.Inviting patients through booking an appointment through the Booking Site
If you use the Booking Site and enable the Automatically send patients an email invitation to join Elation Patient Passport after they book online setting, any patient who books an appointment and doesn’t have a patient portal account will automatically receive an invitation.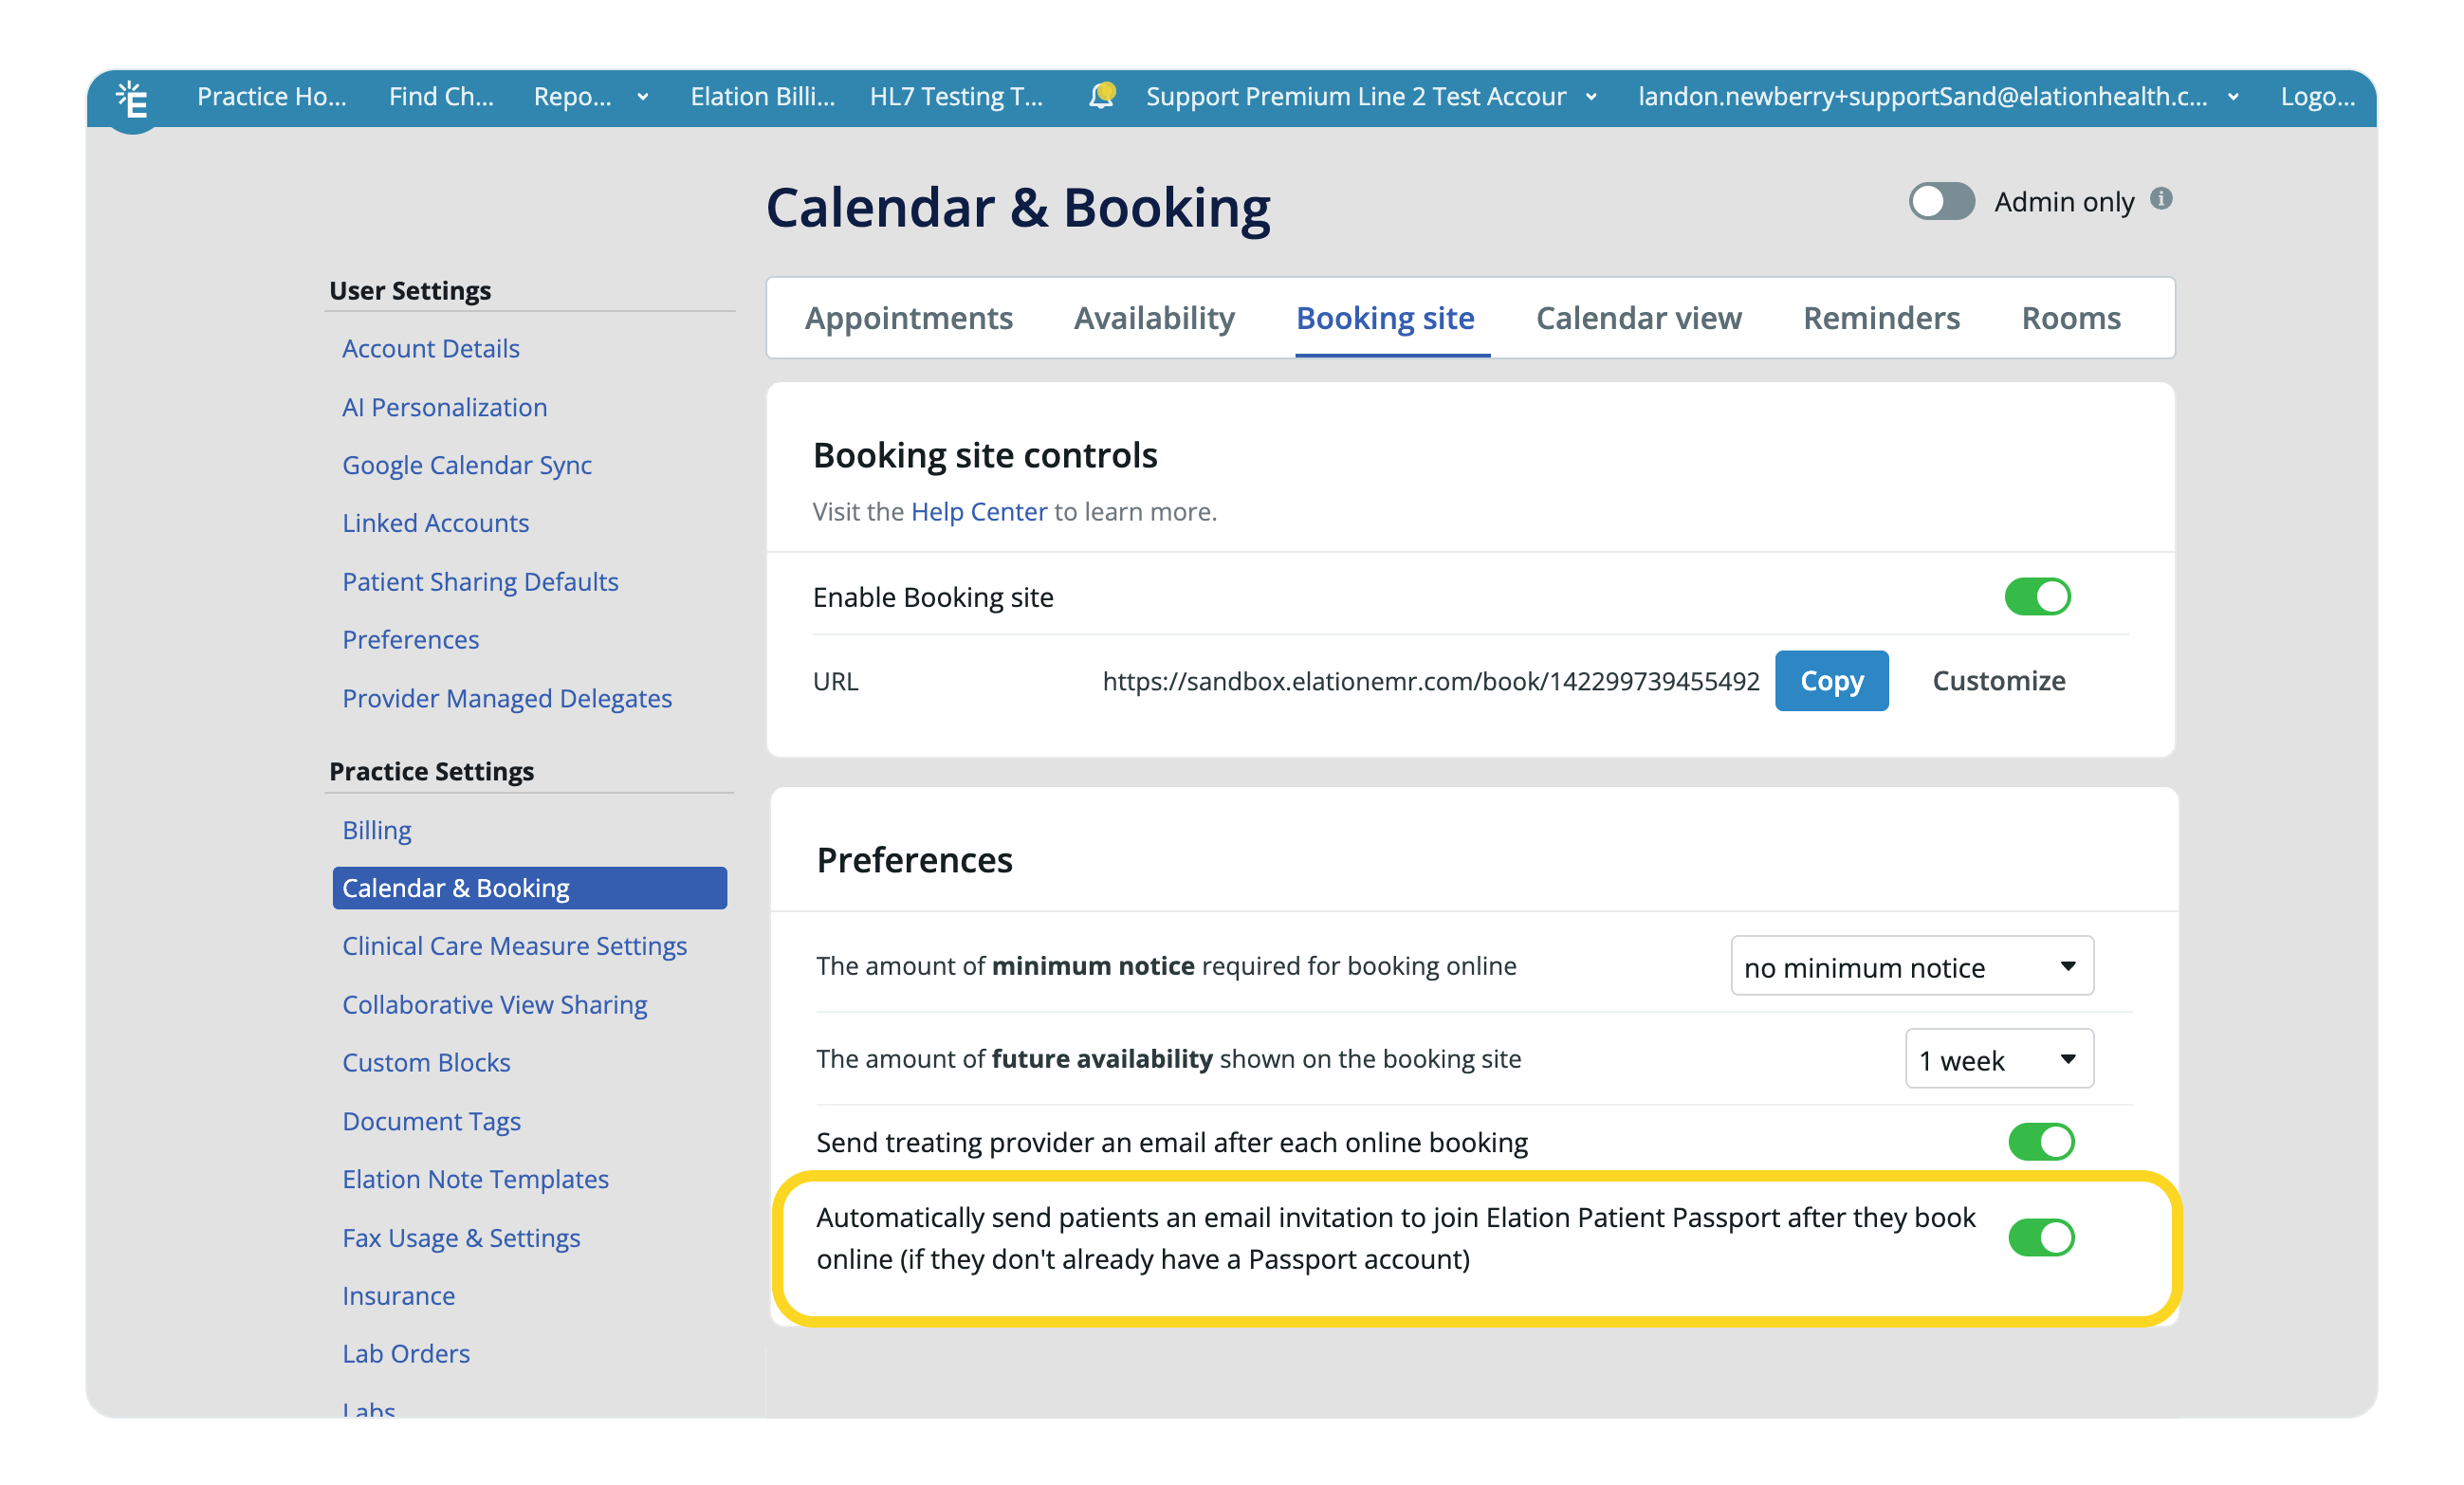
If many of your patients plan to use one patient portal account to access multiple charts—such as parents managing children’s records or caregivers managing relatives’ charts—we recommend leaving this setting off so that your staff can confirm the use case for the account with the patients before sending an invitation.
Inviting patients to link their patient passport accounts
If the patient’s email is already linked to a patient portal account (e.g., they have an account with another Elation doctor or for a family member), your invitation will prompt them to link the new account to their existing one.Even if the patient now sees you as their current provider, they may still see records from their previous practice when logging in to their patient portal account. Ask the patient to switch account views from the portal as needed. Click here for patient-facing instructions about switching between charts.Consider mentioning this behavior during onboarding for patients who previously used the portal with another practice. This helps set expectations and reduces confusion when they first log in.
Invitation Scenarios
Use this table to identify the correct workflow for common situations you may encounter when inviting patients.Does Elation prevent a minor from registering as the patient?
Elation does not enforce an age-based restriction on Patient Passport enrollment. If an invitation is sent to a minor’s own email address and they select that they are the patient during registration, the system will not block the account from being created. Enforcing your own policy for minor access — in accordance with applicable state law — is up to your practice. Consider using Family and Friends Access for younger patients, then switching to direct patient access once appropriate.Related Articles
- Elation Patient Passport Introduction
- Elation Patient Passport Guide - Setting up Patient Passport
- Elation Patient Passport Guide - Communicating with patients & sharing records
- Elation Patient Passport Guide - Helping patients troubleshoot Passport issues
- Elation Patient Passport - Patient’s Point of View