What is the Annotate and eSign feature?
The Annotate and eSign feature allows users at your practice to annotate and electronically sign clinical reports and documents directly in Elation EHR. Annotations and eSignatures can be added to documents that are filed into patient charts. All users can annotate documents, while Provider Level Users can annotate and electronically sign documents.You can only annotate faxed or uploaded clinical reports and documents that are PDFs or images. You will not be able to annotate structured electronic results that come in via integrations (ex. electronic lab results, imaging results or hospital results).
Why is the Annotate and eSign feature valuable?
The Annotate and eSign feature is valuable because it allows you to annotate and electronically sign documents directly in Elation EHR. This feature saves your practice time and streamlines your workflows by enabling you to complete all annotations and electronic signatures directly within Elation. With this feature, you do not have to navigate to another platform, or print the document, to add signatures and complete other necessary markups.How to use the Annotate and eSign feature
Overview
To annotate and/or electronically sign clinical reports or documents, the document must be uploaded to Elation and filed into a patient chart as a Report. These documents can be uploaded from your device into Elation, or faxed to you. There are two ways to upload documents from your device into Elation, either through the Fax Inbox on the Practice Home page or directly into a patient chart. Please reference these guides below for instructions on these workflows: If the document is faxed to you, you will first need to file the document from the Fax Inbox into a patient chart. Once filed to the chart, the document will be located in the Requiring Actions queue awaiting further action, annotation, and eSignatures as needed. Once annotations to the document are saved, it will replace the original, un-annotated version of the document. You can continue to add annotations until a Provider Level User clicks the Sign Off button. After a document has been signed off by a Provider Level User, no additional annotations or eSigntaures can be added and the annotated version of the document will replace the previous version in the patient chart. If users at your practice need other users to follow up on the annotated version of the document, they can send an office message directly from the document in the Report Panel or the Requiring Action section of the patient’s chart by clicking the Actions dropdown located in the top right of the document and selecting Office Message. The Office Message button is also available at the bottom of the annotated document in the Report window. The annotated document can be shared with external entities via a Referral, Provider Letter , or Patient Letter .All users can annotate documents, but only Provider Level Users can eSign documents.
How to start an annotation
To annotate a document, please follow the instructions below:File the document to the patient chart through the Fax Inbox or by dragging and dropping the document into the patient chart.
Locate the document in the Requiring Actions queue of the patient chart and click on the name of the document to open it in the Reports Panel
How to annotate a document
The annotation options toolbar will list all the annotation options. We will describe each annotation option in more detail in the ‘Annotation Options’ section below. To insert an annotation, click on an annotation option from the toolbar and then click on the spot in the document where you want to place the annotation.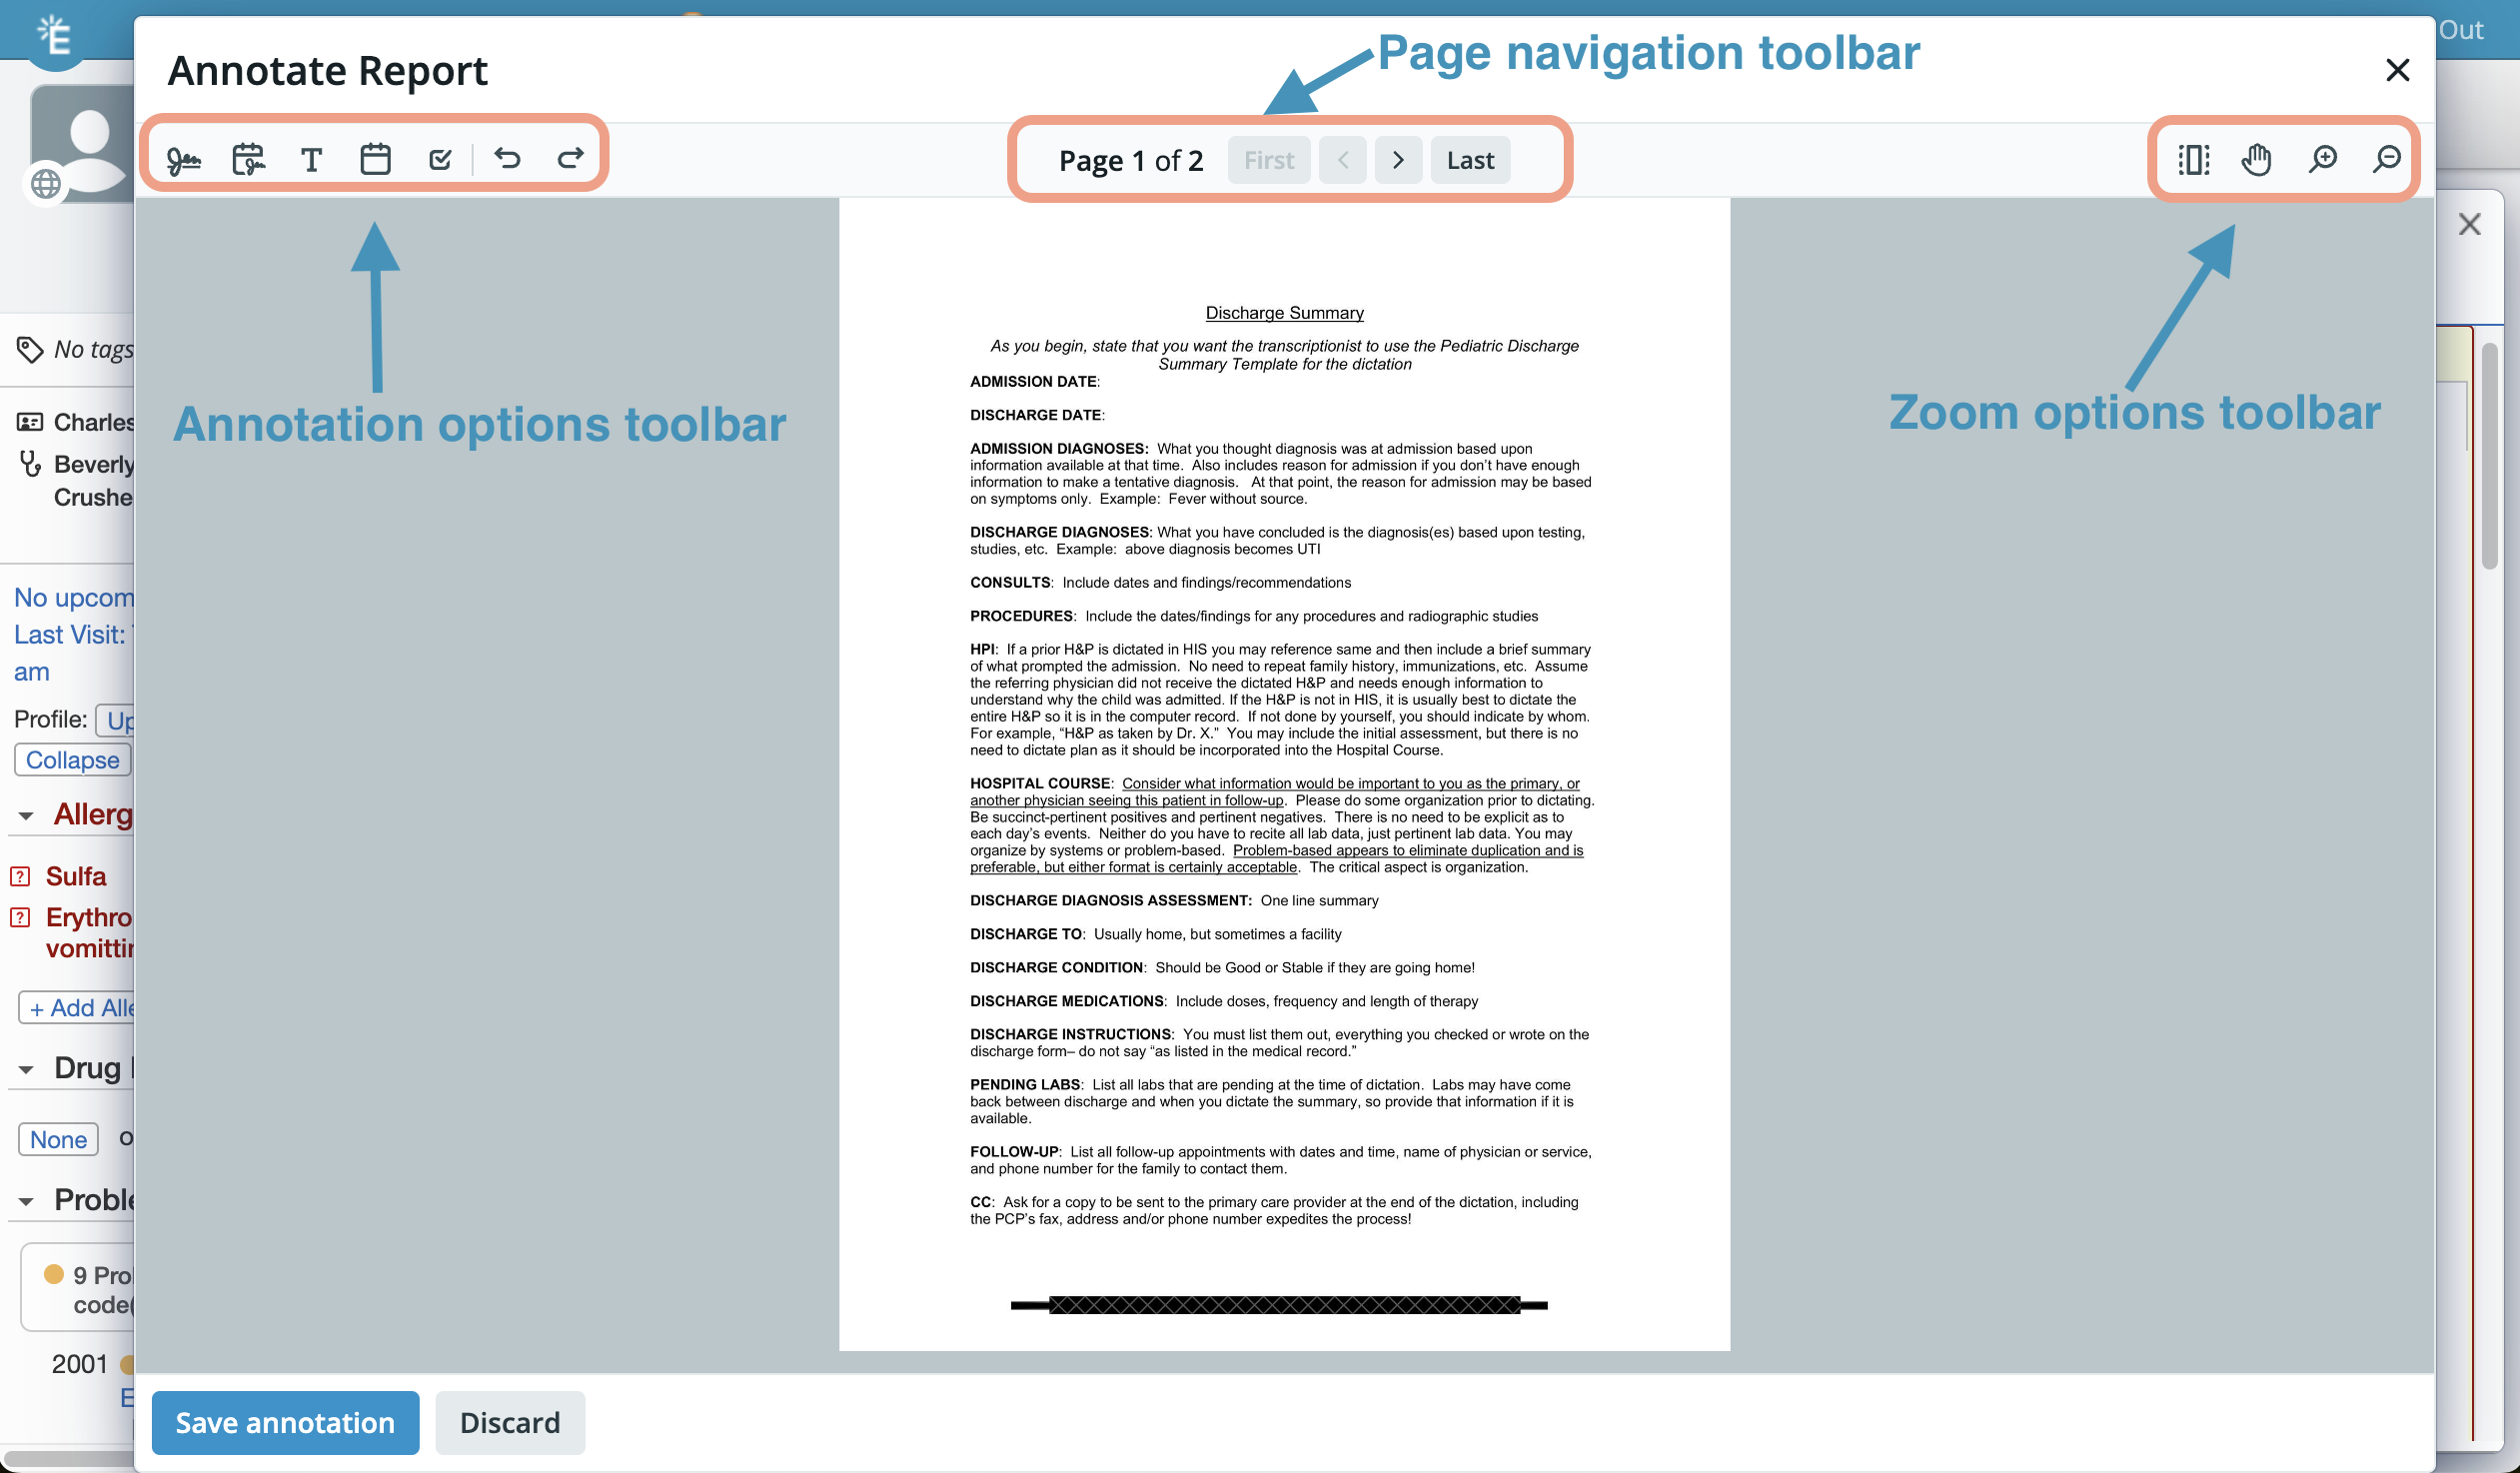
- Move an annotation by clicking and dragging it to a new spot.
- Resize an annotation by clicking the circles on the perimeter of the annotation and then dragging the annotation to the desired size.
- Copy and paste an annotation by clicking on the annotation, pressing Control/Command + C at the same time on your keyboard (to copy) and then pressing Control/Command + V at the same time on your keyboard (to paste).
- Delete an annotation by clicking on the annotation and then clicking the Delete or Backspace button on your keyboard.
- Undo or redo an action by clicking on the Undo or Redo buttons in the annotations toolbar or pressing Control/Command + Z (to undo) or ‘Control/Command’ + ‘Y’ (to redo).
Annotation Options
| Option | Keyboard Shortcut | Description |
|---|---|---|
| Signature | S | Provider Level Users can add their eSignature to the document. Staff Level Users cannot e-sign. To update your signature, go to Settings → Account Details → Edit Profile and click your existing signature. |
| Signature with Date | X | Provider Level Users can add their eSignature plus a date. The date defaults to today but can be adjusted. Staff Level Users cannot e-sign. |
| Text | T | Any user can add text to the document. |
| Date | D | Any user can add a date to the document. The date defaults to today. Double-click the date annotation to edit it. |
| Checkmark | C | Any user can add a checkmark to the document. Press ESC to stop adding checkmarks. |
| Free Draw | W | Any user can draw freehand directly on the document. Click and drag to draw a stroke — circle items, cross things out, or make any freehand markup. Strokes support undo, redo, and delete like any other annotation. |
| Undo | Ctrl+Z (PC) / Cmd+Z (Mac) | Undo the last action. |
| Redo | Ctrl+Y (PC) / Cmd+Y (Mac) | Redo the last undone action. |
| Select All | Ctrl+A (PC) / Cmd+A (Mac) | Select all annotations on the page. Useful for moving or deleting in bulk. |
| Delete | Delete or Backspace | Delete the selected annotation(s). |
| Copy | Ctrl+C (PC) / Cmd+C (Mac) | Copy the selected annotation(s). |
| Paste | Ctrl+V (PC) / Cmd+V (Mac) | Paste copied annotation(s) onto the page. |
| Exit annotation | ESC | Exit annotation mode or cancel the current annotation selection. |
Page Navigation Options
Page navigation options will appear at the top of the annotate window if the document has more than one page. You can use these options to navigate between pages.| Option | Button | Keyboard Shortcut | Description |
|---|---|---|---|
| First | N/A | View the first page of the document. | |
| Previous page | Left arrow | View the previous page of the document. | |
| Next page | Right arrow | View the next page of the document. | |
| Last | N/A | View the last page of the document. |
Zoom Options
Use the zoom options in the top right corner of the annotation window to Zoom in or out of the document page while you are annotating or move to different areas of the page.| Option | Button | Keyboard Shortcut | Description |
|---|---|---|---|
| Zoom to fit | F | Adjust the size of the image to fit the annotation window. | |
| Pan | P Spacebar | Move to different areas of the image while zoomed in. | |
| Zoom in | = (equal) | Zoom in to the image. | |
| Zoom out | - (dash/minus) | Zoom out of the image. |
How to save annotations
Once all of your annotations and eSignatures have been added to the document, click the Save annotation button at the bottom left of the window to save your work and close the annotation window. To view an annotated report, click on the report from the Reports window again. You may need to click the Refresh button at the top right corner of the Reports window to see your updates.Annotation Tips
Using Free Draw to mark up documents
The Free Draw tool (keyboard shortcut: W) lets you draw anything directly on the document — circle a response, cross something out, or add any freehand mark. Click and drag to draw. When you’re done with a stroke, release your mouse and start the next one. Press ESC to exit Free Draw mode.
Exiting an annotation
When you have finished typing text or editing a date in the annotation, press the ESC (escape) key on your keyboard to exit the annotation.Canceling an annotation selection
If you no longer want to add the annotation you selected from the annotation toolbar, press the ESC (escape) key on your keyboard to cancel your selection.Inserting text that is all the same size into different areas of the document
Each new text box you create from the Text button will be a standard size. If you want to resize the font and re-use that font size for other text annotations in the document, we recommend copying (CTRL/’CMD’ + ‘C’ on your keyboard) the first text box you added (the one you resized) and then pasting it (‘CTRL’/’CMD’ + ‘V’ on your keyboard) to the next annotation spot.Moving annotations in bulk
To move multiple annotations:Select the annotations using one of the following methods:
- Click and drag your cursor over all the annotations you want to highlight
- Using your mouse/trackpad and keyboard: click on one of the annotations you want to move, press and hold the Shift key on your keyboard, click on the next annotation you want to move, and repeat until all of the annotations are selected
Click on the highlighted annotations and then hold and drag them to the desired location on the page
Click on the highlighted annotations and then hold and drag them to the desired location on the document
Deleting annotations in bulk
To delete multiple annotations in bulk:Select the annotations using one of the following methods:
- Click and drag your cursor over all the annotations you want to highlight
- Using your mouse/trackpad and keyboard: click on one of the annotations you want to delete, press and hold the Shift key on your keyboard, click on the next annotation you want to delete, and repeat until all of the annotations are selected
You cannot remove or edit annotations and eSignatures once they have been saved, even if you go to annotate the document again.
Frequently Asked Questions
I need to find the original, un-annotated document. How do I do that?
If you need the original, un-annotated document, please click the I need help from the Blue Navigation Bar at the top of your page and select I need help from an Elation Team member to open a support ticket with Elation’s Support Team. Please indicate that you would like the un-annotated version of the document and share the following information with our team:- Patient chart ID number (located at the top of the Demographics Window)
- Date and title of the report
Elation typically provides a first response within 1 business day; Mondays through Fridays, 9am to 5pm Pacific. If you urgently need the un-annotated document and it is blocking patient care, please submit an Urgent Request.
Can staff annotate documents, or only providers?
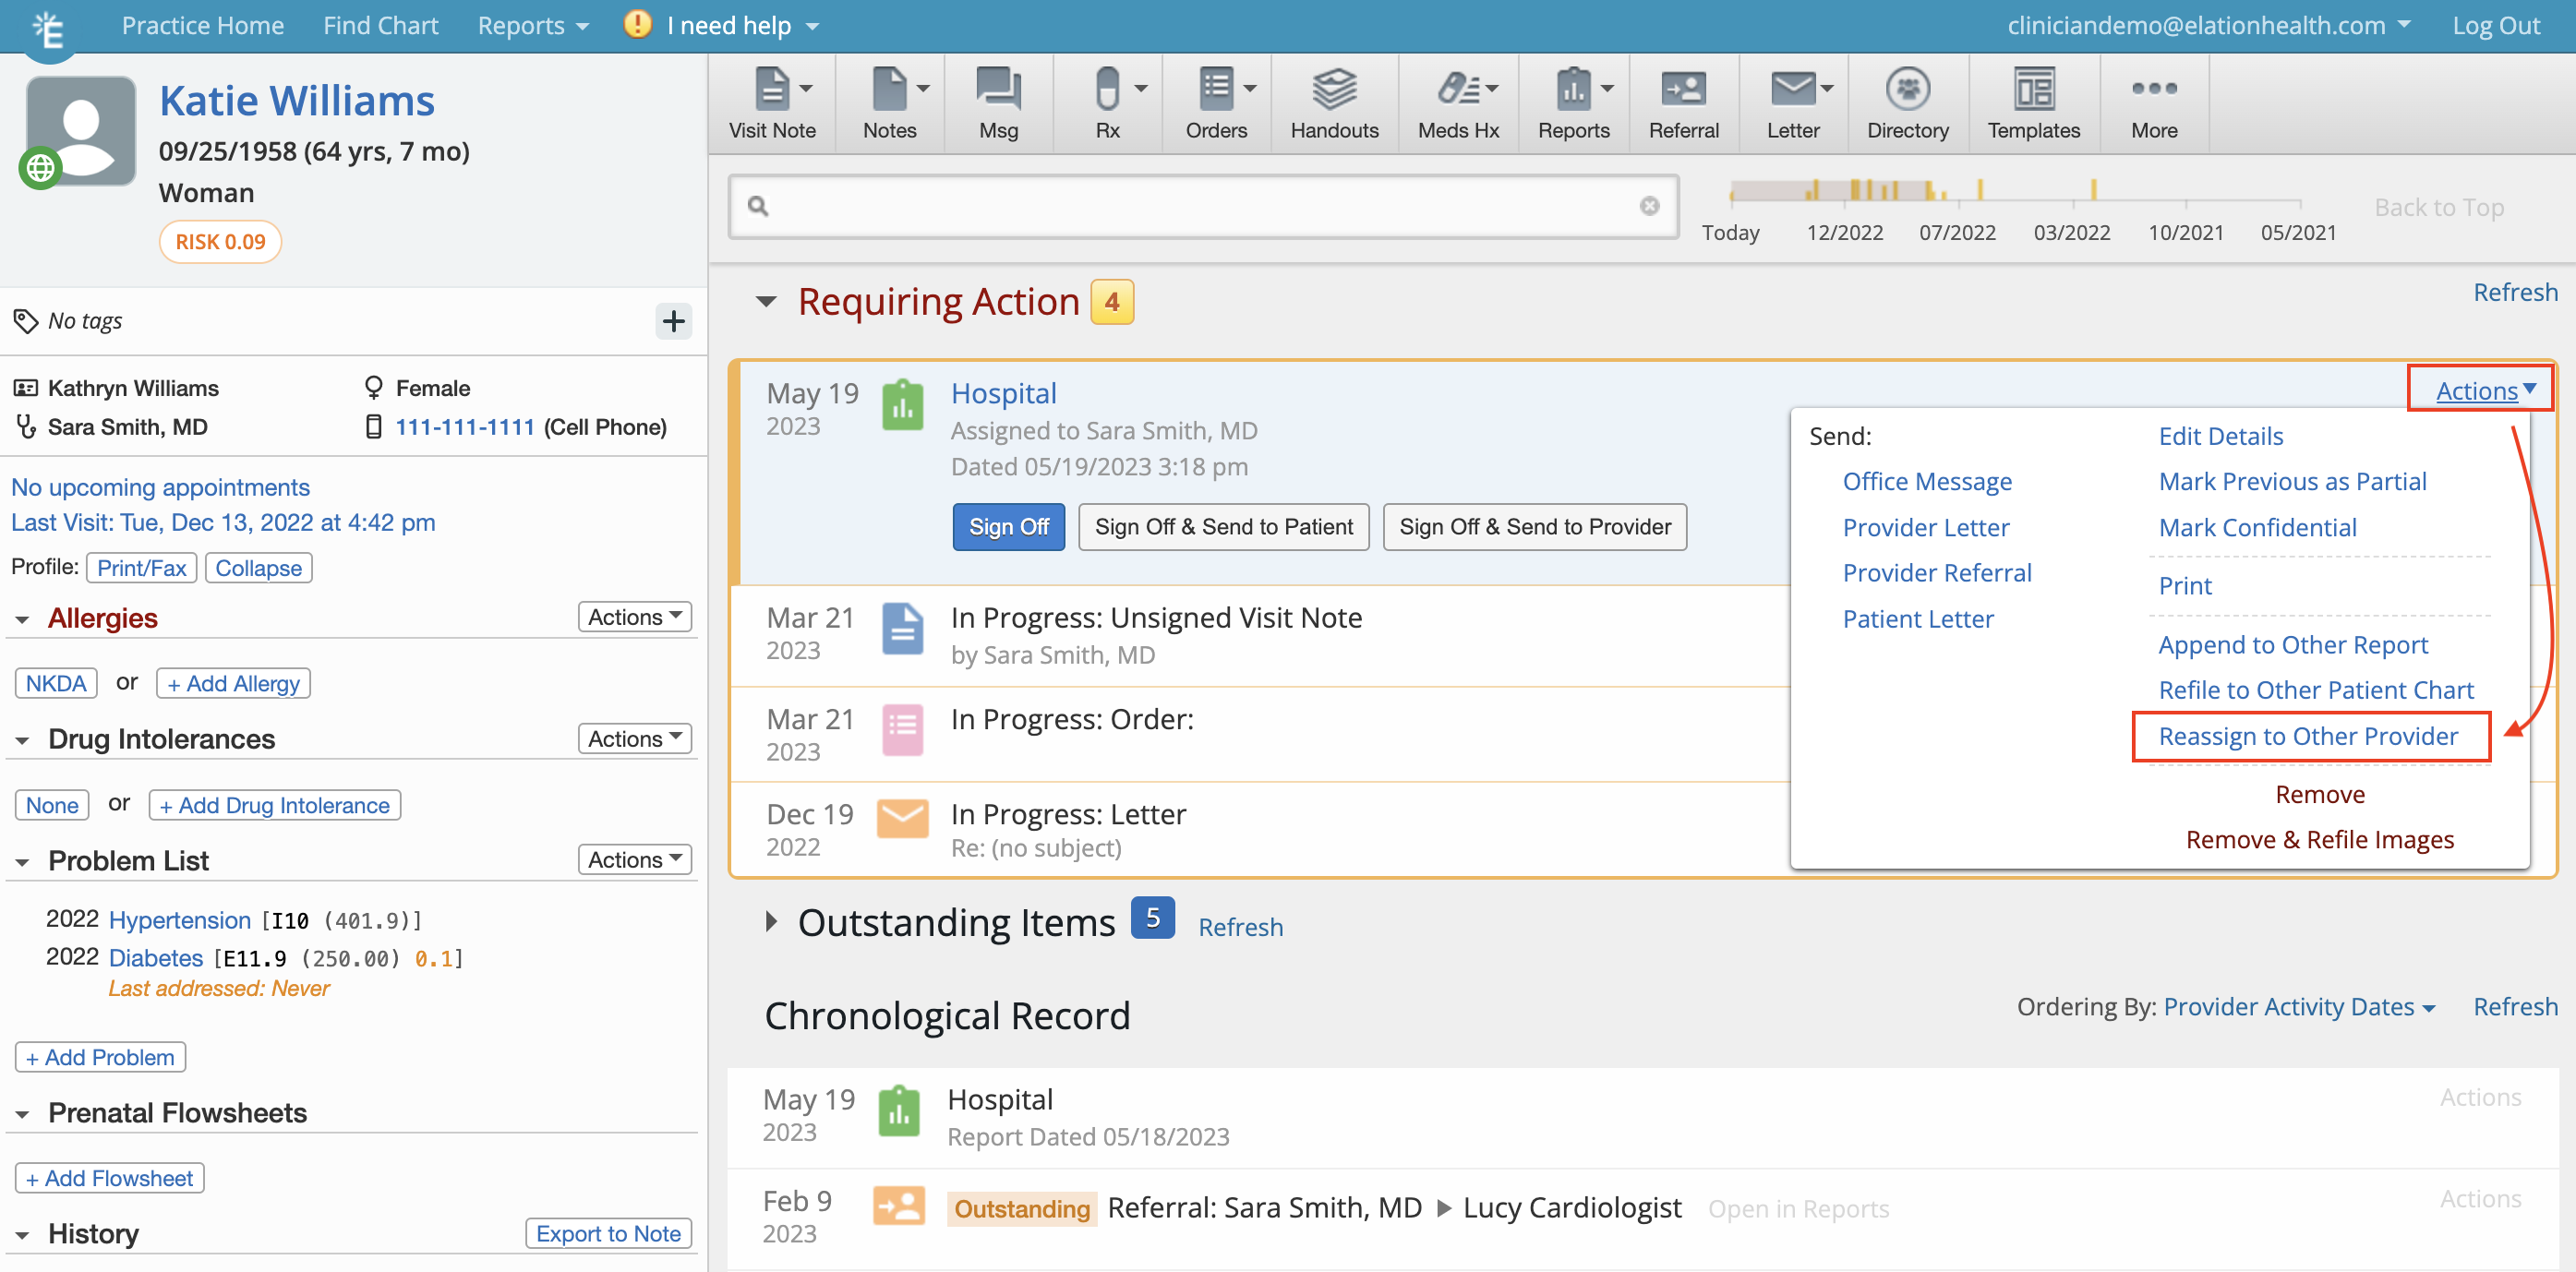
Both Provider Level Users and Staff Level Users can annotate documents, but only Provider Level Users can add their electronic signature to documents.I assigned the wrong reviewer for a document. Can someone else annotate it?
Yes, any user can annotate the document from within the patient’s chart. However, Provider Level Users can formally change the reviewer for a document by clicking the Actions dropdown located in the top right of the document in the Report Window and selecting Reassign to Other Provider. This option is also available directly from the Requiring Action section. Reports Window
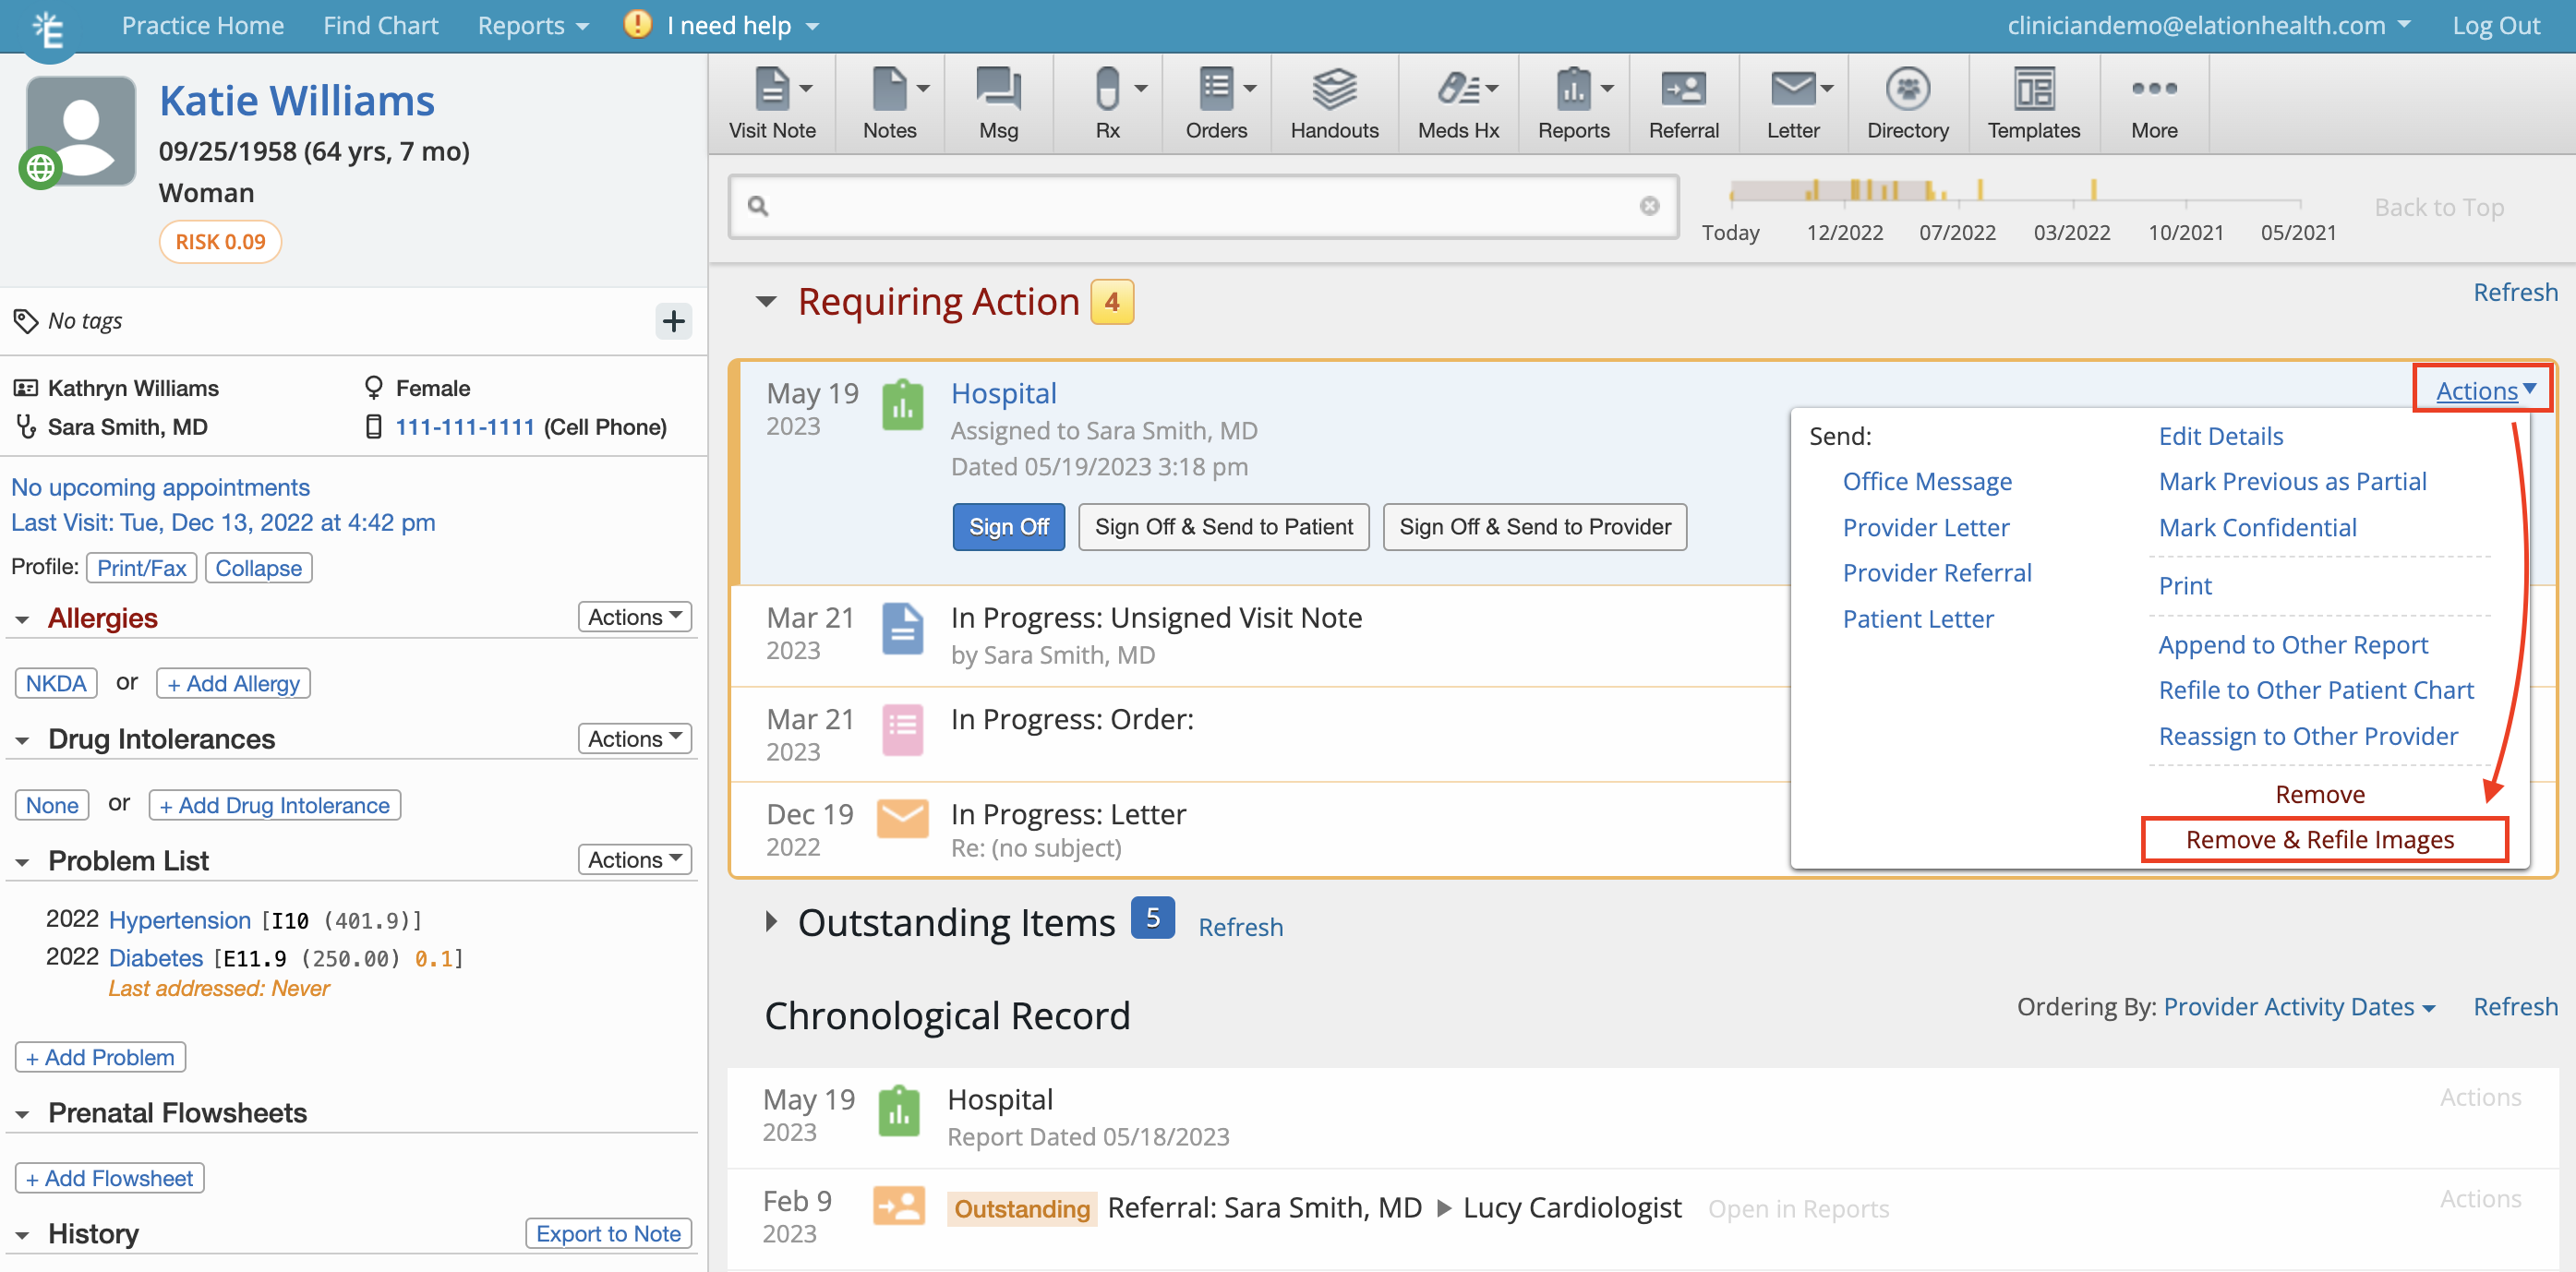
Can I annotate a document that has been signed off?
After a document is signed off, no additional annotations can be added. However, users can use the Actions dropdown for the document and select Remove & Refile Images from either the Report Window or the Requiring Action section to place the annotated version of the document back in the Fax Inbox and then file the document back to the appropriate patient chart to add additional annotations. Report Window