What is Elation Go?
Our mobile app for iOS devices, Elation Go , is a secure communication app that allows providers and staff to take certain actions they would be able to take in the EHR. With Elation Go, you can:- Securely [upload documents](#Documents Upload) into patient charts directly from your mobile device
- Quickly access the clinical profiles of patients with upcoming appointments
- Capture profile photos of your patients and upload them directly into their charts
- Easily [compose](#Send Message) and [reply](#Requiring Actions) to patient letters when it’s top of mind to minimize disruptions in your day (Providers only)
- Electronically send a non-controlled substance medication prescription to a pharmacy (Providers only)
- View your Elation Calendar (Providers only)
- Join Telehealth visits using Elation integrated video (Providers only)
- Easily call patients or other providers on the Care Team to seamlessly collaborate across the care continuum
Why is Elation Go useful?
Elation Go extends the value of our EHR by providing a mobile-platform that enables providers and practice staff to more efficiently and effectively manage patient panels and perform practice activities on the go. The Elation Go allows you to take quick actions from any phone or mobile device.Where to download the Elation Go app
The mobile app is currently for iOS users only, and can be found in the Apple Store © on your mobile device by searching Elation Go or by clicking here .
How to use Elation Go
Logging in to Elation Go
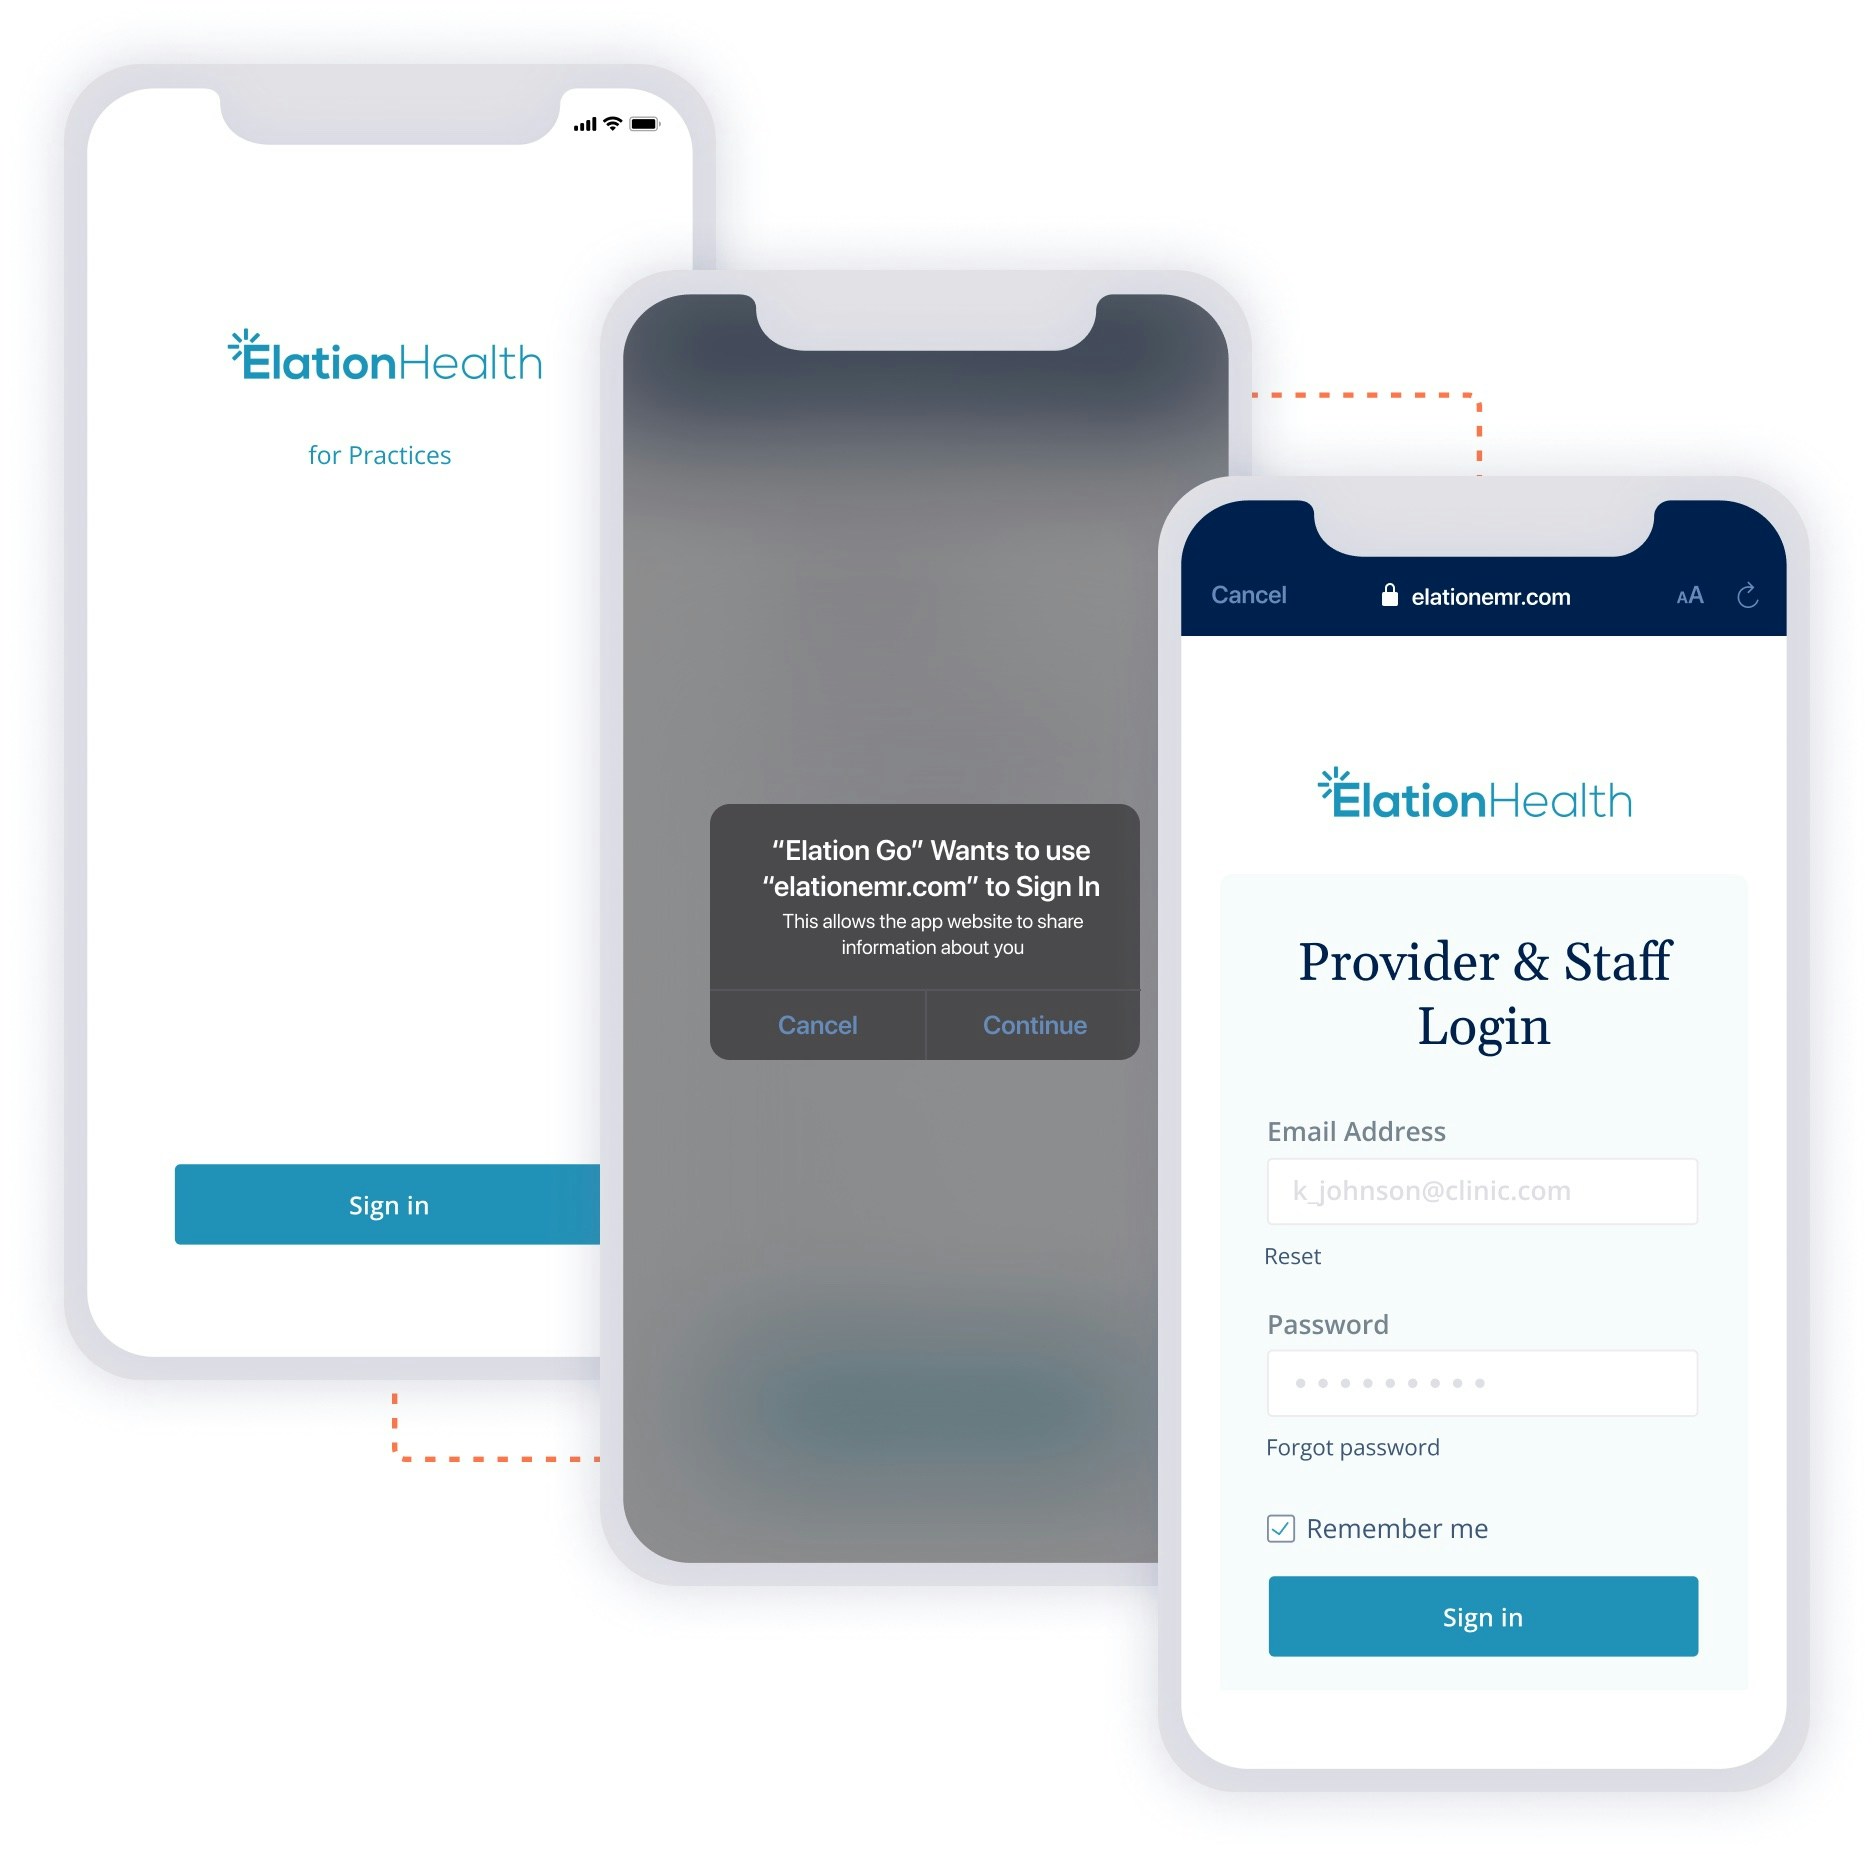
Log in to Elation Go with the same credentials you use when logging into Elation EHR on a regular browser. You can also enable Elation’s Single Sign-On feature to log in to the Elation Go app using Single Sign-On.- Launch the Elation Go app on your mobile device
- Click the Sign In button.
- Click Continue on the pop-up that indicates Elation Go wants to use elationemr.com to sign in.
- An in-app browser window will open, displaying the Elation EHR login page. This is the same login page used by the web application.
- Login using the credentials and authentication method you typically use to log into the web application - your login credentials will not change with this update.
- Upon successful login, the in-app browser window will close automatically and you will be granted access to your account on the Elation Go app.
Viewing the Clinical Profile
The Clinical Profile is visible when you open any patient’s chart and is designed to be ‘view only’, which means no edits to this section can be made. All information in the Clinical Profile is synced from the patient’s chart in Elation. This page can be refreshed by pulling down on your screen when scrolled all the way to the top. Additionally, you can press on the phone number for both the patient, or providers in the Patient’s Provider list, to make a call directly from your phone to the patient or provider.Uploading patient profile pictures
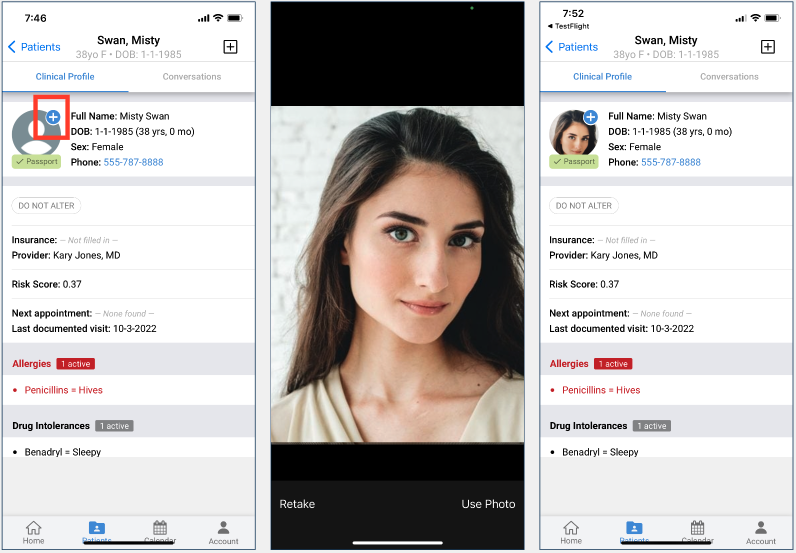
To upload a patient’s profile photo- Search for the patient in question and open their profile in the mobile app
- Press on the + button (Options Menu) at the corner of the patient’s portrait
- Press Take Photo to take a picture of the patient
- Use the app to position the photo so the patient’s face is in the middle of the photo square and then press Use Photo.
Scanning and uploading documents directly into a patient’s chart
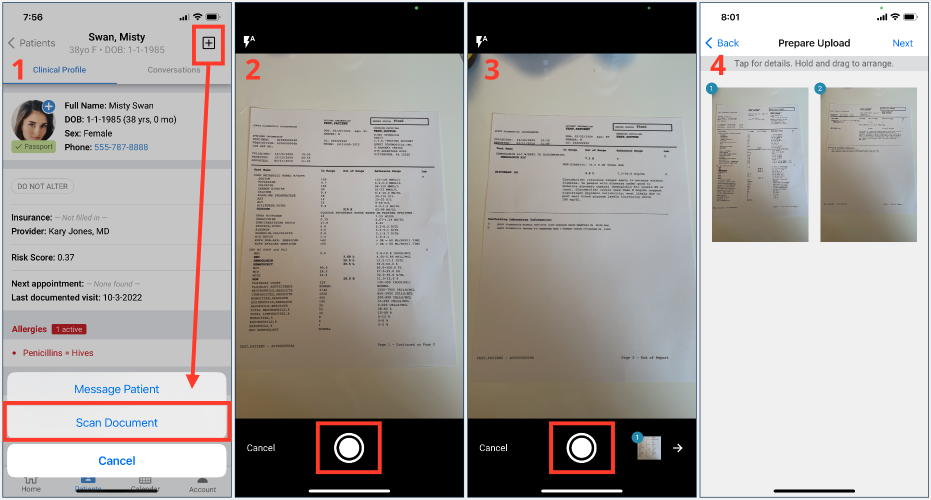
To scan and upload a document direct into a patient’s chart- Search for the patient and open their profile in the mobile app
- Press the + button (Options Menu) in the top right corner and choose Scan Document
- Capture images of the document with your phone camera. You can take up to 20 pages for a single document.
- Once all of the photos are taken, you can rearrange the order of the pages by holding on the image and dragging it to the desired position/order. You can also take the image to take a closer look at it, rotate the image, and/or delete the image.
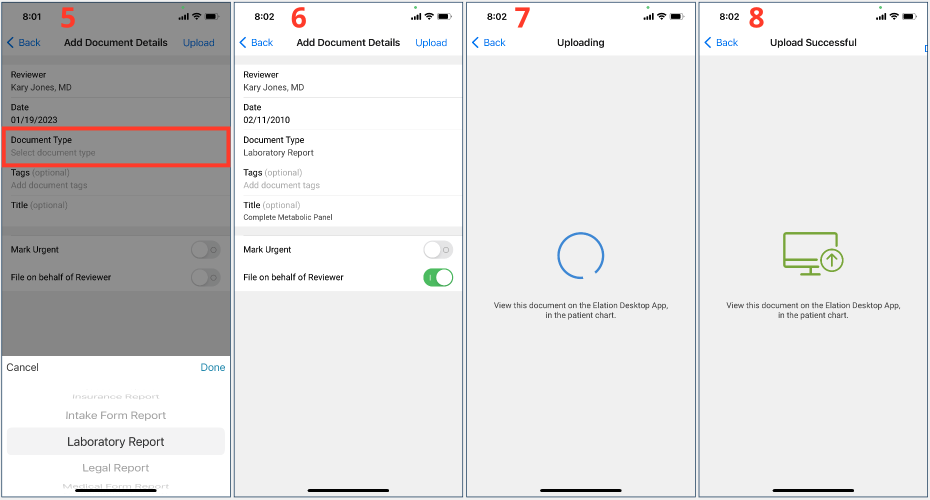
- Once you’re satisfied with the images, press Next to complete the following document details:
- Reviewer
- Date
- Document Type
- Tags (optional)
- Title (optional)
- Mark Urgent
- File on behalf of Reviewer
- Press Upload to file the document into the patient’s chart.
Responding to patient messages
The Requiring Actions queue of the Home section shows all patient letters that are addressed to you that require your attention. Users can also pull down to refresh this page. From this queue, you will be able to Reply, Sign Off, End, and Acknowledge messages. You will find a breakdown of these actions below:- Reply: Providers can reply to the message and choose whether they’d like to end the conversation (patient can’t reply and would need to initiate a new message to reach back out), or just reply (leaving the conversation open).
-
You cannot add new attachments to message responses.
-
- Sign Off: Signing Off a conversation will remove it from the Requiring Actions queue. When choosing to Sign Off on a letter, if there are attachments, providers can choose to file one, multiple, or all the attachments as a Miscellaneous Report in the patient’s chart.
- End: Pressing End will officially end the conversation — preventing a patient from being able to reply to the message.
- Acknowledge: Like in the browser app, Acknowledge is used to recognize a comment (a reply) on a letter and remove it from the Requiring Actions queue.
Sending messages to patient’s Passport accounts
To send a message from the Home section, press the + button (Options Menu) at the top of the screen and choose Message Patient. You will then be asked who you want to send your letter to, and be given the option to select from a list of your panel.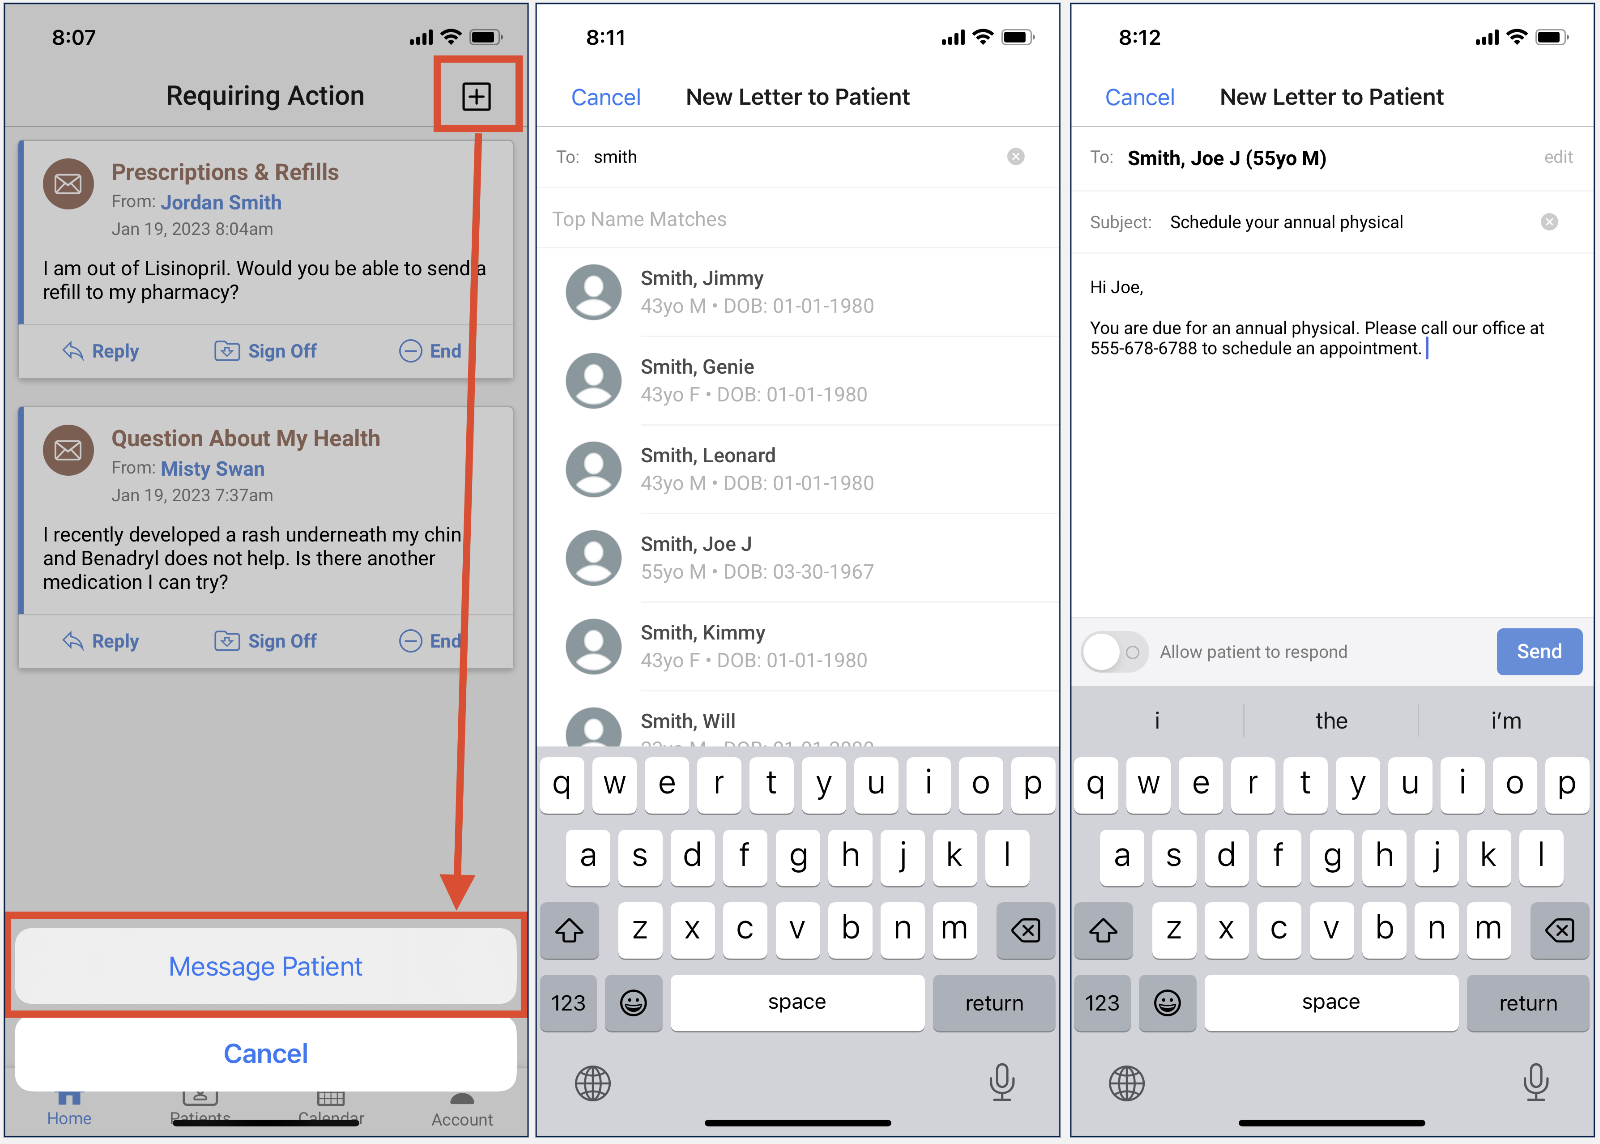

Receiving notifications about new patient messages
You can set up or turn off Notifications from the Account page, by pressing on the gear icon in the top left corner of the app, and flipping the toggle next to Notifications on/off. Set the Push Notifications option to green to turn it on or set it to gray to turn it off. With notifications on, you will receive a notification whenever patients send you a message via their Patient Passport account and then you can log in to Elation Go to respond.Sending a non-controlled medication prescription to a pharmacy
Providers can send non-controlled substance medication prescriptions to pharmacies directly from the Elation Go Mobile App. The ePrescribing experience on Elation Go will allow you to:- send new, non-controlled substance medication prescriptions to pharmacies
- view allergies, drug interactions and drug interaction alerts while e-Prescribing
- select from the patient’s list of preferred pharmacies or the pharmacy database
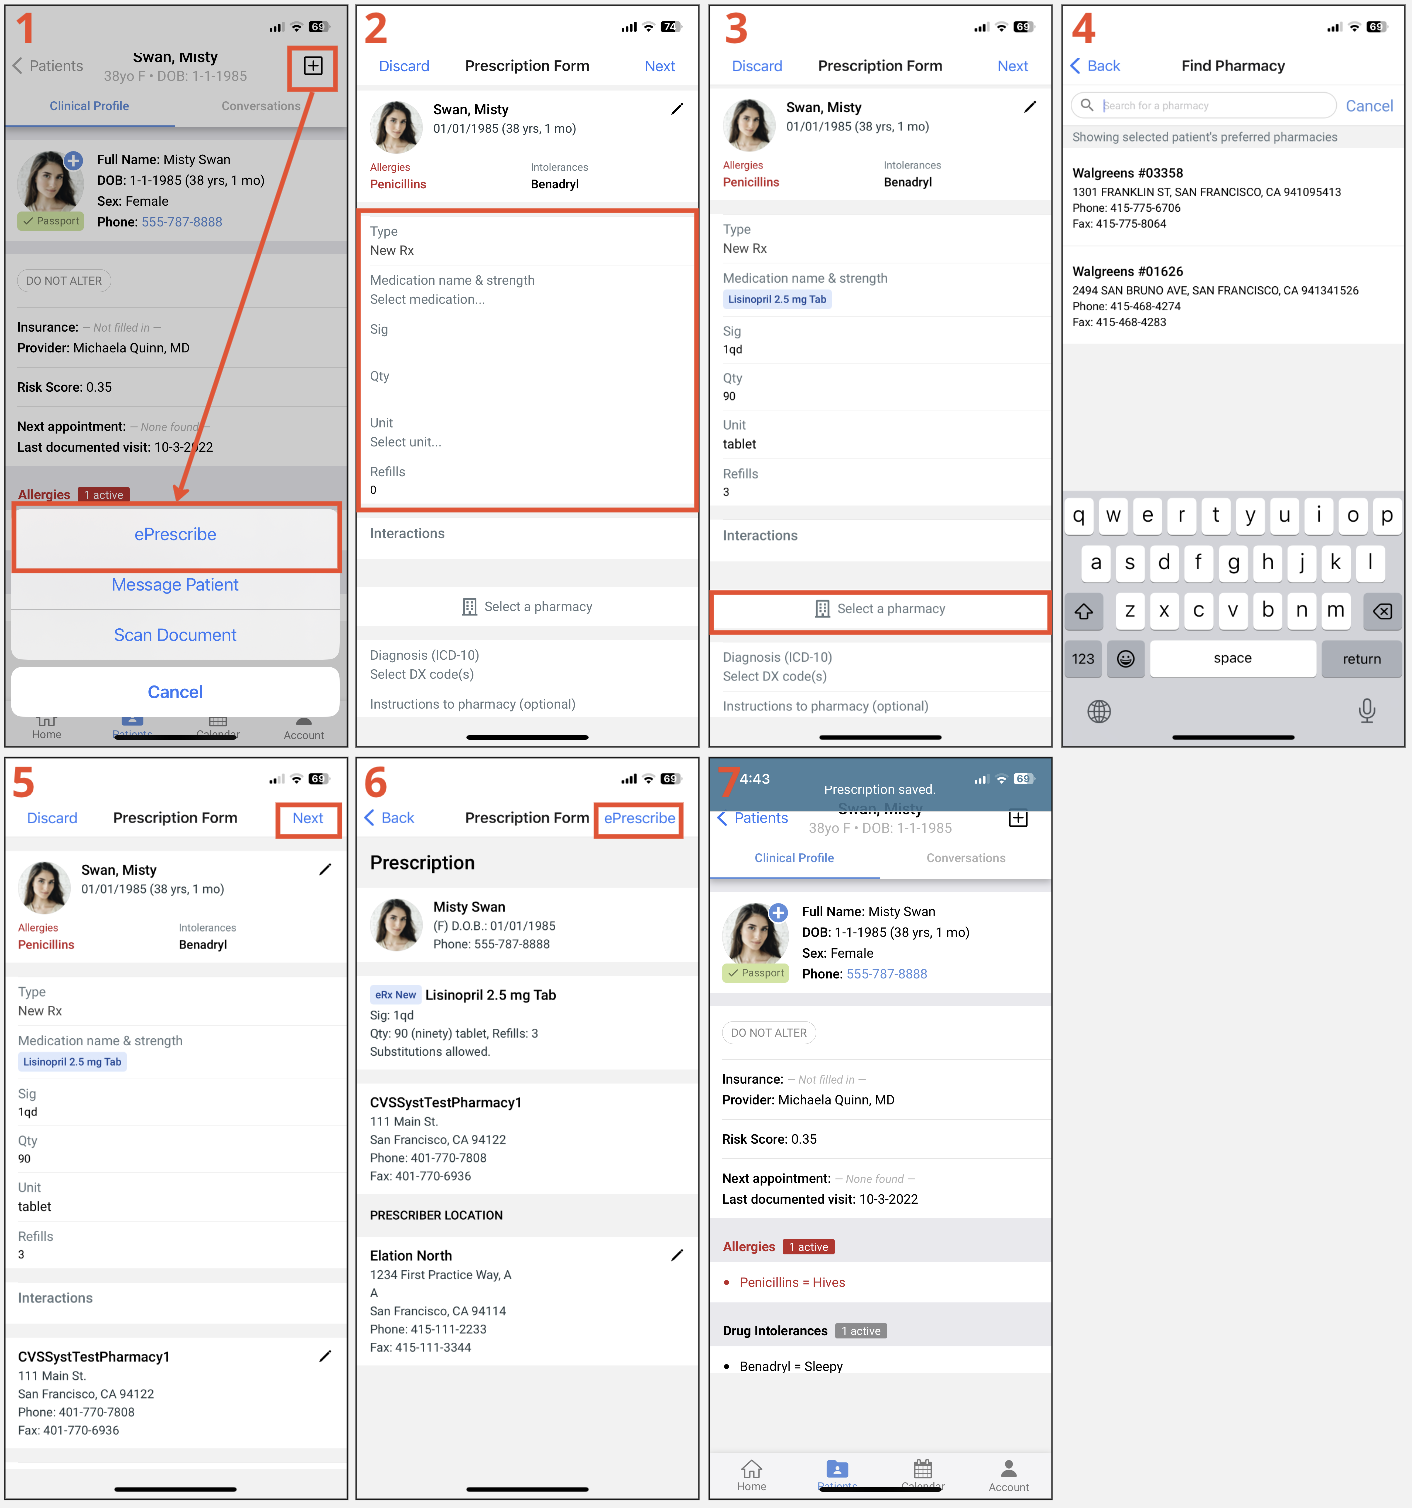
- Open the patient’s chart in Elation Go
- Click on the + button (Options Menu)
- Press on the ePrescribe option
- Fill out the prescription details (Medication name & strength, Sig, Qty, Unit & Refills)
- The patient’s allergies and drug intolerances will be listed at the top of the form
- Press the Select a pharmacy button to select a pharmacy for the patient. The patient’s preferred pharmacies will appear for selection first. You can also search for any pharmacy in the pharmacy database.
- Fill in the diagnosis codes for the prescription as needed. Diagnosis codes from the patient’s Problem List will be available for selection first. You can also search for any diagnosis code from the diagnosis database.
- Click Next once you finish filling out the prescription form
- Review the prescription & then click ePrescribe once you are ready to send the prescription to the pharmacy
-
The Elation Go application does not support failed prescription notifications. Please continue to monitor your “Urgent” inbox in the Elation desktop application for failed prescription notifications.
-
The following functionality will be supported at a later point in time: Refilling existing medications from the Medication ListRx Templates and Custom Rx SigsControlled substance medication e-PrescribingElectronic refill requests
Viewing your Elation Calendar as a Provider
Provider Level Users can view their Elation Calendar directly in the Elation Go App by pressing the Calendar button at the bottom of the App. You will see a list of all your appointments listed on a day by day basis. Pressing on the appointment will display the full details of the appointment.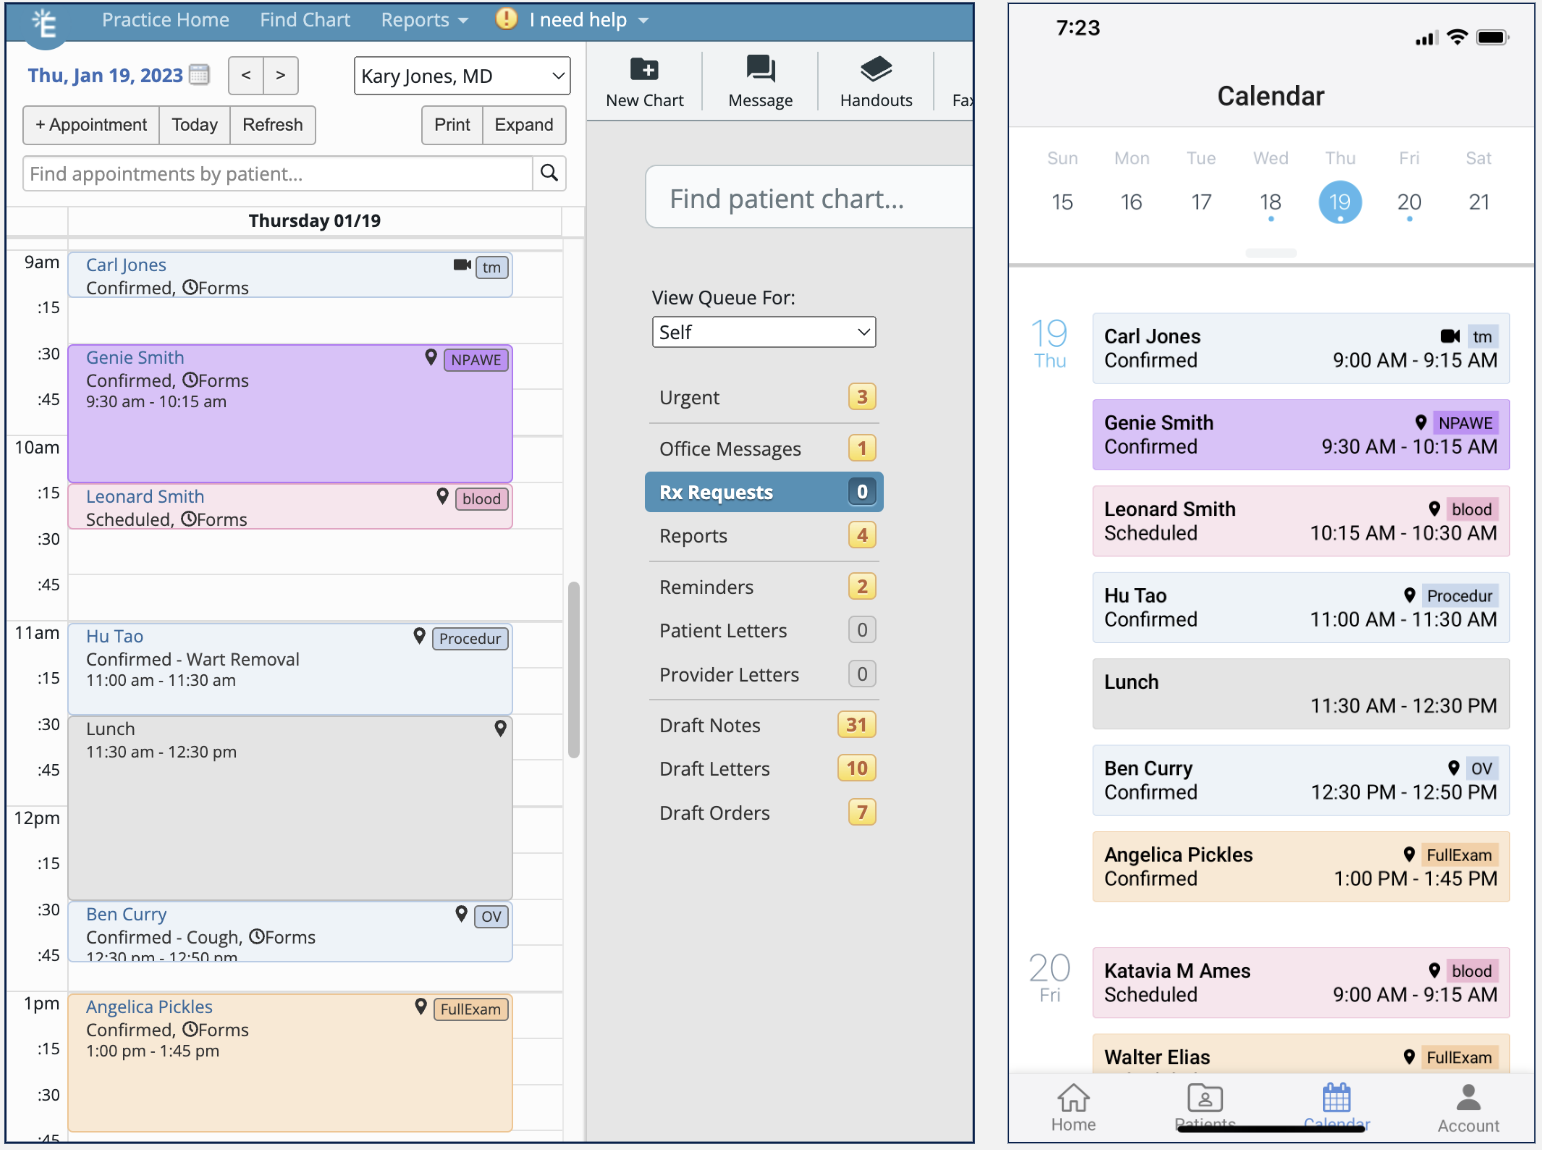
Updates to events in the Calendar (such as the time you blocked off for lunch or meetings) will only be visible after you refresh the Elation Go application by closing the Elation Go application completely and then logging in again. This will be addressed in a future upgrade.
Launching Telehealth visits from Elation Go
Providers can start any of their scheduled video visits with patients directly through the Elation Go application. To join a video visit using Elation integrated video, press on the appointment from your Calendar to view the full details and click Start Video. This will automatically open the Zoom app on the device and log you into the video visit as the host. From here, providers will be able to admit patients into the video visit from the waiting room!
The Start Video button will only appear after a provider has activated their Elation integrated video account. This option does not appear for staff users, as they do not have their own Elation integrated video accounts.
Additional information about Elation Go
Additional App Details:- Elation Go is an iOS app. We do not have any Android apps yet.
- The minimum iOS version we support is iOS 12.0.
- If the user has a version below this, they might not be able to see it in the app store.
- The app is free from the App Store.
- We currently support iPhone, iPod Touch, and iPad (Universal).
- Users need an existing Elation account to log in.
- This app is rated for ages 17+ and is only available in the US.
Session Timeout: Sessions last 2 hours - if you take any actions on your device after this time (outside of the app), the app will return you to the login screen where you’ll be required to re-login.