> ## Documentation Index
> Fetch the complete documentation index at: https://help.elationhealth.com/llms.txt
> Use this file to discover all available pages before exploring further.
# Using Patient Passport
> A complete guide to using Elation Patient Passport — registering, logging in, messaging your practice, viewing appointments, and managing your health information.
**For patients and caregivers** · 8 min read
This guide covers everything you need to use Elation Patient Passport, a patient portal feature that your care team uses to interact with patients — from registering for the first time to sending messages, viewing appointments, and managing your health records. Use the cards below to jump to the section you need.
Register for the first time or link a new chart/practice to your existing Passport account
Log in, send messages, view appointments, and manage health records
Download the app for iPhone or Android and learn what's different from the web version.
Common questions and troubleshooting tips
## Setup
### Register your account
A practice sends you an invitation to join Patient Passport. To register:
Log in to your email account and look for the most recent Passport invitation email. It is from the email domain "elationpassport.com" with one of the following subject lines:
* Passport Account Registration
* \[Doctor's Name] has a secure message for you
Open the email and click **Create Your Account**. A new page will open up. If your email is text-based, copy and paste the long URL at the center of the email body into your web browser.
Verify the First Name and Last Name you want to appear on the account (especially for messages to the care team), then enter a unique password twice. Your password must be at least 8 characters and include at least one number or special character.
Next, review the terms of service and then check **I agree to Elation's Terms of Service** if you agree to the terms and click **Submit**.
Enter the date of birth of the patient chart you're verifying access for; even if it's for your own chart. Then click **Confirm**.
* If you click **I'll do this later** then you will not have access to the chart's information until you verify access later on.
You will then be taken to your Passport account.
### Link a new chart to your existing account
If you have multiple providers who use Elation, you can use the same Passport account to access all of your charts. Just use the same email address!
Log in to your email account and look for the most recent Passport invitation email. It is from the email domain "elationpassport.com" with one of the following subject lines:
* New Chart Access
* \[Doctor's Name] has a secure message for you
Open the email and click **Log In**. A new page will open up. If your email is text-based, copy and paste the long URL at the center of the email body into your web browser.
Log in to your existing Passport account to verify your identity.
Click Verify for access to access the new chart that you were invited to.
Click **Verify for access** to access the new chart that you were invited to.
* If you click **I don't need access to this record** then you will not gain access to the new chart unless the practice grants you access again.
Enter the date of birth of the person whose account you're claiming in MM/DD/YYYY format (slashes included). This could be your own date of birth if you're linking multiple accounts from different providers.
Click **Confirm**.
## Workflow Instructions
**Logging in to your Passport account from a web browser**
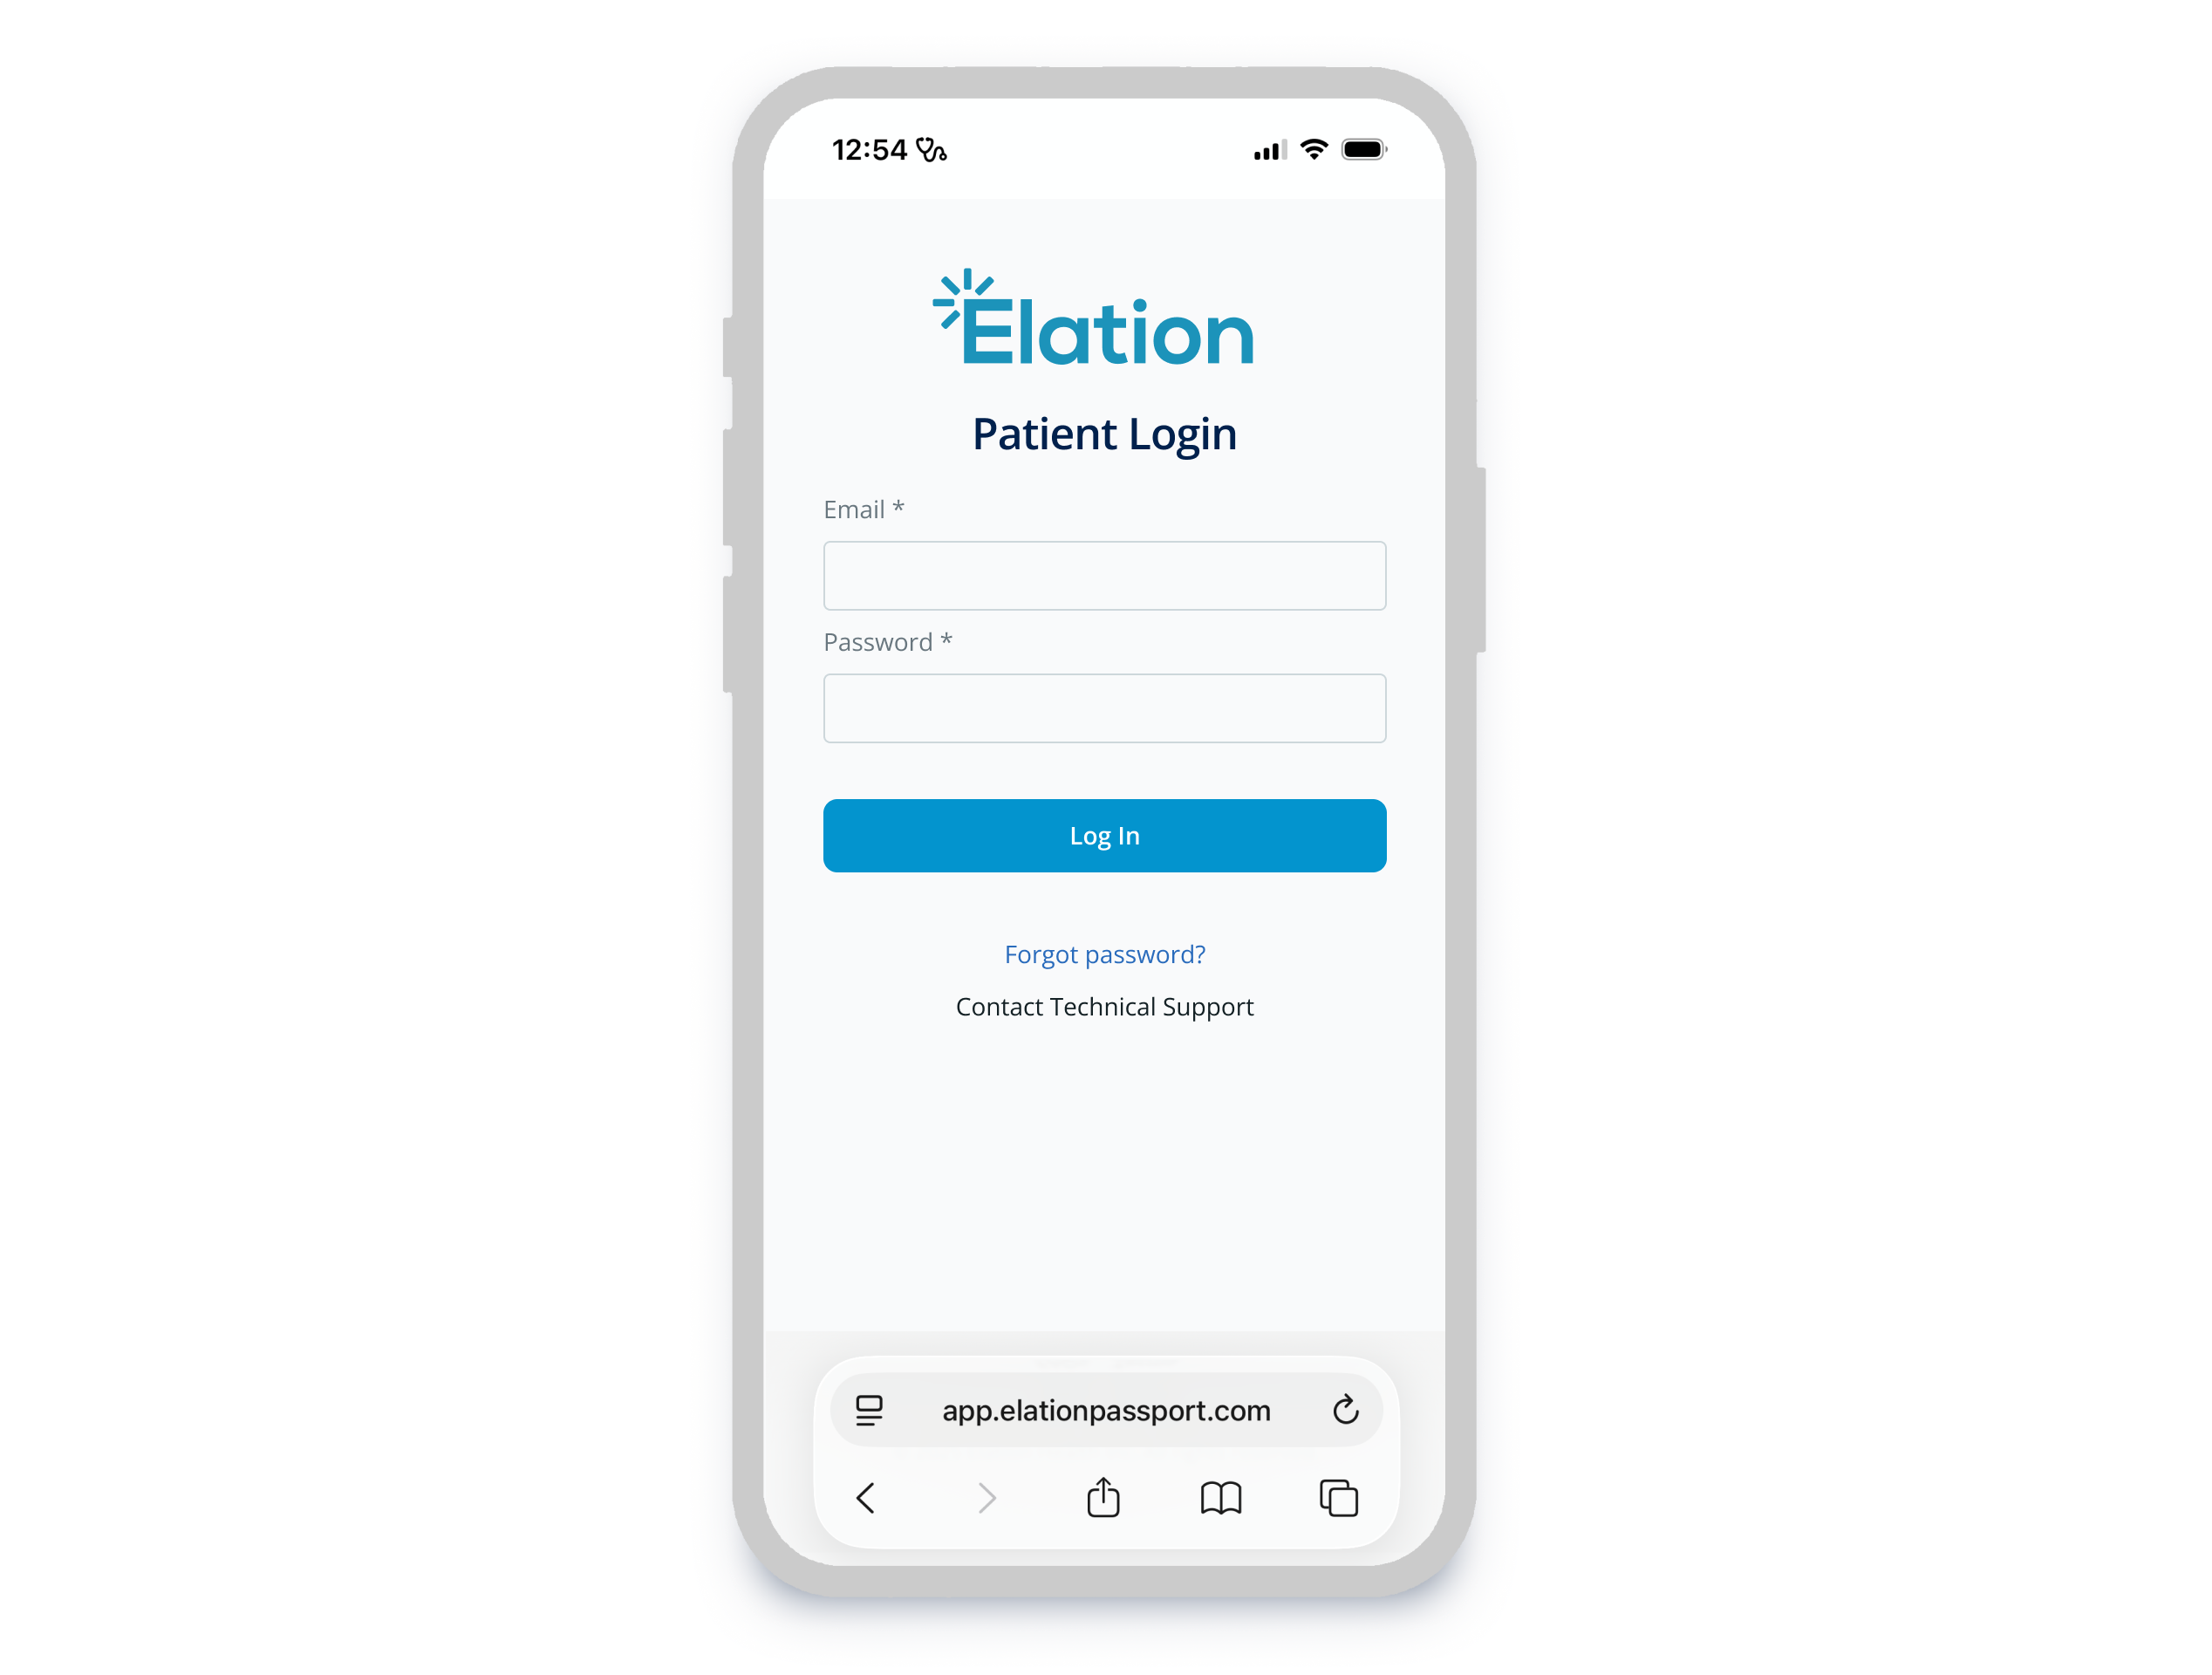 Open any web browser on your computer or mobile device and navigate to [app.elationpassport.com](https://app.elationpassport.com/passport/login/?next=/passport/).
If you're using the Elation Passport App on your iOS or Android mobile device then open the App.
Type your **Email** and **Password**, then click **Log In**.
You may be prompted to specify your relationship with the 'patient'. Choose from one of the following options and then click **Continue**:
* **This is me** — You are the patient.
* **I manage their care** — You are the parent, guardian, or caregiver.
* **Remove this chart** — You do not recognize it or do not want access.
You may be asked to confirm your **Account Name** — the name that appears when you message any practice(s) from the Passport account. This does not have to be your legal name or the legal name of any of the charts you have access to. Choose the name you actually go by and want to be addressed by, then save.
You can enter a preferred **Mobile number** and set **Notification Methods** as well.
Afterwards, click **Confirm and continue to Passport** to continue to the Passport account.
If you need to reset your password, follow the instructions in the [Resetting your password](#resetting-your-password) section below.
If you need any other assistance, click **Contact Technical Support** on the login page.
#### Switching between linked charts
If there are multiple charts linked to your account, switch to a different chart by following these steps:
Click on the current profile name at the top right of the account.
Click on the name of the profile you want to switch to.
If you want a specific chart to load by default each time you log in, go to **Account Settings** and update your default chart preference there.
#### Sending and receiving messages
Appointment reminders, new message alerts, and visit summary notifications are sent from a do-not-reply address. Replying to these emails will not reach the care team. To send a message, select **Messages** in Patient Passport and send from there.
If the practice has turned off patient messaging, you will not be able to send new messages or reply to existing ones.
Select **Messages** in the navigation. Your inbox lists all message threads, most recent first. Select a thread to read the full conversation.
Open any web browser on your computer or mobile device and navigate to [app.elationpassport.com](https://app.elationpassport.com/passport/login/?next=/passport/).
If you're using the Elation Passport App on your iOS or Android mobile device then open the App.
Type your **Email** and **Password**, then click **Log In**.
You may be prompted to specify your relationship with the 'patient'. Choose from one of the following options and then click **Continue**:
* **This is me** — You are the patient.
* **I manage their care** — You are the parent, guardian, or caregiver.
* **Remove this chart** — You do not recognize it or do not want access.
You may be asked to confirm your **Account Name** — the name that appears when you message any practice(s) from the Passport account. This does not have to be your legal name or the legal name of any of the charts you have access to. Choose the name you actually go by and want to be addressed by, then save.
You can enter a preferred **Mobile number** and set **Notification Methods** as well.
Afterwards, click **Confirm and continue to Passport** to continue to the Passport account.
If you need to reset your password, follow the instructions in the [Resetting your password](#resetting-your-password) section below.
If you need any other assistance, click **Contact Technical Support** on the login page.
#### Switching between linked charts
If there are multiple charts linked to your account, switch to a different chart by following these steps:
Click on the current profile name at the top right of the account.
Click on the name of the profile you want to switch to.
If you want a specific chart to load by default each time you log in, go to **Account Settings** and update your default chart preference there.
#### Sending and receiving messages
Appointment reminders, new message alerts, and visit summary notifications are sent from a do-not-reply address. Replying to these emails will not reach the care team. To send a message, select **Messages** in Patient Passport and send from there.
If the practice has turned off patient messaging, you will not be able to send new messages or reply to existing ones.
Select **Messages** in the navigation. Your inbox lists all message threads, most recent first. Select a thread to read the full conversation.
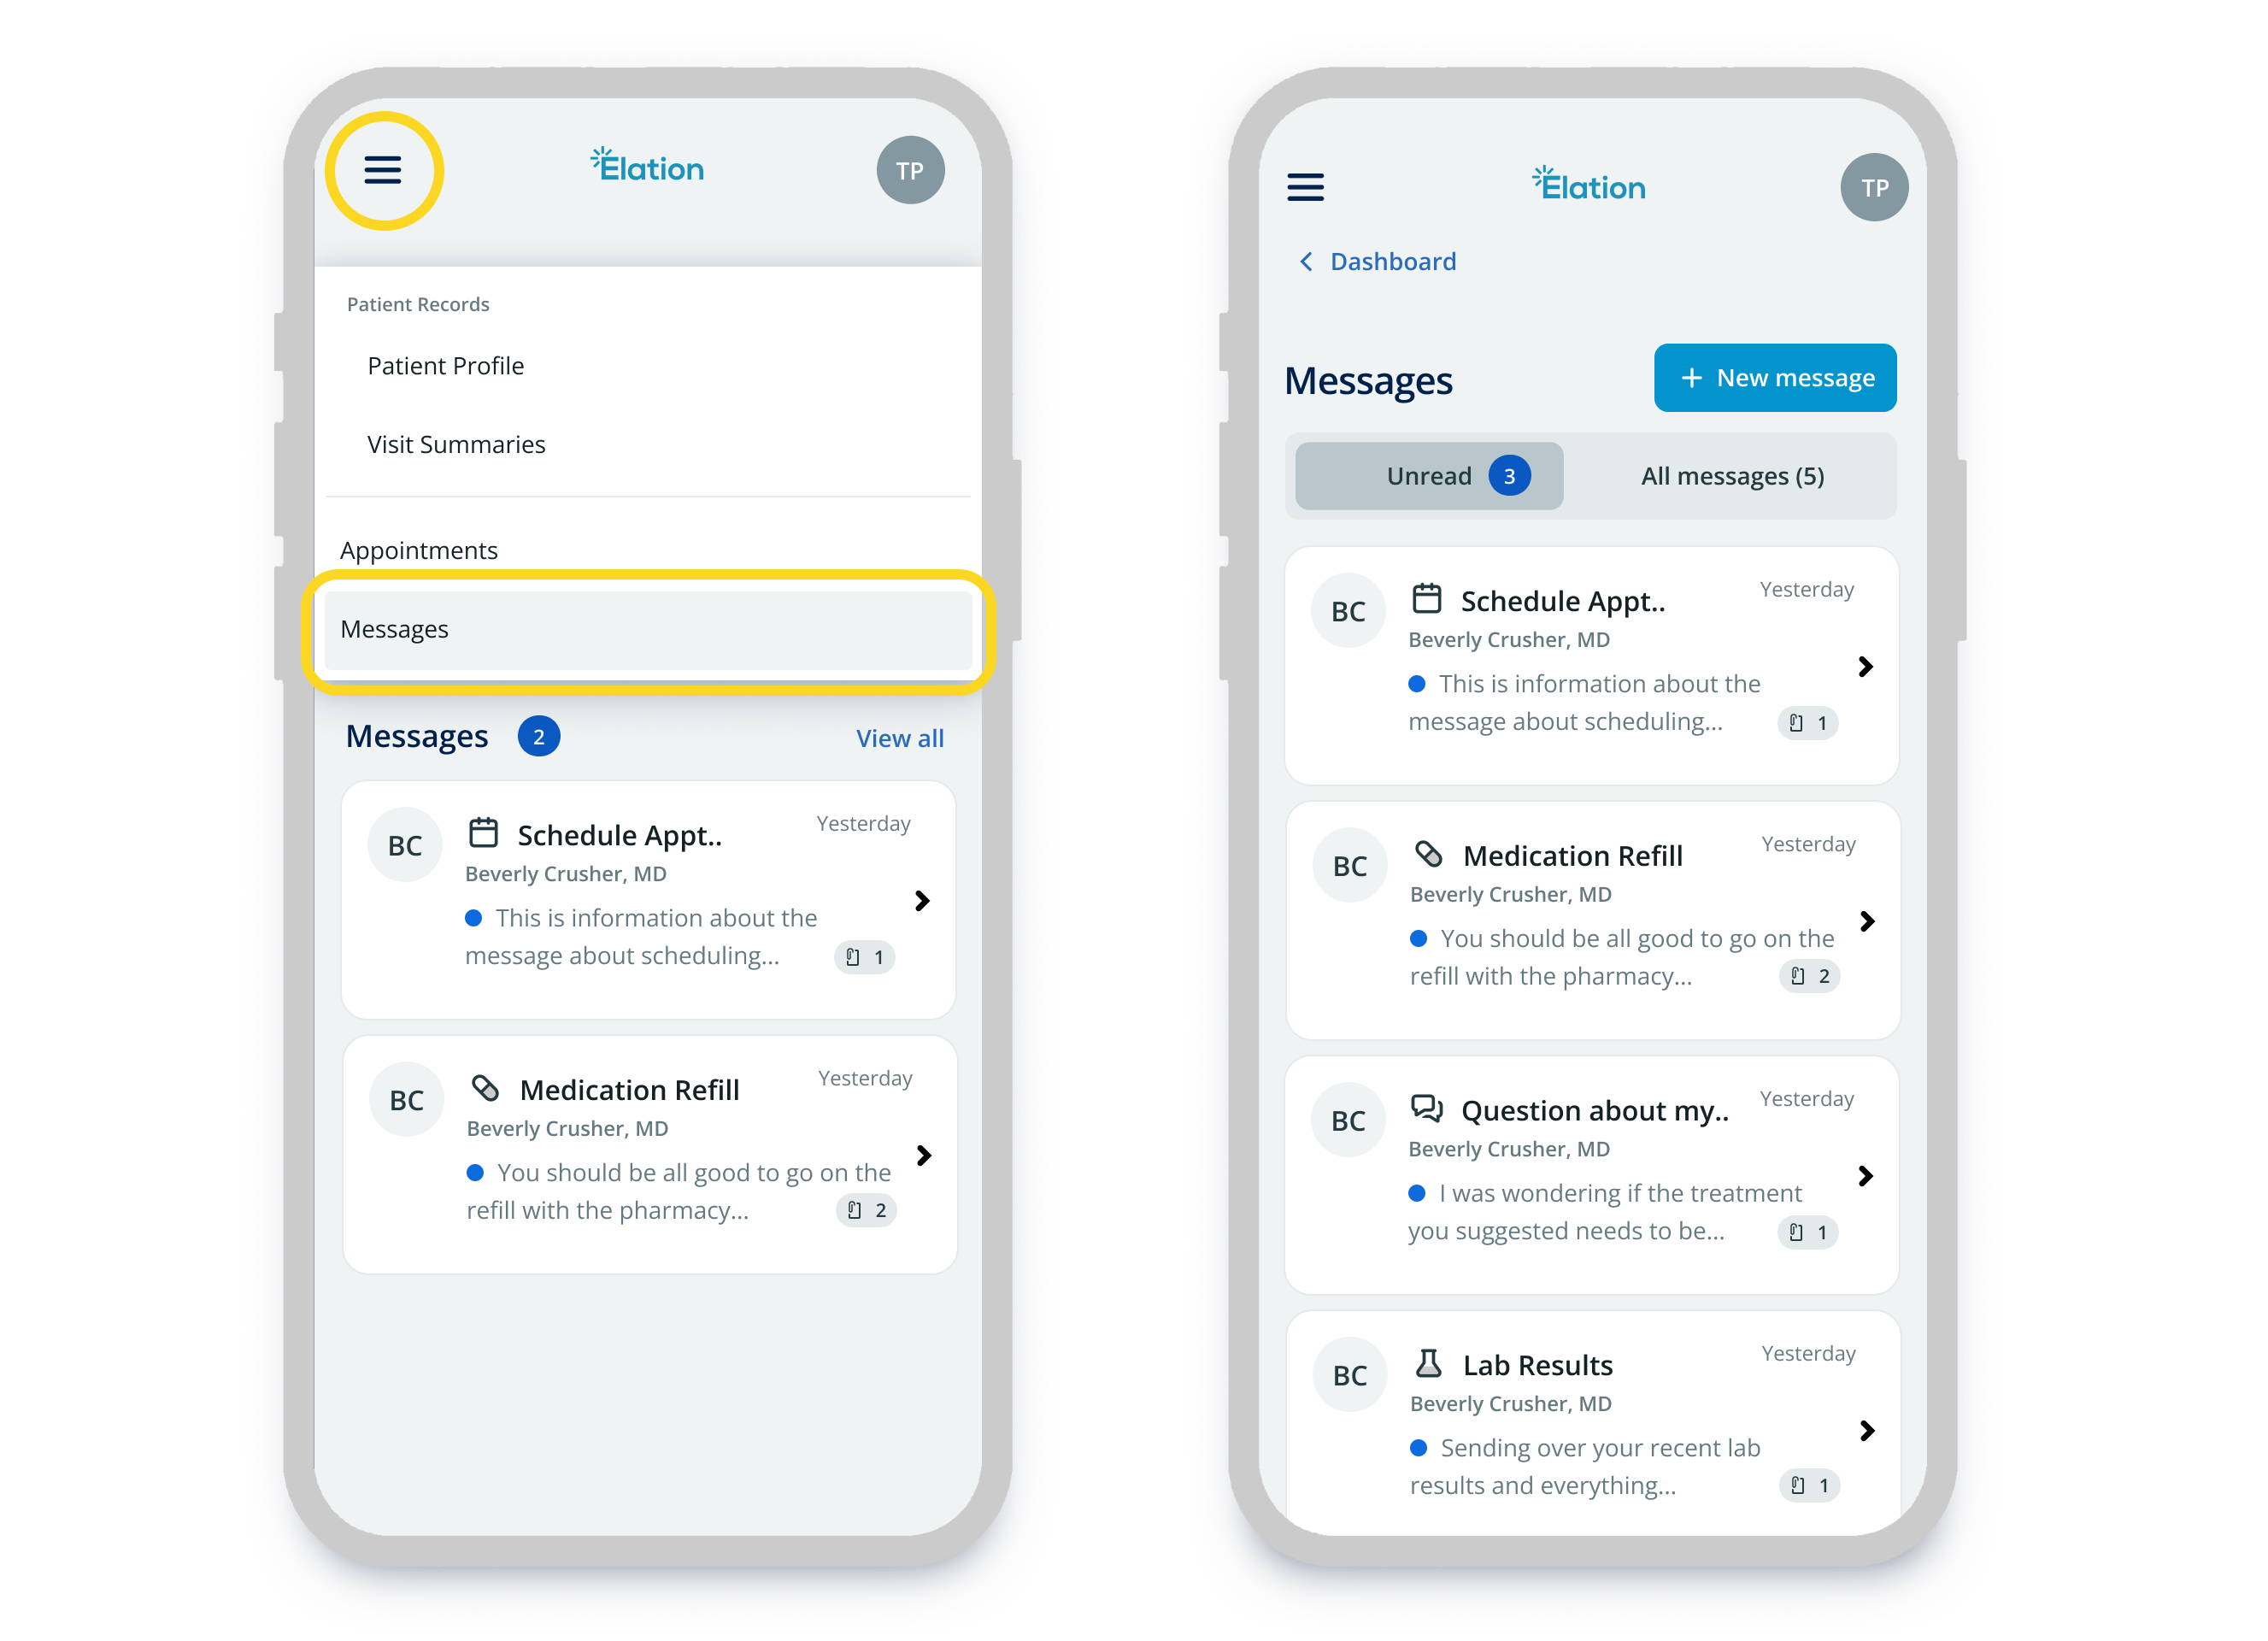 Sending a new message
Select **Messages** in the navigation.
Select **New message** and select a subject category from the list. The list will tell you who the message is routed to in the practice.
Type your message in the message field.
(Optional) Select the attachment icon to include a file from your device.
Select **Send** to send it to the practice. It will appear in your list of messages after it is sent.
Replying to a message
Select the message you want to reply to from your inbox.
(Optional) Select the attachment icon to include a file from your device.
Type your response in the message field at the bottom of the thread.
Select **Send** to send it to the practice.
#### Viewing and managing appointments
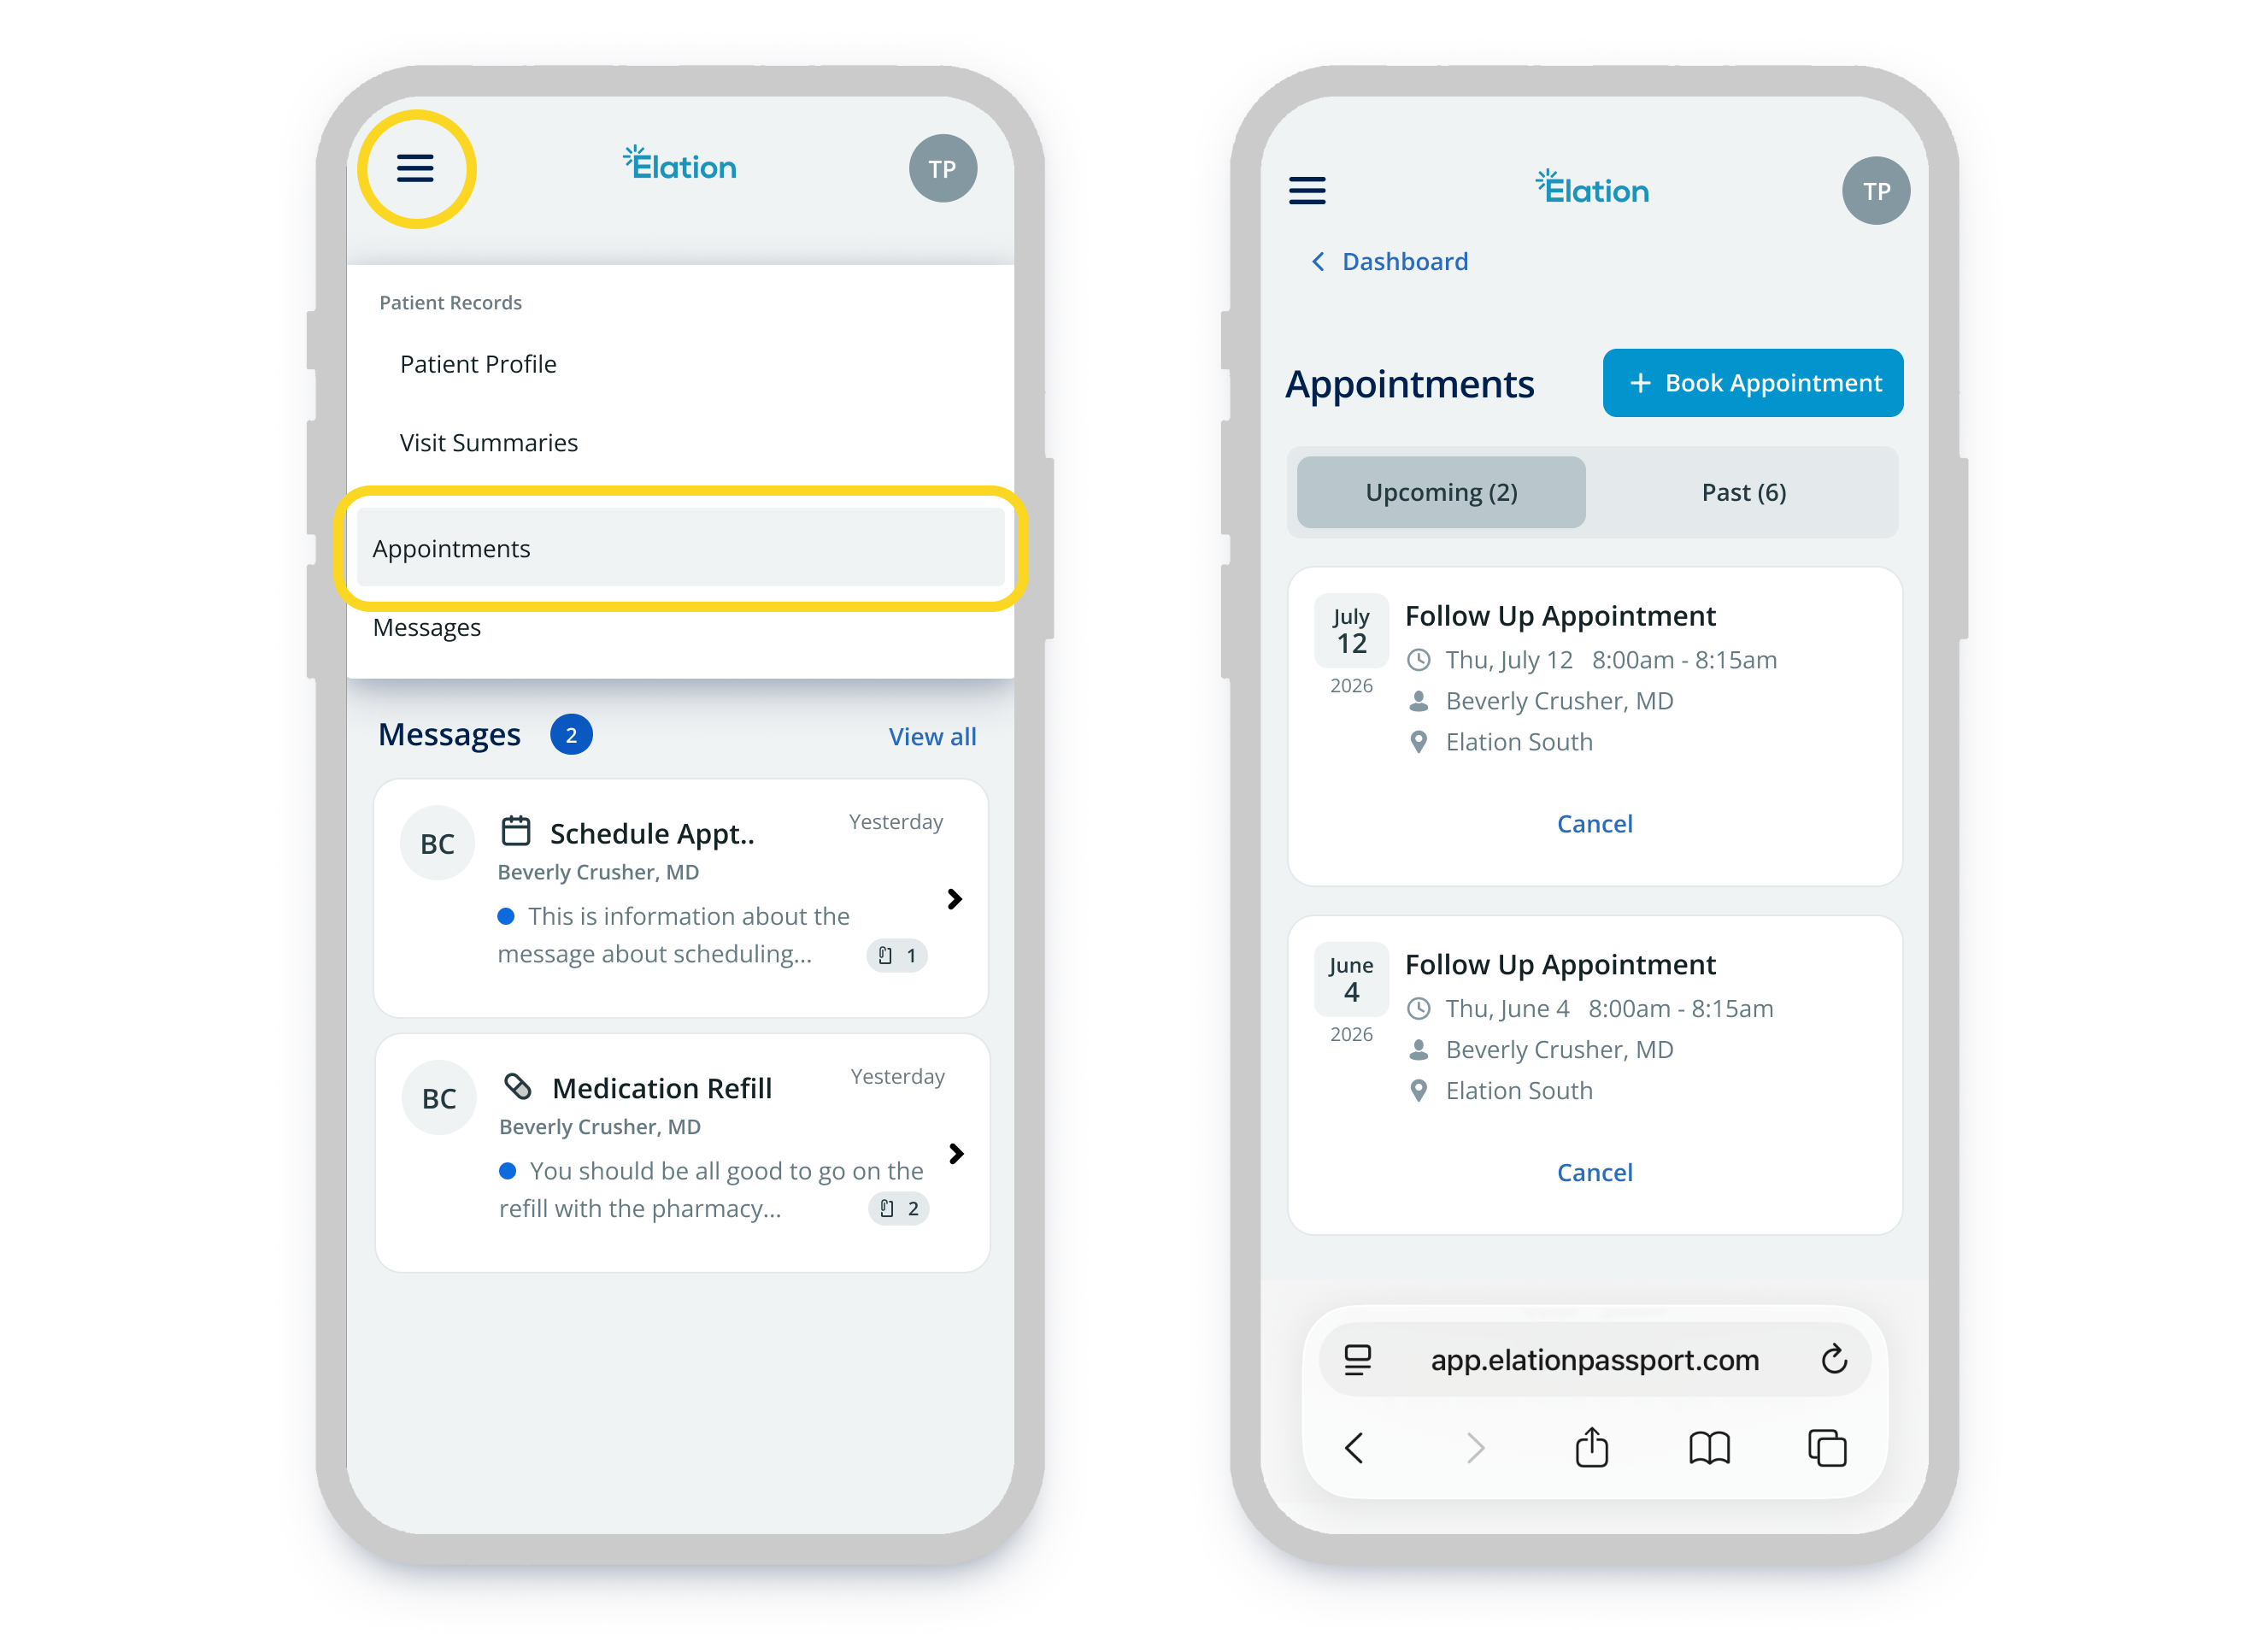
Select **Appointments** in the navigation to see scheduled visits.
Each appointment card shows the date and time, provider name, appointment type, and location.
Sending a new message
Select **Messages** in the navigation.
Select **New message** and select a subject category from the list. The list will tell you who the message is routed to in the practice.
Type your message in the message field.
(Optional) Select the attachment icon to include a file from your device.
Select **Send** to send it to the practice. It will appear in your list of messages after it is sent.
Replying to a message
Select the message you want to reply to from your inbox.
(Optional) Select the attachment icon to include a file from your device.
Type your response in the message field at the bottom of the thread.
Select **Send** to send it to the practice.
#### Viewing and managing appointments
Select **Appointments** in the navigation to see scheduled visits.
Each appointment card shows the date and time, provider name, appointment type, and location.
 Canceling an appointment
Select the appointment you want to cancel.
Select **Cancel appointment** and confirm when prompted.
If the practice has turned off patient self-cancellation, you will not be able to cancel appointments.
Booking an appointment
If the doctor's office offers self-booking appointments, select **Appointments** → **Book appointment** to book an appointment with them.
#### Reviewing health records
Viewing visit summaries
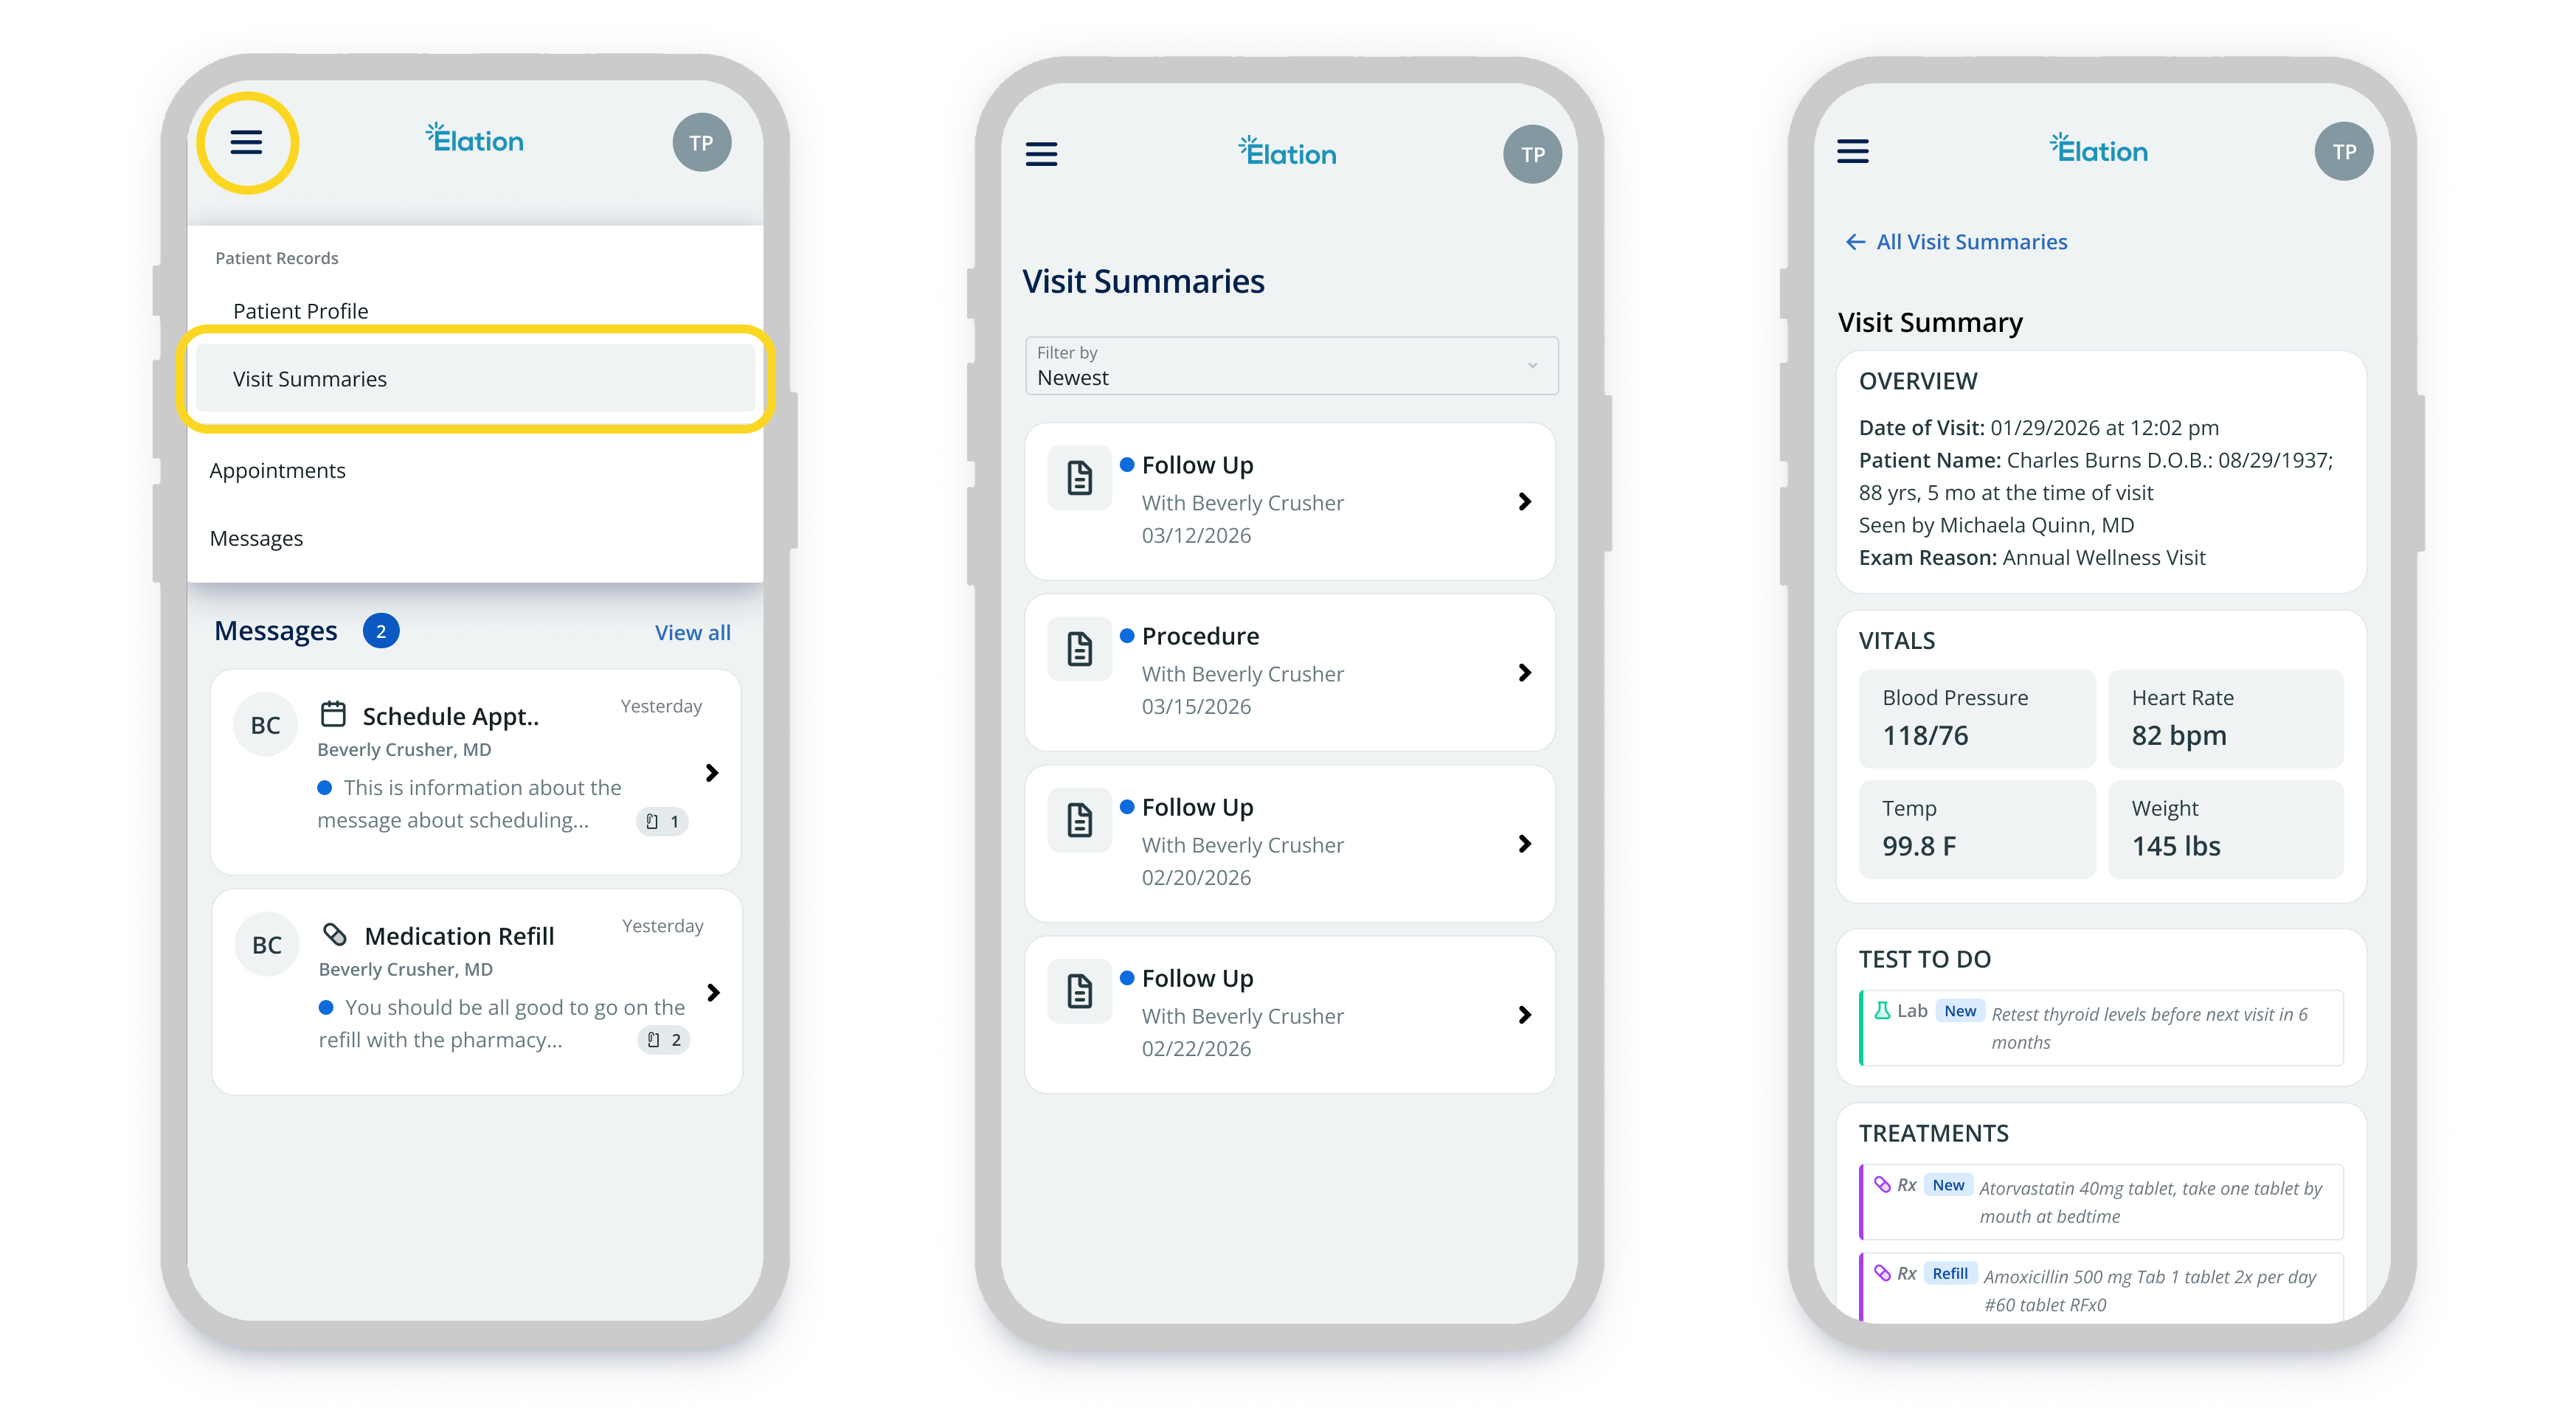
Select **Visit Summaries** to see signed visit notes from appointments, most recent first. Select a visit to read the full summary.
Canceling an appointment
Select the appointment you want to cancel.
Select **Cancel appointment** and confirm when prompted.
If the practice has turned off patient self-cancellation, you will not be able to cancel appointments.
Booking an appointment
If the doctor's office offers self-booking appointments, select **Appointments** → **Book appointment** to book an appointment with them.
#### Reviewing health records
Viewing visit summaries
Select **Visit Summaries** to see signed visit notes from appointments, most recent first. Select a visit to read the full summary.
 Viewing your Patient Profile
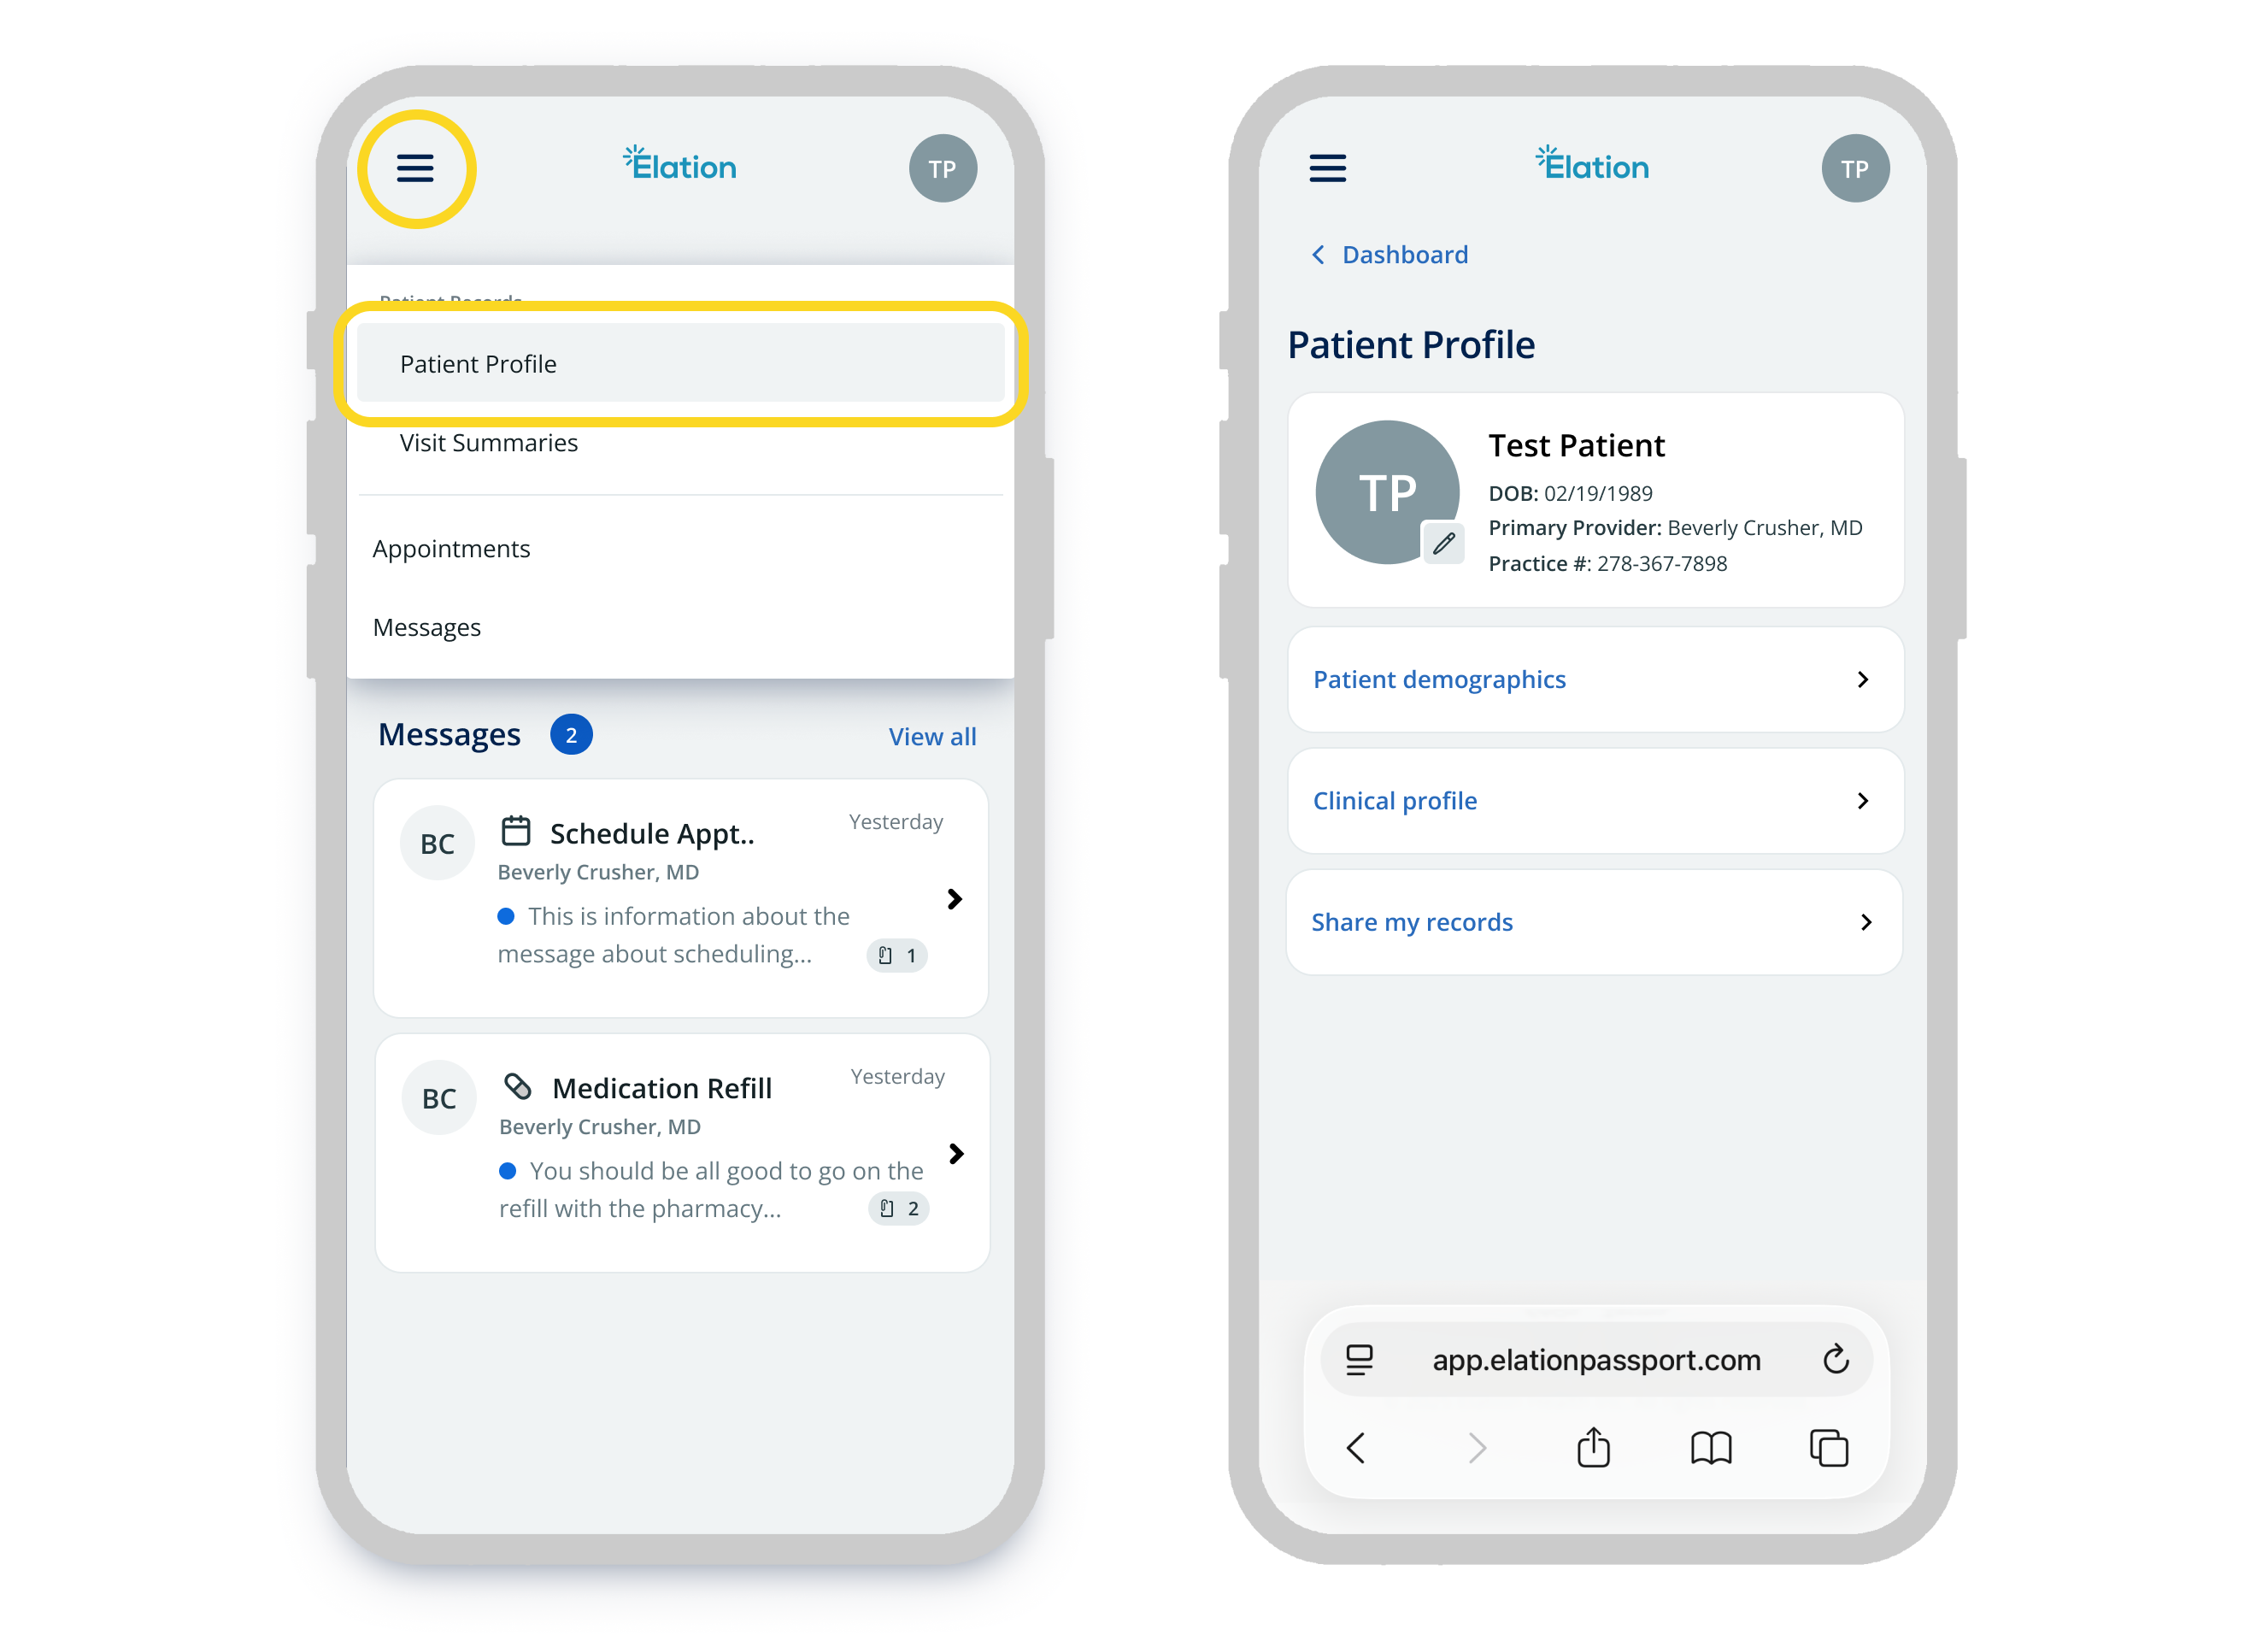
Select **Patient Profile** from the main navigation menu. From here you can access your patient demographics, clinical profile and share your records.
Viewing your Patient Profile
Select **Patient Profile** from the main navigation menu. From here you can access your patient demographics, clinical profile and share your records.
 Viewing the Clinical Profile
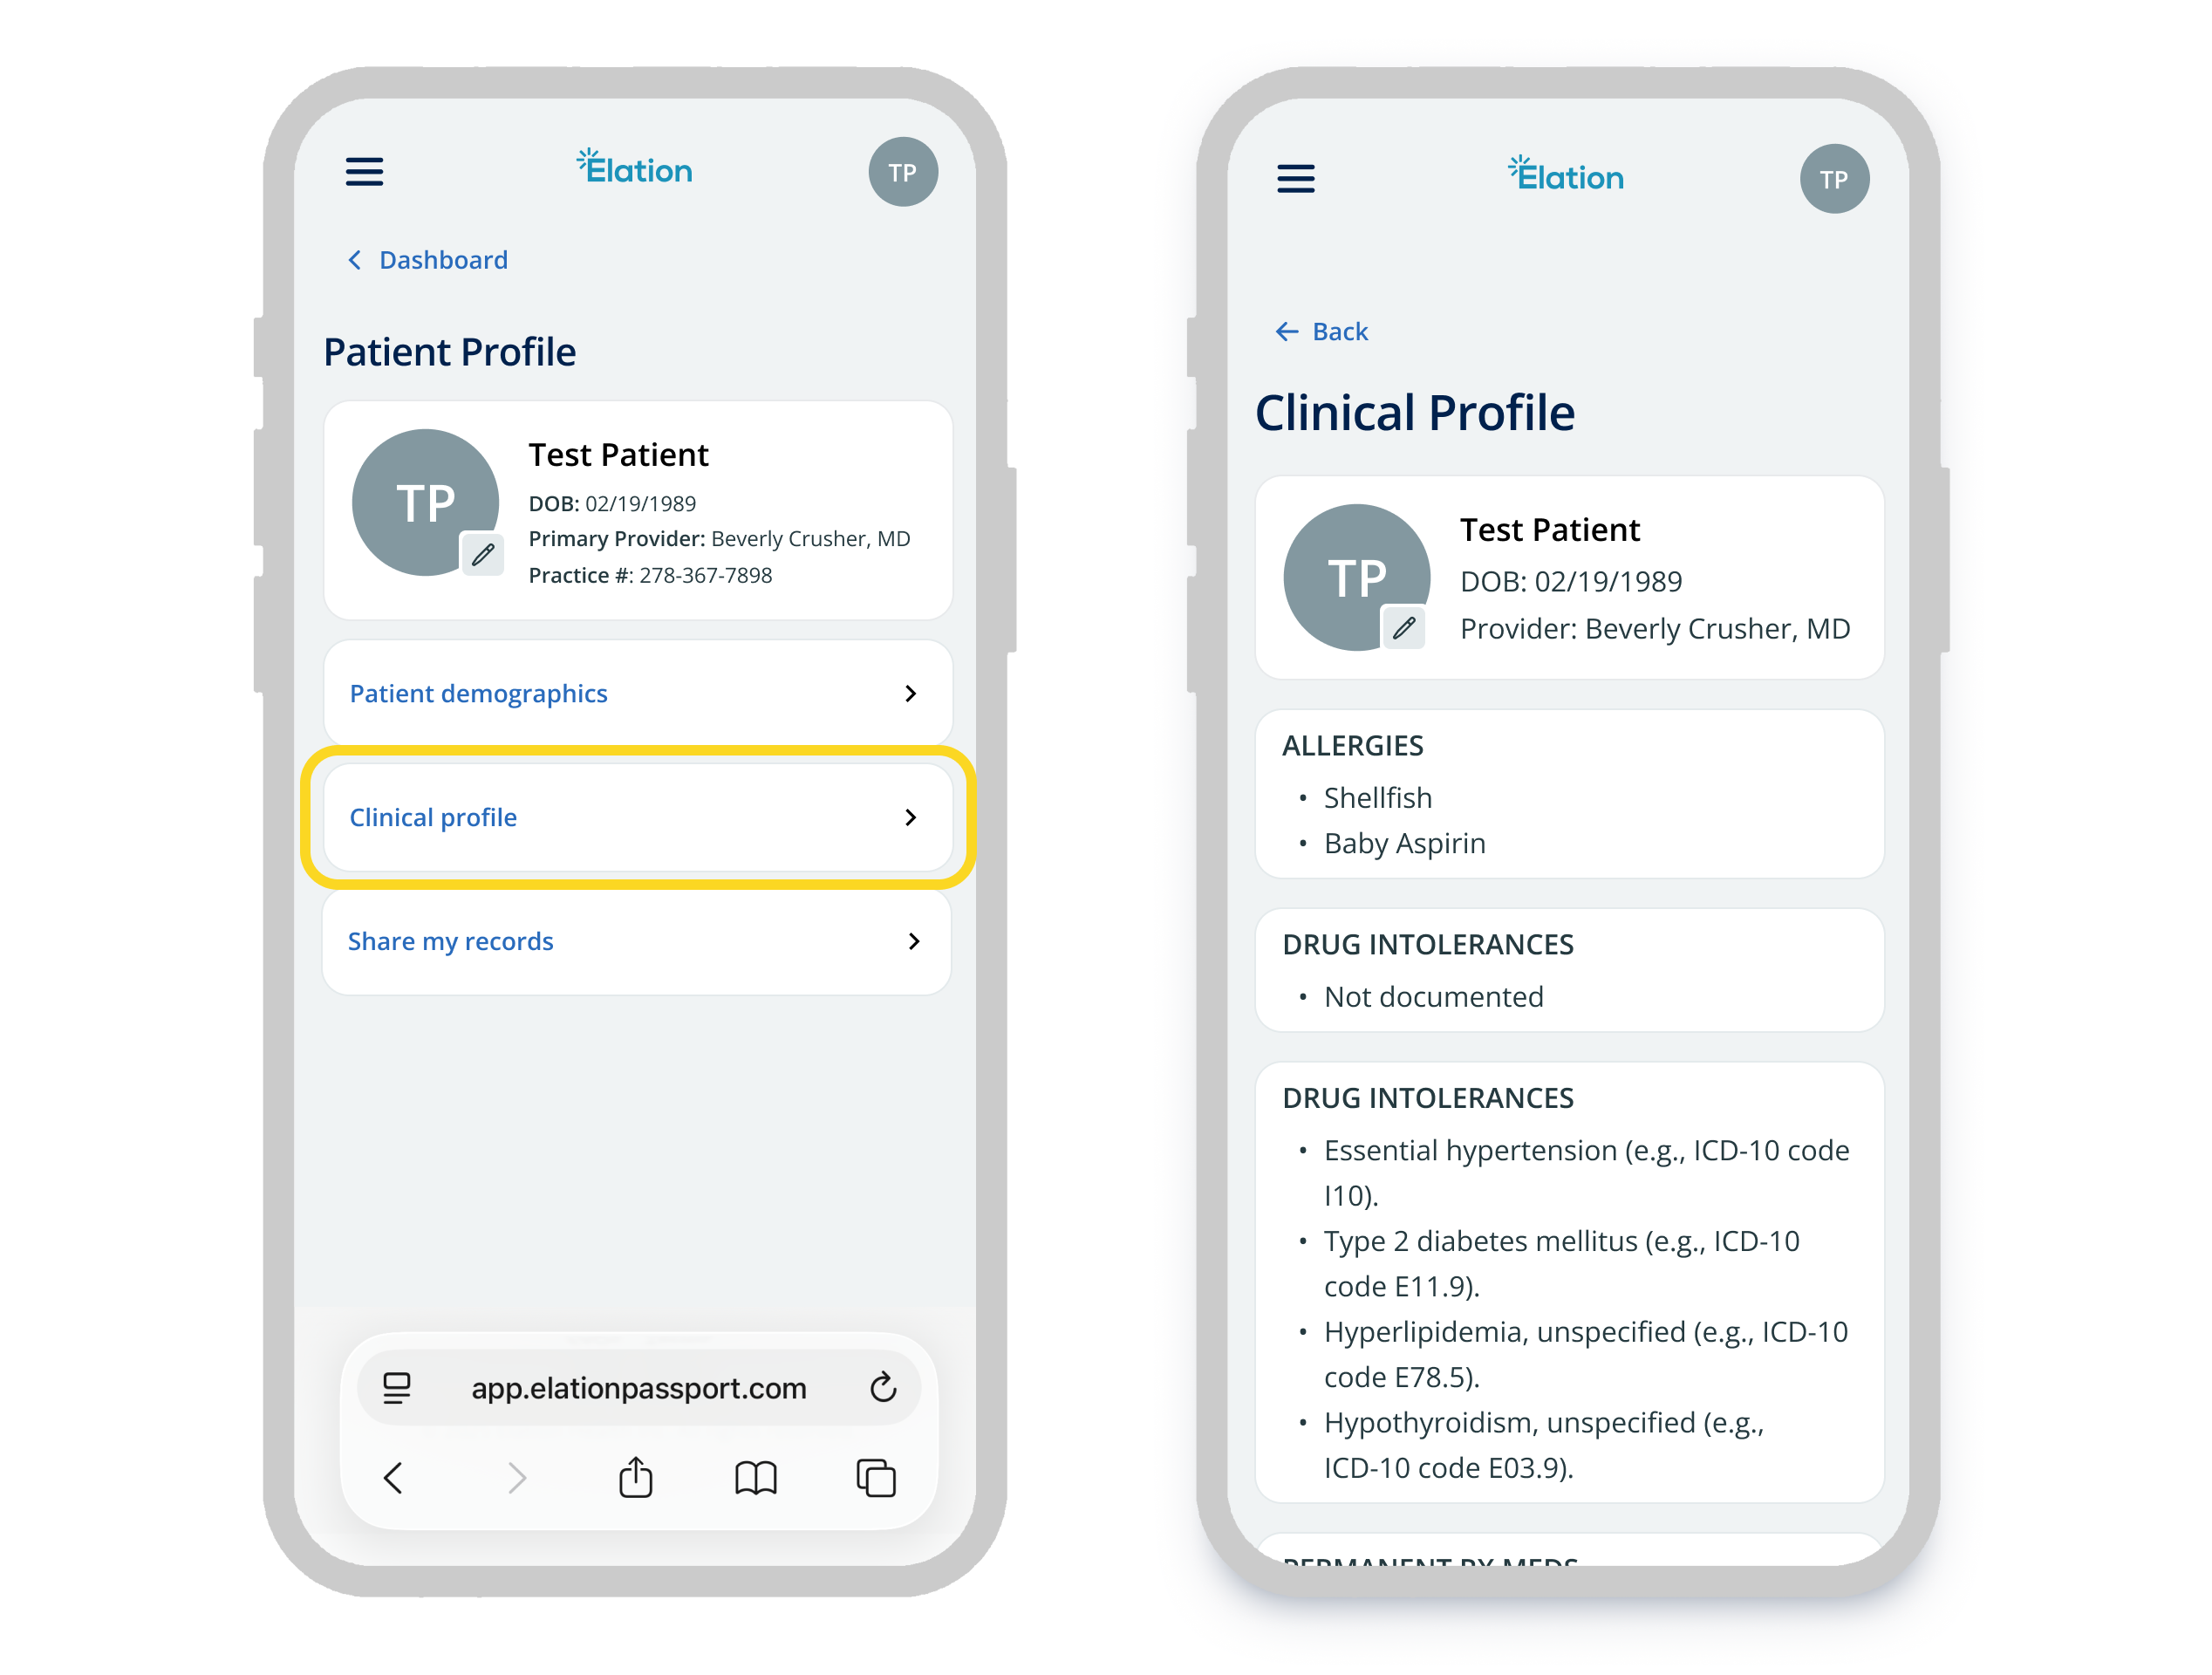
Select **Patient Profile** → **Clinical Profile** to see the following health information on file:
* Allergies
* Drug intolerances
* Permanent Rx Meds
* Permanent OTC Meds
* Immunizations
* Problem list
Viewing the Clinical Profile
Select **Patient Profile** → **Clinical Profile** to see the following health information on file:
* Allergies
* Drug intolerances
* Permanent Rx Meds
* Permanent OTC Meds
* Immunizations
* Problem list
 Sharing, downloading, faxing, or printing records
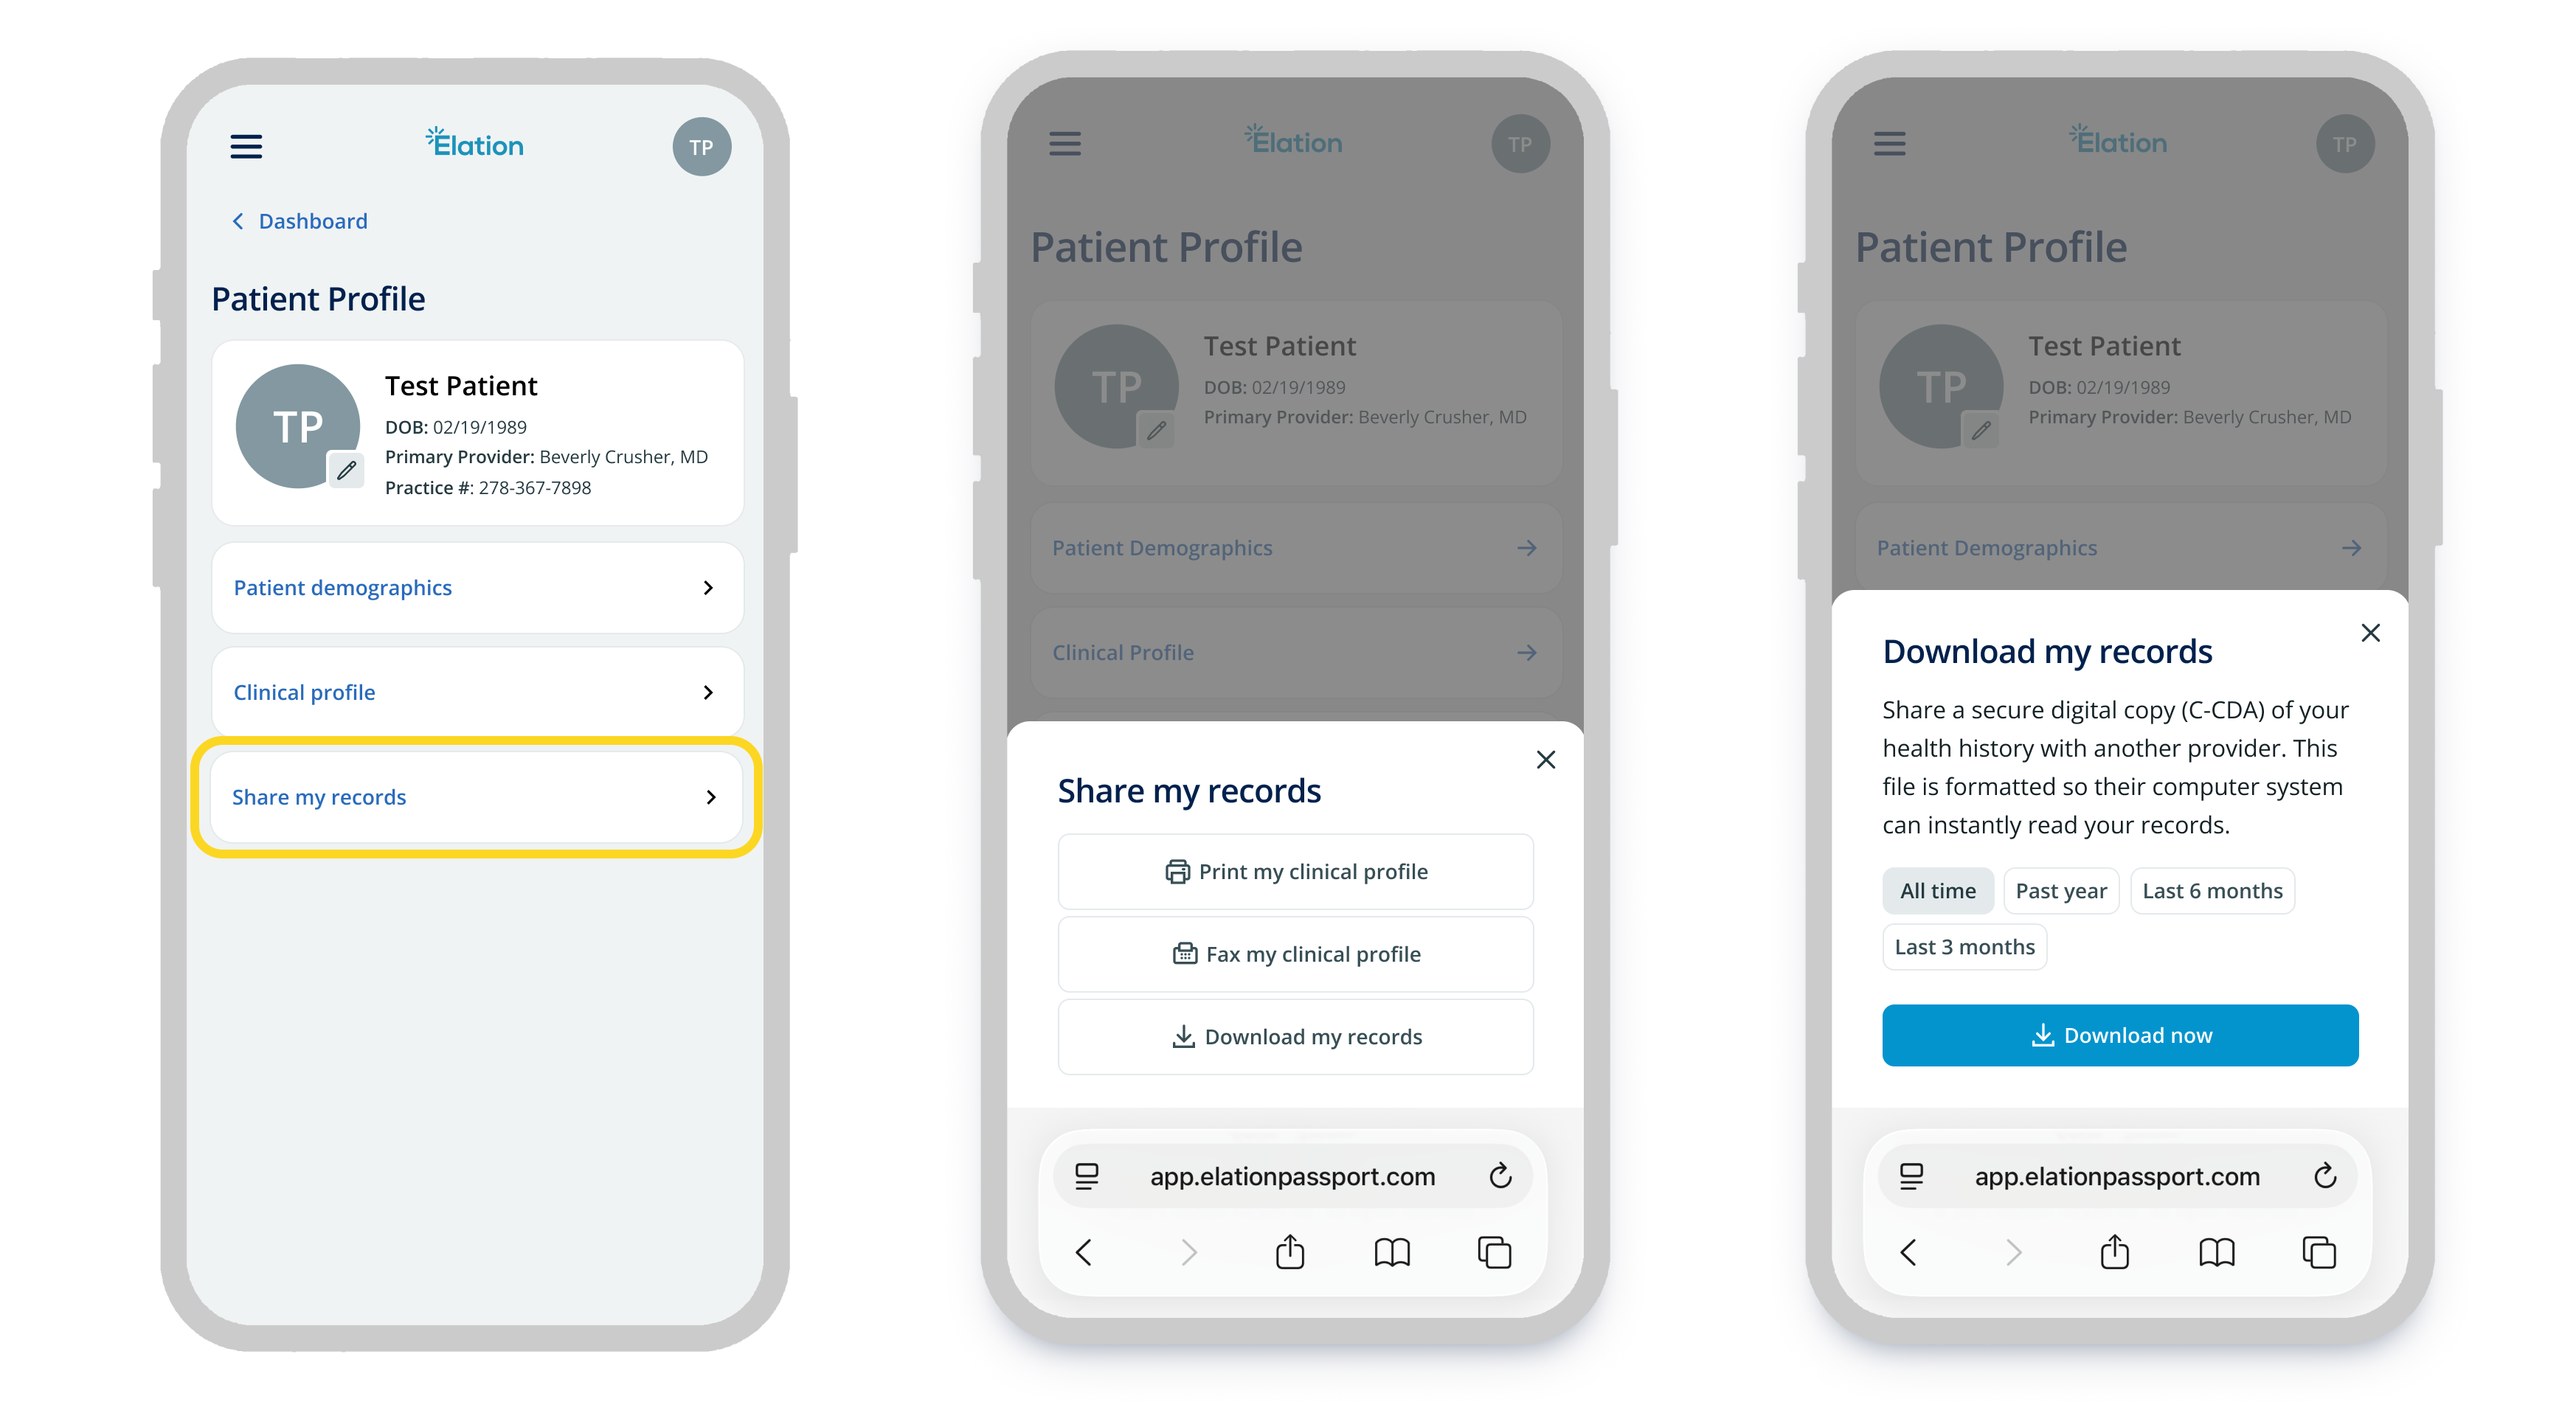
From **Patient Profile**, select **Share my records** to access the following options:
* **Download my records** — Save a copy of the clinical profile to your computer or device.
* **Email my records** — Send the clinical summary directly to another provider's email address.
* **Download or print immunization history** — Save or print just the immunization history as a separate document. Helpful for school enrollment, sports physicals, or sharing with another provider.
* **Fax my clinical profile** — Send the clinical profile to a fax number.
* **Print** — Print a copy of the clinical profile.
Sharing, downloading, faxing, or printing records
From **Patient Profile**, select **Share my records** to access the following options:
* **Download my records** — Save a copy of the clinical profile to your computer or device.
* **Email my records** — Send the clinical summary directly to another provider's email address.
* **Download or print immunization history** — Save or print just the immunization history as a separate document. Helpful for school enrollment, sports physicals, or sharing with another provider.
* **Fax my clinical profile** — Send the clinical profile to a fax number.
* **Print** — Print a copy of the clinical profile.
 #### Managing your profile and account
Viewing demographics
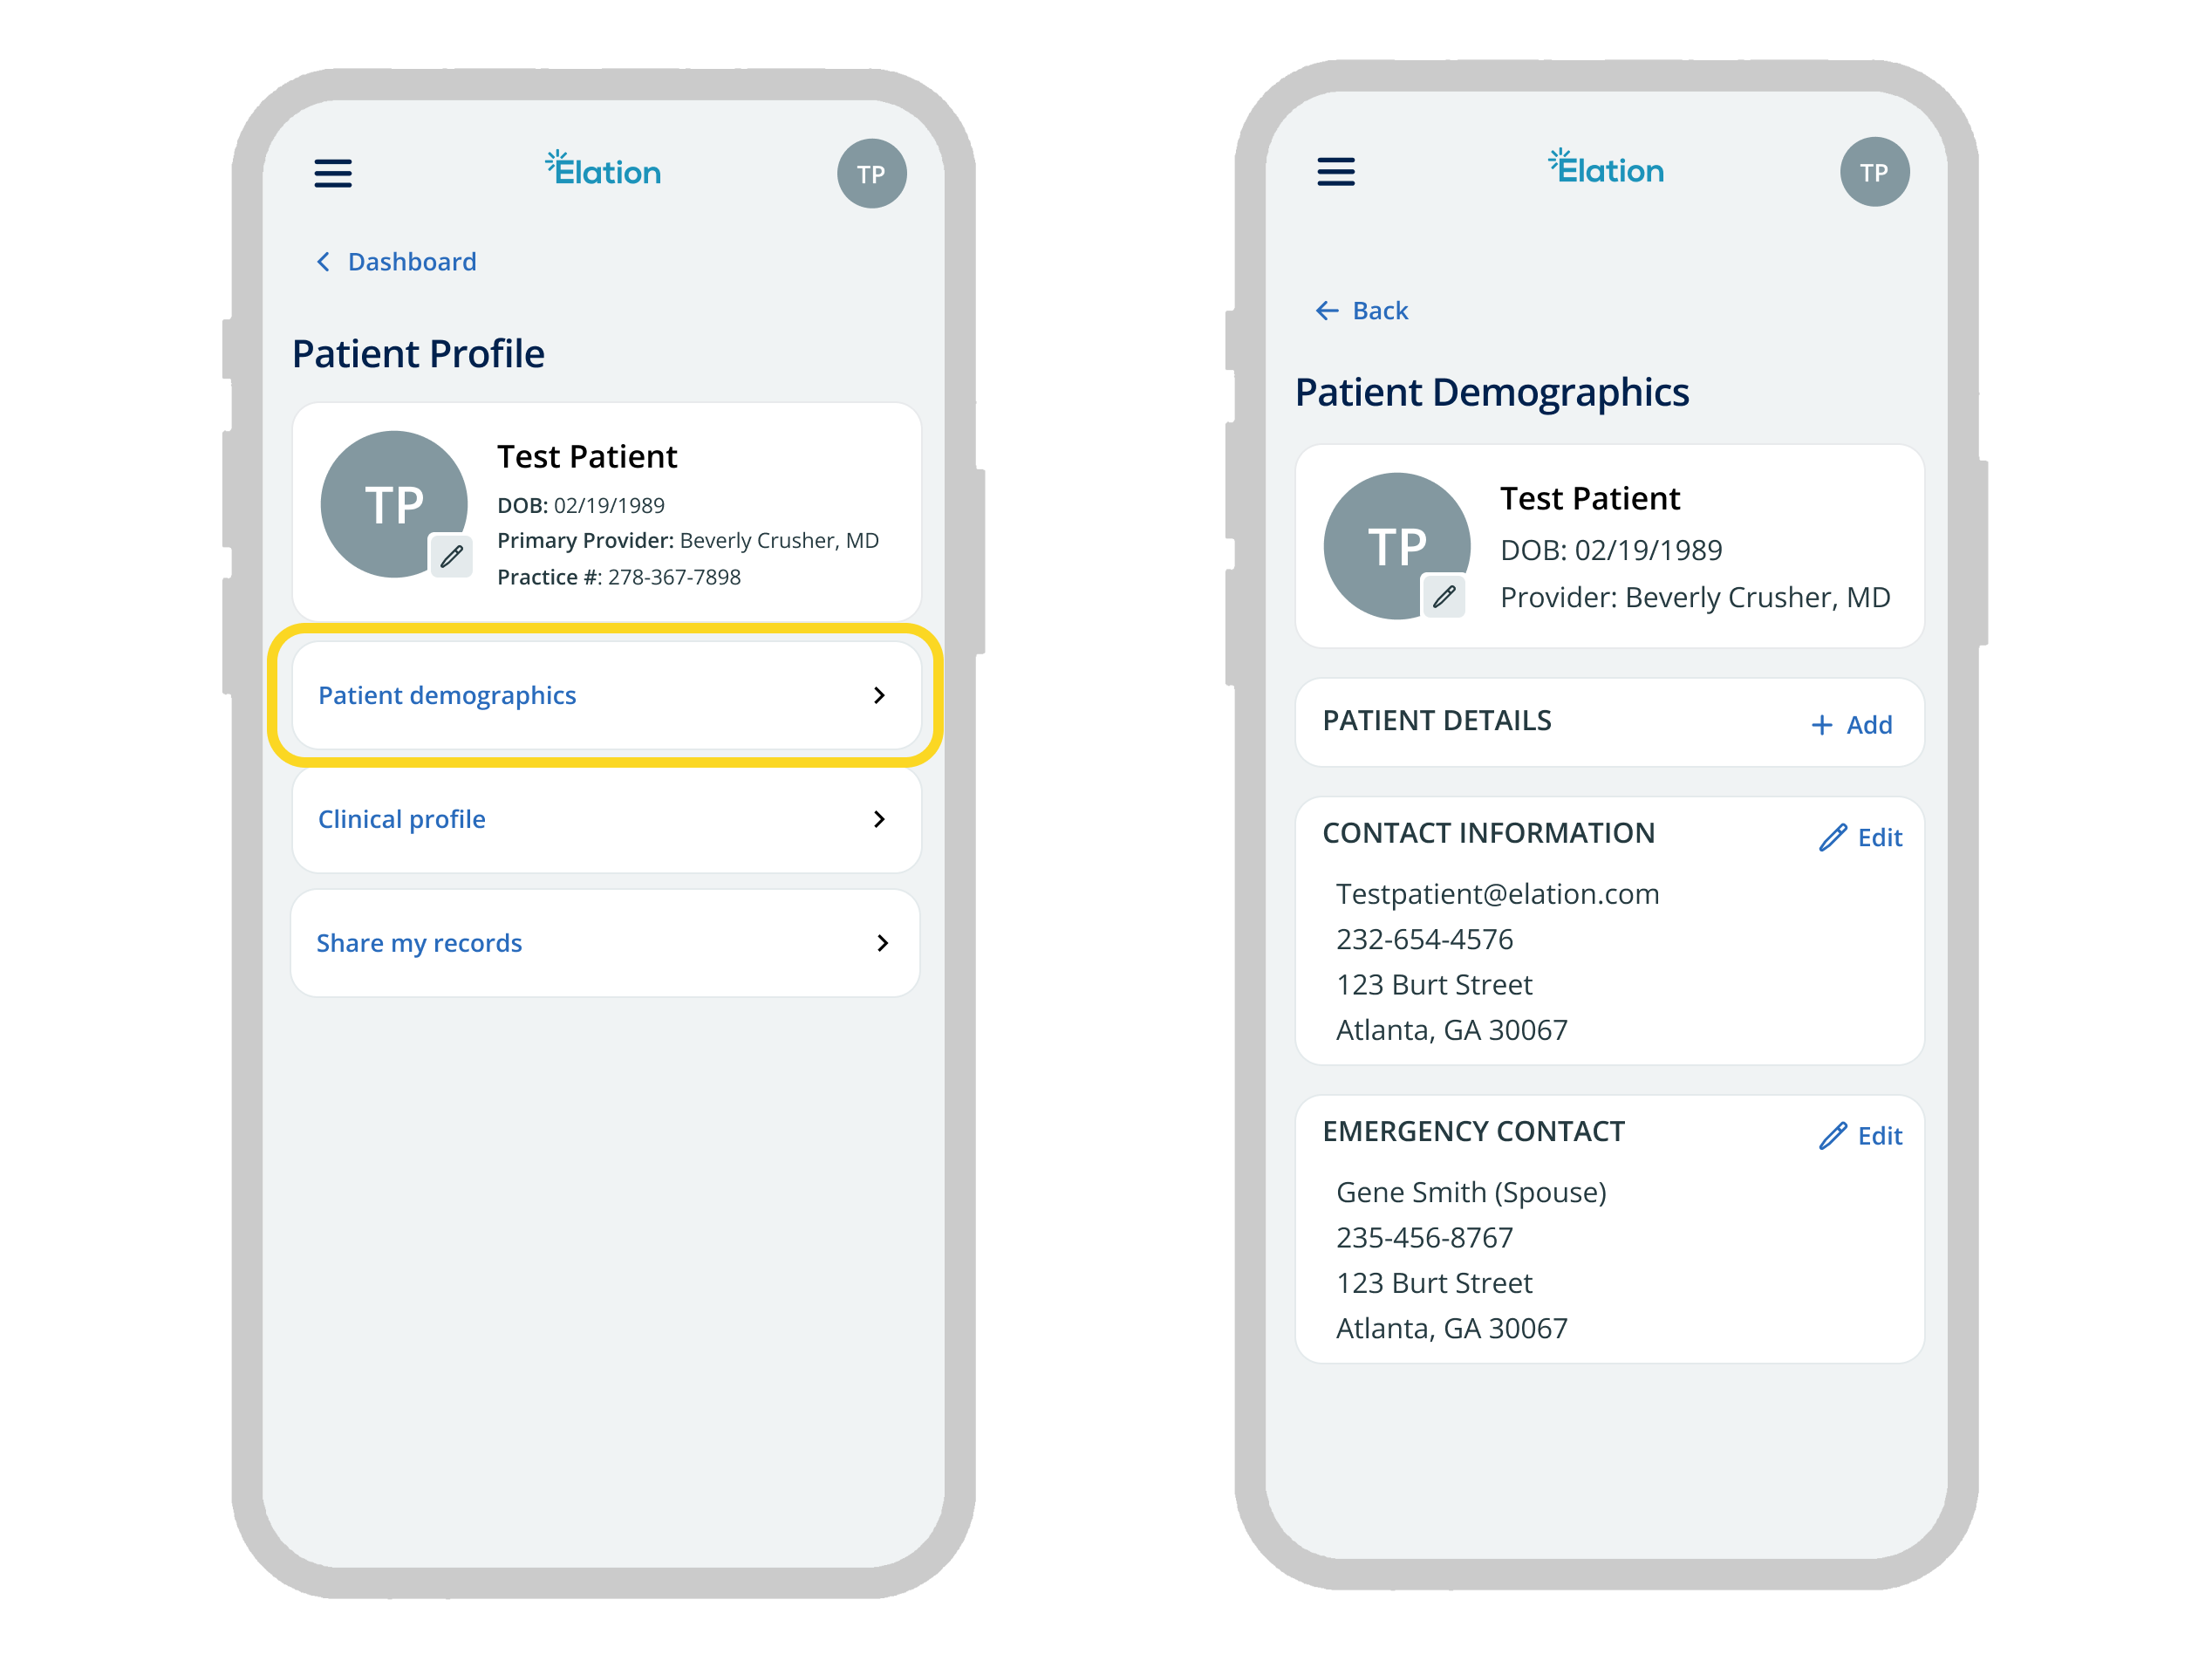
Select **Patient Profile** → **Patient Demographics** to view and update the following personal information for the chart:
* Contact Information
* Email
* Primary phone number and phone type
* Address
* Emergency Contact
* Patient Details
* Full Name (if different from legal) — the chosen name for the patient, shown throughout Passport and visible to the care team
* Pronouns
* Gender identity
* Sexual orientation
Any changes will be reflected in the chart right away. The patient's legal name, date of birth, and sex at birth can only be updated by the practice.
#### Managing your profile and account
Viewing demographics
Select **Patient Profile** → **Patient Demographics** to view and update the following personal information for the chart:
* Contact Information
* Email
* Primary phone number and phone type
* Address
* Emergency Contact
* Patient Details
* Full Name (if different from legal) — the chosen name for the patient, shown throughout Passport and visible to the care team
* Pronouns
* Gender identity
* Sexual orientation
Any changes will be reflected in the chart right away. The patient's legal name, date of birth, and sex at birth can only be updated by the practice.
 Viewing your account settings
Select **Account Settings** to manage the following:
* **Account Name** — The name the patient's care team sees when you message them. This is separate from the patient's **Legal name** and from the patient's **Full name** in Demographics. You set it during your first login and can change it anytime here.
* **Mobile Phone Number** — Add or update your mobile phone number.
* **Notification methods** — Choose whether to receive notifications by **Email** or **SMS**.
* **Email** — Change the email address you use to log in.
* **Password** — Change your login password.
* **Usage log** — View recent login activity on the account.
Viewing your account settings
Select **Account Settings** to manage the following:
* **Account Name** — The name the patient's care team sees when you message them. This is separate from the patient's **Legal name** and from the patient's **Full name** in Demographics. You set it during your first login and can change it anytime here.
* **Mobile Phone Number** — Add or update your mobile phone number.
* **Notification methods** — Choose whether to receive notifications by **Email** or **SMS**.
* **Email** — Change the email address you use to log in.
* **Password** — Change your login password.
* **Usage log** — View recent login activity on the account.
 ### Using the Elation Passport app
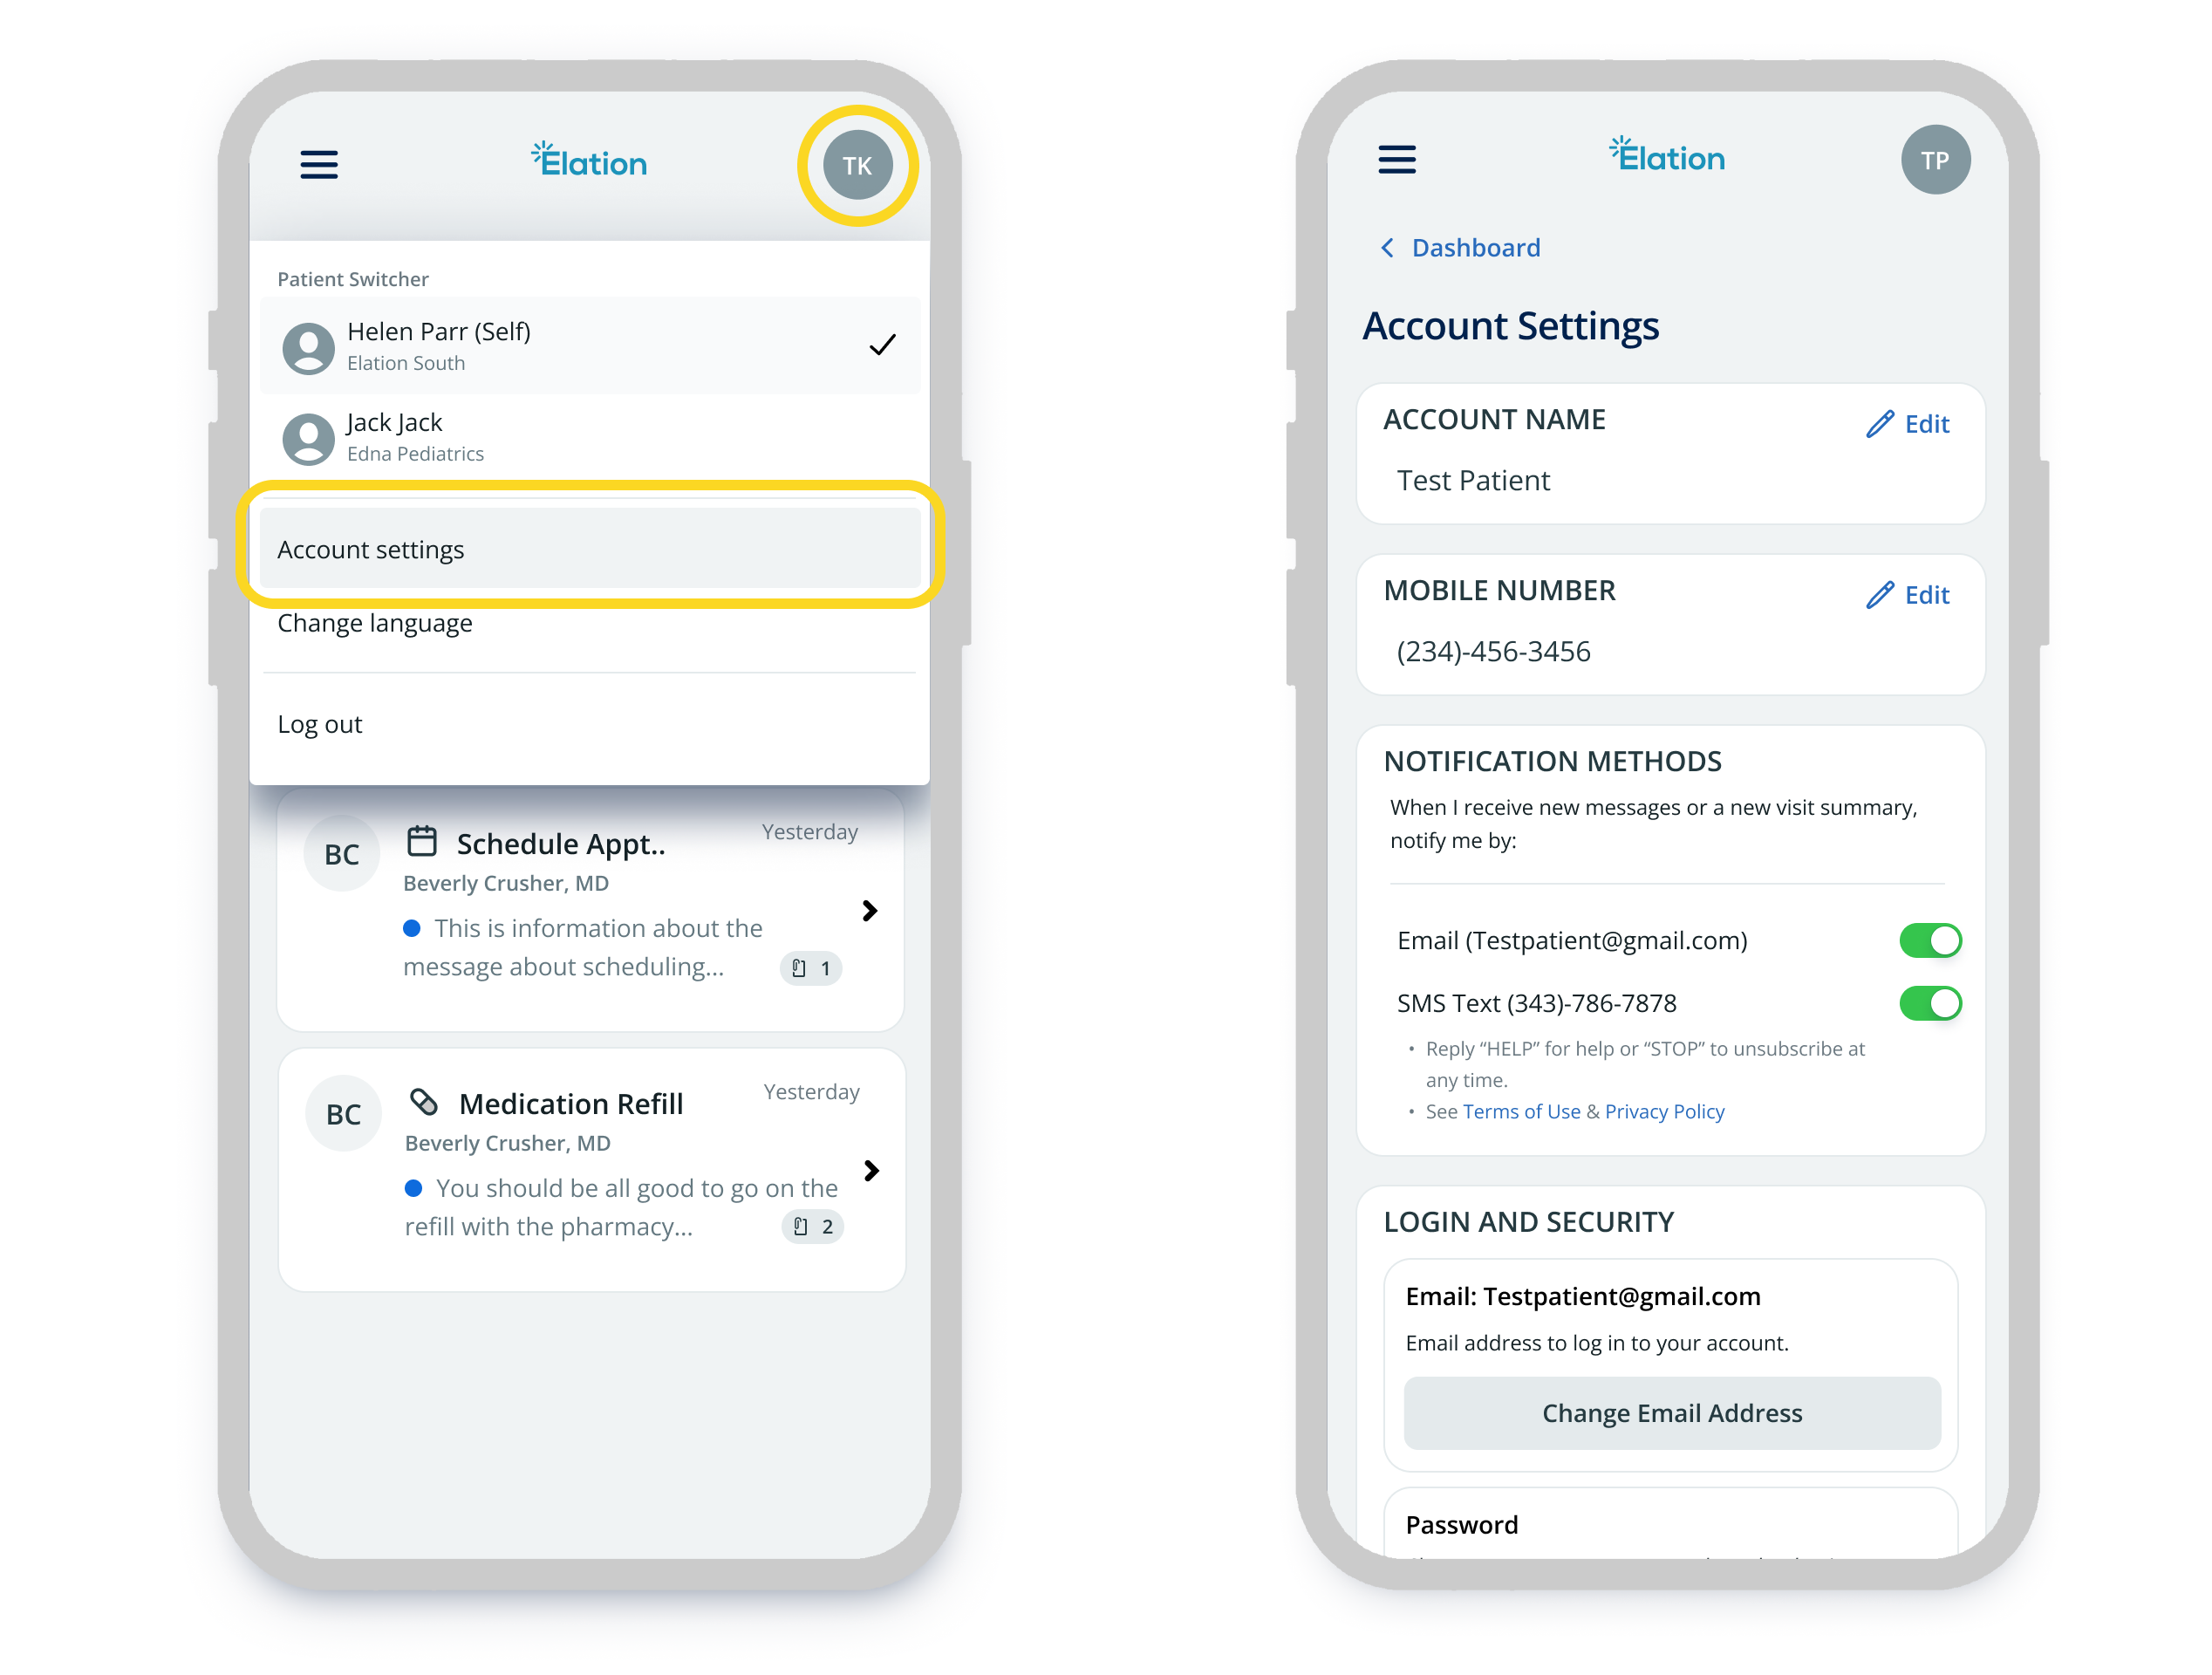
The Elation Passport app is a free download from the [App Store](https://apps.apple.com/us/app/elation-passport-for-patients/id1264836684) (iPhone) or [Google Play](https://play.google.com/store/apps/details?id=com.elation.patientpassportapp) (Android). It’s separate from the Passport web version — you don’t need to download anything to use the web version at [app.elationpassport.com](https://app.elationpassport.com).
The app generally provides the same experience as the web version — the same navigation, features, and steps described throughout this guide all apply.
#### Unique features of the Elation Passport app
A few things work differently or are only available in the downloaded app:
**Biometric login**
On iPhone, you can use Face ID or Touch ID to sign in instead of typing your password. On Android, you can use fingerprint authentication. After your first login, follow your device's prompt to enable biometric login, or turn it on in your device settings.
**Push notifications**
The app supports push notifications for new messages, visit summaries, and appointment reminders. You will be prompted to allow notifications when you first open the app. You can manage your notification preferences in **Account Settings** at any time.
**Privacy screen**
When you switch away from the app, your health information is automatically blurred in your device's app switcher to protect your privacy.
**Profile photo**
When updating your profile picture, you can take a photo directly with your device's camera or choose an existing photo from your library.
Switching between linked charts is only available from Patient Passport at [app.elationpassport.com](https://app.elationpassport.com) in a web browser.
Printing records or message threads is best done from Patient Passport in a web browser. Print behavior may vary by device in the app.
### Resetting your password
Open the following login page in a web browser: [https://app.elationpassport.com/patient-portal/login?next=/patient-portal/](https://app.elationpassport.com/patient-portal/login?next=/patient-portal/)\
\
OR open the Elation Passport App on your iOS on Android device.
Click **Forgot password?**.
Open the email and follow the link to create a new password.
## Tips
**Switching between charts.** If there is more than one chart linked to your Passport account, select your profile icon in the upper right corner of the header to switch between them. A checkmark shows your currently active chart. A banner at the top of the page confirms whose information you are viewing.
**Staying on top of notifications.** Each time the practice sends you a message or a new visit summary becomes available, you will receive a notification by your preferred contact method. Log in to view the new item. SMS notifications come from 36331 — save this number in your contacts to prevent messages from being flagged as spam.
**Updating the name that appears on your messages.** The name the care team sees when you send a message is your **Account Name** — it is separate from the patient's chosen name in Demographics. To update it, select your profile icon in the top right corner and go to **Account Settings**. If your old name is still showing, update your Account Name there to fix it.
**Account Name vs. chosen name.** Passport keeps two kinds of names separate. Your **Account Name** is how you sign your messages — it belongs to you as the person signed in. The **patient's chosen name** (the "Full Name (if different from legal)" field) belongs to the patient's chart, which may be you or someone you care for. Neither has to match a legal name. Update your Account Name in **Account Settings** and a patient's chosen name in **Patient Profile > Patient Demographics > Patient Details**.
## Frequently Asked Questions
See: [Frequently Asked Questions](https://help.elationhealth.com/articles/patient-passport-faq)
## Related Articles
* [Family and Friends Access](https://help.elationhealth.com/articles/patient-passport-family-and-friends-access)
### Using the Elation Passport app
The Elation Passport app is a free download from the [App Store](https://apps.apple.com/us/app/elation-passport-for-patients/id1264836684) (iPhone) or [Google Play](https://play.google.com/store/apps/details?id=com.elation.patientpassportapp) (Android). It’s separate from the Passport web version — you don’t need to download anything to use the web version at [app.elationpassport.com](https://app.elationpassport.com).
The app generally provides the same experience as the web version — the same navigation, features, and steps described throughout this guide all apply.
#### Unique features of the Elation Passport app
A few things work differently or are only available in the downloaded app:
**Biometric login**
On iPhone, you can use Face ID or Touch ID to sign in instead of typing your password. On Android, you can use fingerprint authentication. After your first login, follow your device's prompt to enable biometric login, or turn it on in your device settings.
**Push notifications**
The app supports push notifications for new messages, visit summaries, and appointment reminders. You will be prompted to allow notifications when you first open the app. You can manage your notification preferences in **Account Settings** at any time.
**Privacy screen**
When you switch away from the app, your health information is automatically blurred in your device's app switcher to protect your privacy.
**Profile photo**
When updating your profile picture, you can take a photo directly with your device's camera or choose an existing photo from your library.
Switching between linked charts is only available from Patient Passport at [app.elationpassport.com](https://app.elationpassport.com) in a web browser.
Printing records or message threads is best done from Patient Passport in a web browser. Print behavior may vary by device in the app.
### Resetting your password
Open the following login page in a web browser: [https://app.elationpassport.com/patient-portal/login?next=/patient-portal/](https://app.elationpassport.com/patient-portal/login?next=/patient-portal/)\
\
OR open the Elation Passport App on your iOS on Android device.
Click **Forgot password?**.
Open the email and follow the link to create a new password.
## Tips
**Switching between charts.** If there is more than one chart linked to your Passport account, select your profile icon in the upper right corner of the header to switch between them. A checkmark shows your currently active chart. A banner at the top of the page confirms whose information you are viewing.
**Staying on top of notifications.** Each time the practice sends you a message or a new visit summary becomes available, you will receive a notification by your preferred contact method. Log in to view the new item. SMS notifications come from 36331 — save this number in your contacts to prevent messages from being flagged as spam.
**Updating the name that appears on your messages.** The name the care team sees when you send a message is your **Account Name** — it is separate from the patient's chosen name in Demographics. To update it, select your profile icon in the top right corner and go to **Account Settings**. If your old name is still showing, update your Account Name there to fix it.
**Account Name vs. chosen name.** Passport keeps two kinds of names separate. Your **Account Name** is how you sign your messages — it belongs to you as the person signed in. The **patient's chosen name** (the "Full Name (if different from legal)" field) belongs to the patient's chart, which may be you or someone you care for. Neither has to match a legal name. Update your Account Name in **Account Settings** and a patient's chosen name in **Patient Profile > Patient Demographics > Patient Details**.
## Frequently Asked Questions
See: [Frequently Asked Questions](https://help.elationhealth.com/articles/patient-passport-faq)
## Related Articles
* [Family and Friends Access](https://help.elationhealth.com/articles/patient-passport-family-and-friends-access)