> ## Documentation Index
> Fetch the complete documentation index at: https://help.elationhealth.com/llms.txt
> Use this file to discover all available pages before exploring further.
# Calendar Guide - Using the Calendar for appointments & events
> This article describes how to use your Elation Calendar, including creating, managing and deleting patient appointments and events as well as how to utilize the different calendar views.
## Overview
### What is the Calendar?
The Calendar is a scheduling tool used to manage provider availability and patient appointments.
### What are the benefits of using the Calendar?
The Calendar offers visibility into a provider’s availability, helping reduce scheduling conflicts and support efficient, uninterrupted patient care.
### Scheduling features at a glance
Elation's Calendar includes several features to help you manage appointments efficiently:
| Feature | Description |
| -------------------------------- | ----------------------------------------------------------------------------------------------------------------------- |
| **Quick Reschedule** | Instantly move a single appointment to a new time slot based on provider availability. Staff-only feature. |
| **Recurring Appointments** | Schedule a series of ongoing patient visits in one workflow. Staff-only feature. |
| **Calendar Blocks** | Block off time when a provider is unavailable (e.g., lunch, meetings). Removes time from availability and Booking Site. |
| **Non-Blocking Calendar Events** | Show scheduling preferences on the calendar without blocking availability or Booking Site slots. |
| **Overlapping appointments** | Book multiple appointments in the same time slot when needed (double-booking). |
#### Quick Reschedule
[Quick Reschedule](#reschedule) streamlines the process of moving appointments by letting you instantly select a new date and time for a patient visit—all without leaving your current workflow.
* **Staff-only feature**: Only Staff Level Users and Provider Level Users can use Quick Reschedule.
* **Applies to single appointments only**: Quick Reschedule moves one appointment at a time. It does not apply to recurring appointment series.
* **Requires matching availability**: The feature displays the next six available time slots based on the appointment's **Location**, **Duration**, and the provider's configured **Availability**.
* If no available times appear, verify the provider's availability settings. See the [Calendar & Booking Site Guide – Enhanced Provider availability by Practice Location & Appointment Type](/articles/Calendar-Booking-Site-Guide-Enhanced-Provider-availability-by-Practice-Location-Appointment-Type) article for instructions on configuring Provider Availability.
#### Recurring Appointments (internal only)
The Recurring Appointments feature lets you schedule a series of ongoing patient visits—such as for behavioral health, chronic care management, or multi-visit treatment plans—in just a few steps. A recurring icon appears next to Recurring Appointments for easy identification.
Patients cannot book recurring appointments through the Booking Site.
The latest possible end date for a recurring appointment series is 18 months from the date it is created, or a maximum of 52 recurrences.
For full instructions on creating, editing, and deleting recurring appointment series—including icon semantics and series behavior—see the [Calendar Guide – Scheduling recurring patient appointments](/articles/recurring-patient-appointments) article.
#### Calendar Blocks vs Non-Blocking Calendar Events
Elation offers two types of **Other Events** to help you manage your schedule:
| Event Type | Blocks Calendar availability? | Blocks Booking Site availability? | Visible to patients? | Visible in reports? |
| ------------------------------- | ----------------------------- | --------------------------------- | -------------------- | ------------------------------ |
| **Calendar Block** | Yes | Yes | No | Yes (as non-appointment event) |
| **Non-Blocking Calendar Event** | No | No | No | Yes (as non-appointment event) |
##### Calendar Blocks
Calendar Blocks let you block off time when a provider isn't available for appointments, like during lunch or a meeting. Calendar Blocks prevent that time slot from appearing as available when you use Quick Reschedule, book other appointments, or when patients book via the Booking Site. [Click here to jump to the instructions for adding a calendar block](#add_events).
##### Non-Blocking Calendar Events
Non-Blocking Calendar Events (also called non-blocking placeholders) let you show additional availability preferences on the calendar without preventing you from scheduling appointments or other calendar blocks during that time. Patients can still book appointments during those times via the Booking Site if the provider's main availability preferences allow it.
Non-Blocking Calendar Events are **internal preference indicators only** and do not remove times from availability or the Booking Site.
Best-practice examples
* **New patients only** – Mark morning slots to remind staff to prioritize new patient bookings during those times.
* **Telehealth preferred** – Indicate that a provider prefers virtual visits during certain hours without blocking in-person appointments.
* **Lab-only window** – Reserve time for lab draws while still allowing other appointments if needed.
##### Example scenario
Dr. Jones is available from 10am to 5pm on Fridays for all appointments, but she would prefer the staff to book all of her appointments before 3pm when possible. This way she might be able to leave the office earlier on Fridays. Staff can create a Non-Blocking Calendar Event from 3pm to 5pm titled **Ask Dr. Jones before booking** to communicate this preference without blocking the time. karin
 #### Overlapping appointments (double-booking)
Elation allows you to book multiple appointments in the same time slot when needed. The most recently booked appointment will appear on top.
The Booking Site does not allow patients to double-book the same time slot. Each appointment slot can only be booked by one patient through the Booking Site.
Elation does not currently offer a formal waitlist feature. To manage patients waiting for earlier appointments, consider using [Non-Blocking Calendar Events](#non-blocking_events) as internal notes or tracking patients manually. If conflicting appointments are detected while creating a recurring appointment, the conflicting dates will be listed at the top of the create appointment dialog. Resolve each conflict separately after the series is created.
## Setup
Start by reviewing the [Calendar Guide- How to set up the provider Calendar](/articles/calendar-and-booking-settings) article to explore the configuration options available for optimizing each Provider’s Calendar experience and workflows.
## Workflow Instructions
### Viewing the Calendar
The Calendar is designed to provide an intuitive experience for managing appointments and providing visibility into each Provider Level User’s schedule.
#### Default behavior
* If you are a Provider Level User the Calendar will always default to showing your Calendar.
* If you are a Staff Level User,
* If the practice only has one Provider Level User, the Calendar will always default to showing that Provider's Calendar.
* If the practice has multiple Provider-level users, the Calendar will default to displaying your assigned Default Physician, as specified in your Account Details settings.
#### Calendar actions
* Select which Provider's schedule you want to view by clicking on the Provider dropdown (for multi-provider practices).
* Utilize the date picker or arrows at the top to navigate to different days.
* Click **Today** to see the schedule for the day.
* Click **Print** to print the Standard daily schedule.
* Search for a patient's appointment history.
* Add appointments, calendar blocks or placeholder events.
* Manage appointments, calendar blocks or placeholder events.
To support both quick schedule checks and more detailed calendar management, the Calendar offers two distinct views, outlined below.
Appointments marked as **Virtual** will display a video icon in the appointment box, making it easy to distinguish virtual from in-person visits at a glance on the Elation Calendar.
#### Standard View vs Expanded View
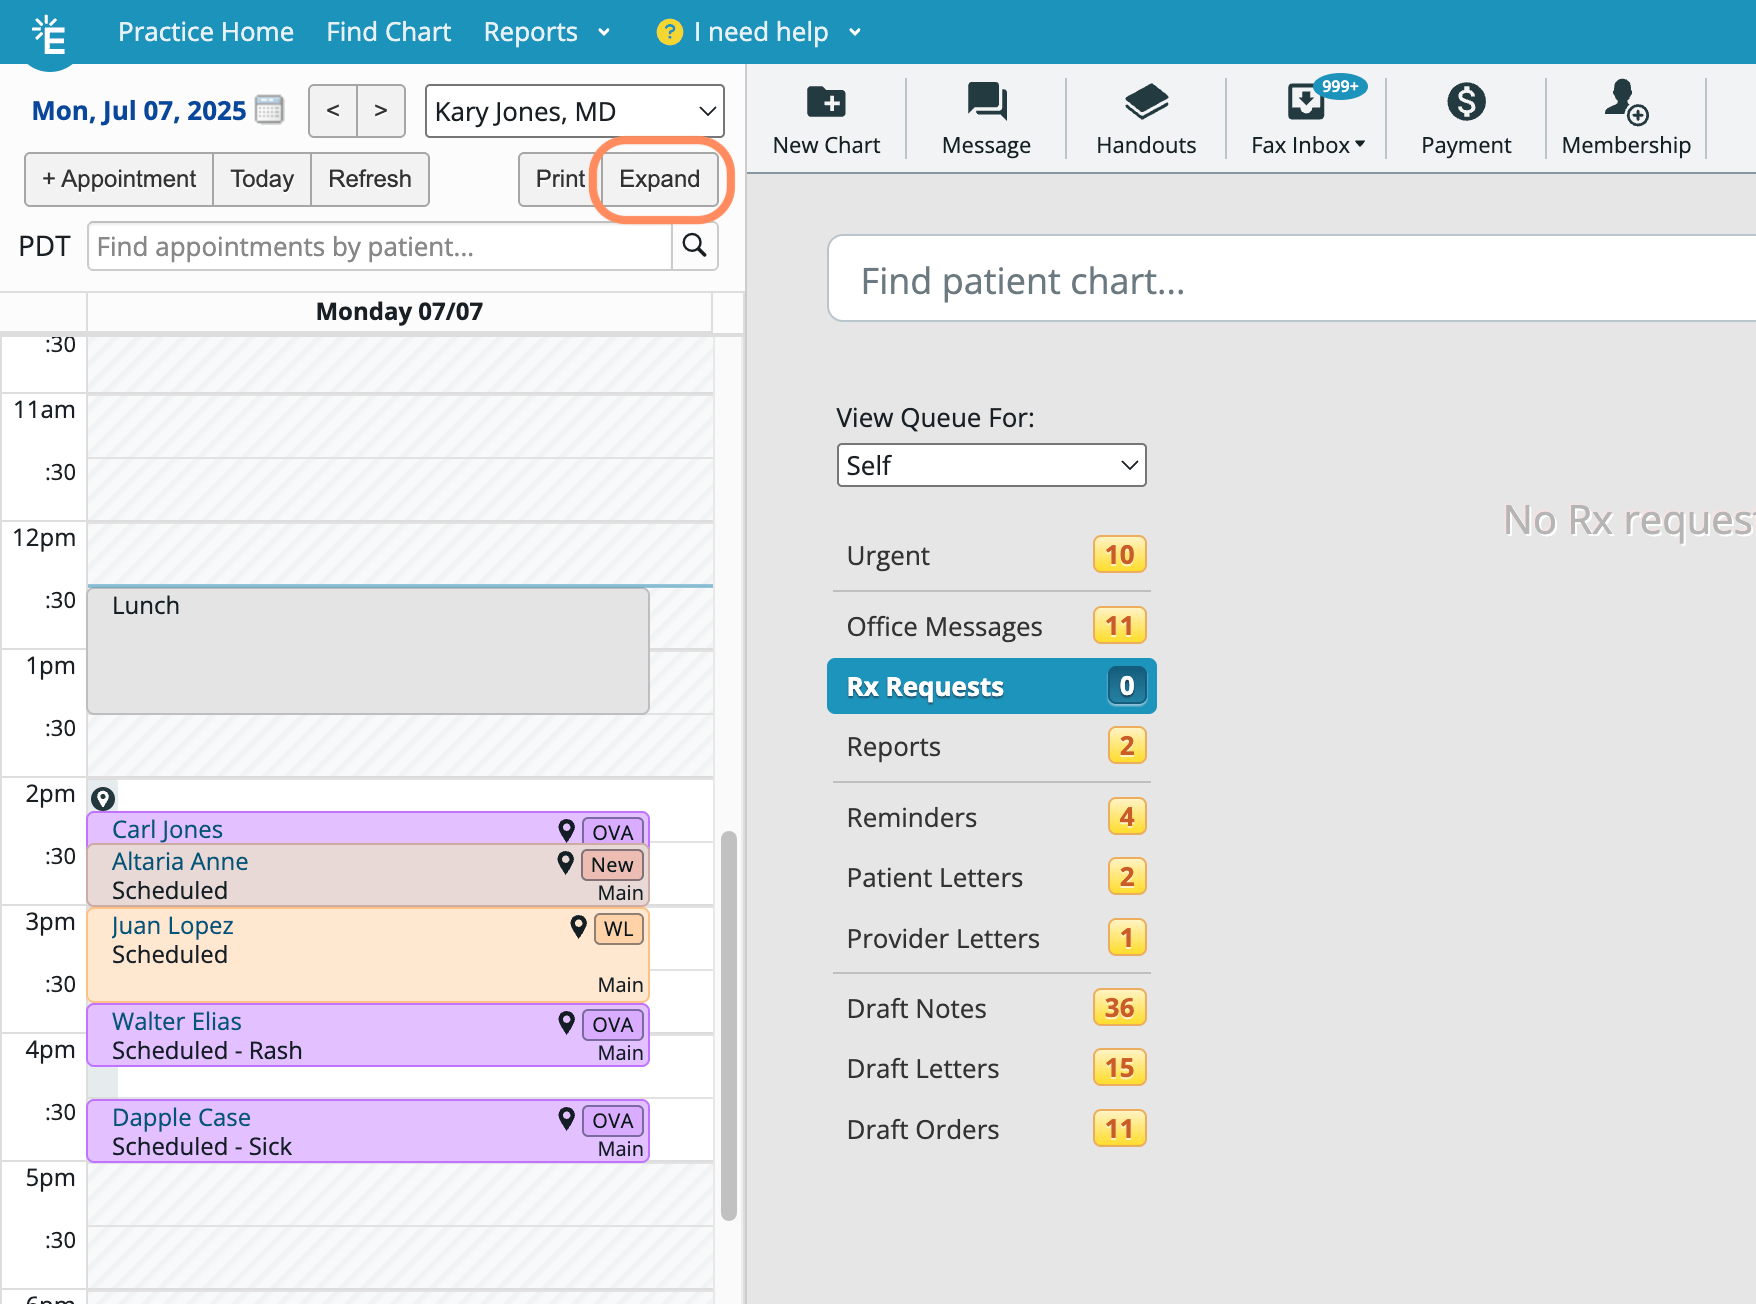
The Standard View is the daily schedule for a single Provider Level User.
Click **Expand** to view the schedule for multiple days or multiple Providers.
#### Overlapping appointments (double-booking)
Elation allows you to book multiple appointments in the same time slot when needed. The most recently booked appointment will appear on top.
The Booking Site does not allow patients to double-book the same time slot. Each appointment slot can only be booked by one patient through the Booking Site.
Elation does not currently offer a formal waitlist feature. To manage patients waiting for earlier appointments, consider using [Non-Blocking Calendar Events](#non-blocking_events) as internal notes or tracking patients manually. If conflicting appointments are detected while creating a recurring appointment, the conflicting dates will be listed at the top of the create appointment dialog. Resolve each conflict separately after the series is created.
## Setup
Start by reviewing the [Calendar Guide- How to set up the provider Calendar](/articles/calendar-and-booking-settings) article to explore the configuration options available for optimizing each Provider’s Calendar experience and workflows.
## Workflow Instructions
### Viewing the Calendar
The Calendar is designed to provide an intuitive experience for managing appointments and providing visibility into each Provider Level User’s schedule.
#### Default behavior
* If you are a Provider Level User the Calendar will always default to showing your Calendar.
* If you are a Staff Level User,
* If the practice only has one Provider Level User, the Calendar will always default to showing that Provider's Calendar.
* If the practice has multiple Provider-level users, the Calendar will default to displaying your assigned Default Physician, as specified in your Account Details settings.
#### Calendar actions
* Select which Provider's schedule you want to view by clicking on the Provider dropdown (for multi-provider practices).
* Utilize the date picker or arrows at the top to navigate to different days.
* Click **Today** to see the schedule for the day.
* Click **Print** to print the Standard daily schedule.
* Search for a patient's appointment history.
* Add appointments, calendar blocks or placeholder events.
* Manage appointments, calendar blocks or placeholder events.
To support both quick schedule checks and more detailed calendar management, the Calendar offers two distinct views, outlined below.
Appointments marked as **Virtual** will display a video icon in the appointment box, making it easy to distinguish virtual from in-person visits at a glance on the Elation Calendar.
#### Standard View vs Expanded View
The Standard View is the daily schedule for a single Provider Level User.
Click **Expand** to view the schedule for multiple days or multiple Providers.
 The Expanded View provides a more detailed look at the Calendar by day or week, and allows you to view multiple provider schedules side by side. Select **All Providers** to see all schedules at once for easier practice management. To return to the Standard View, click the **X** in the top-right corner.
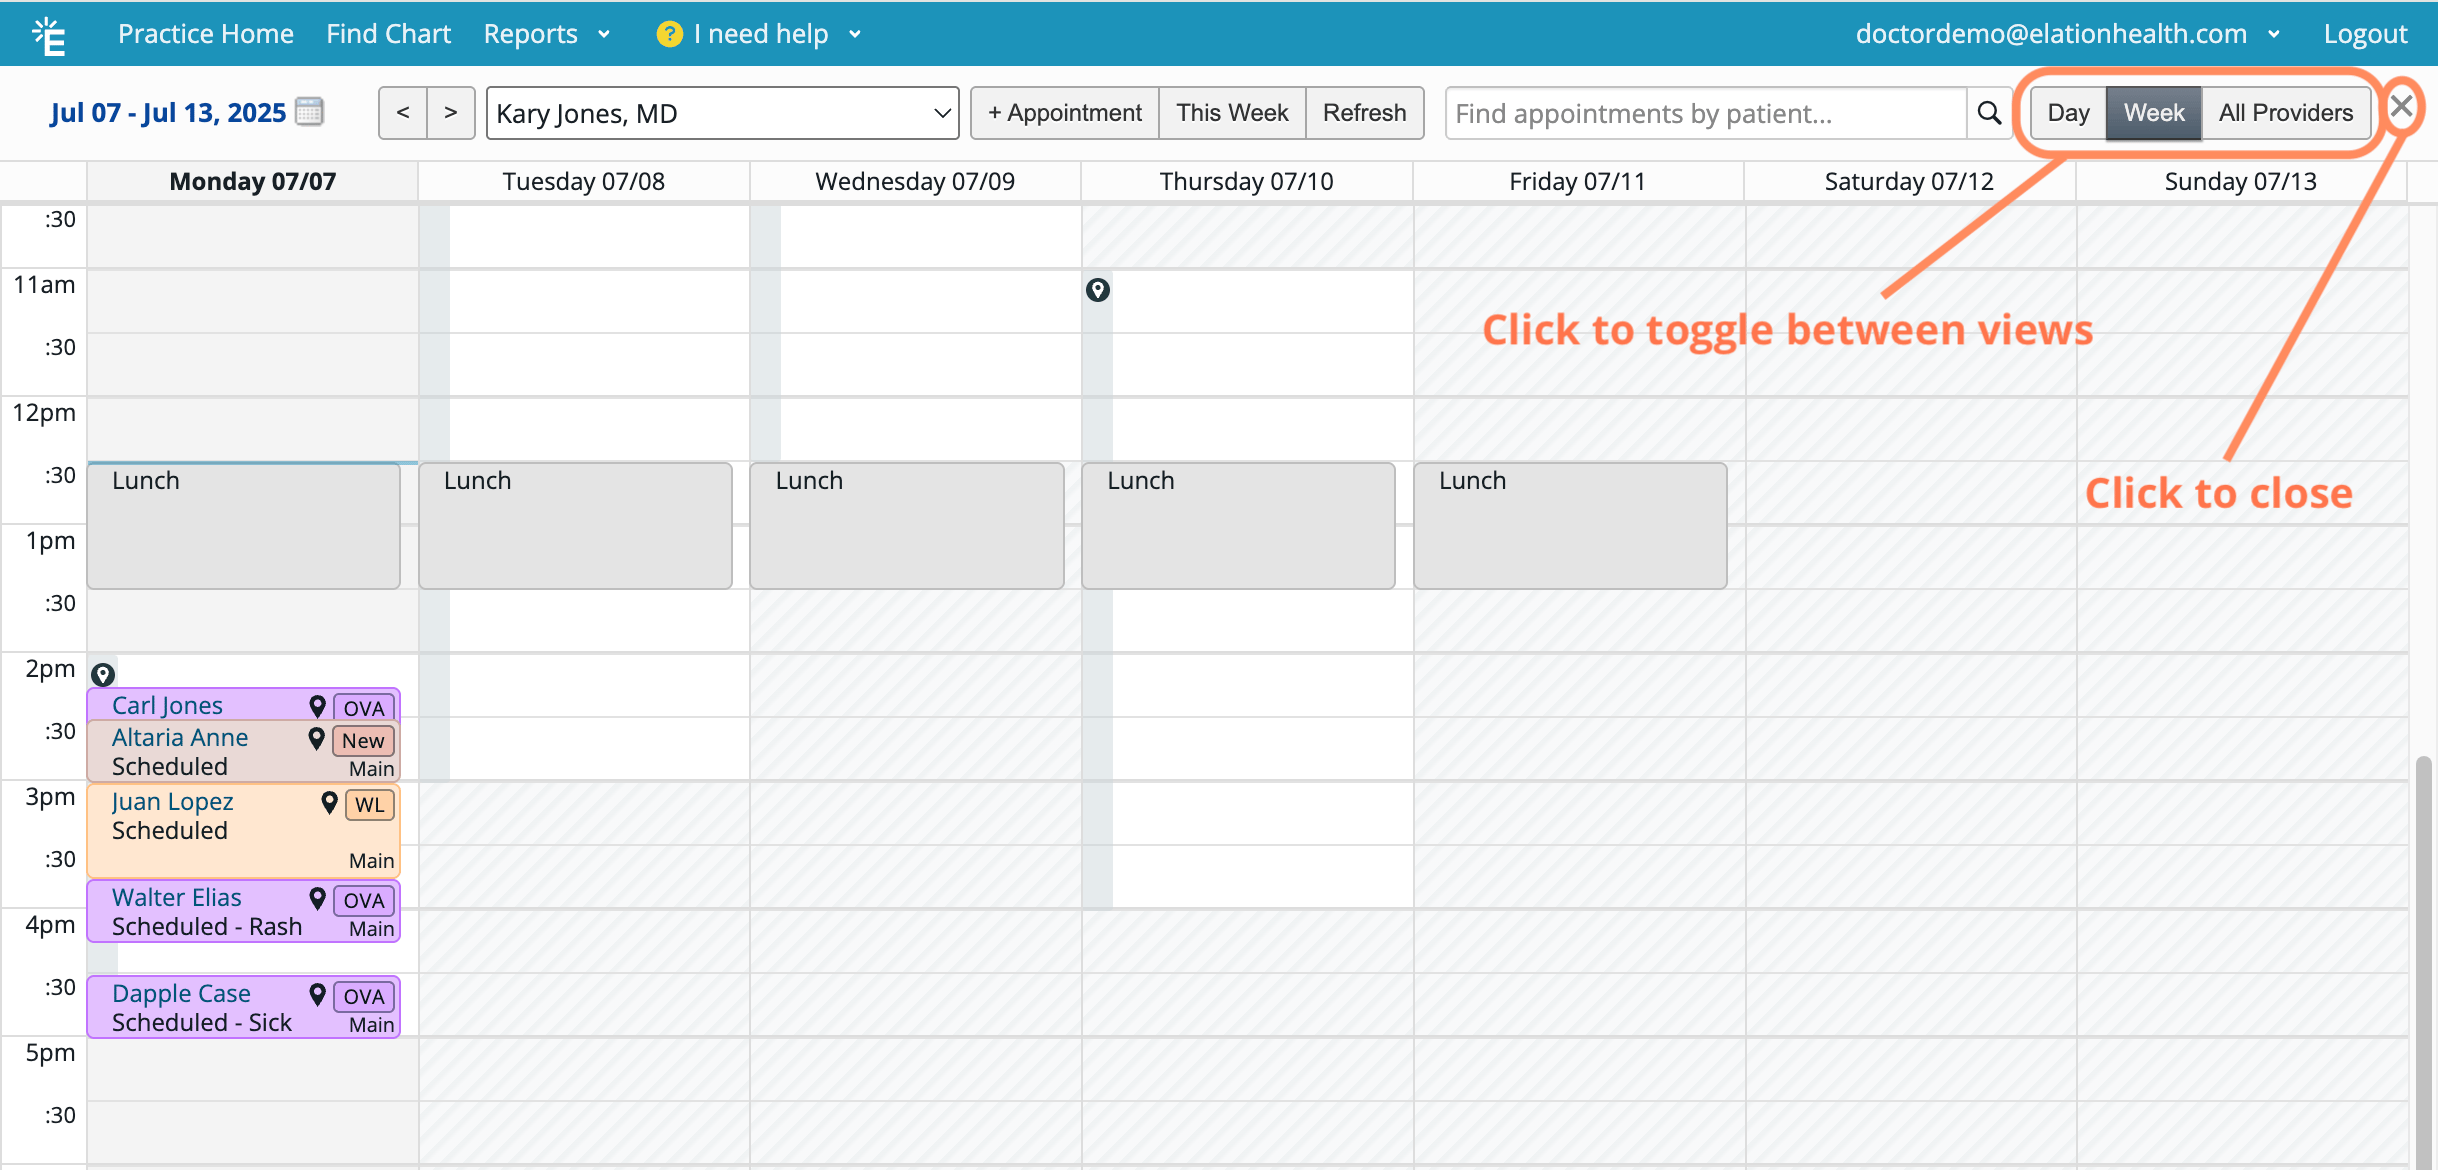 ##### Using User Groups for the Expanded View
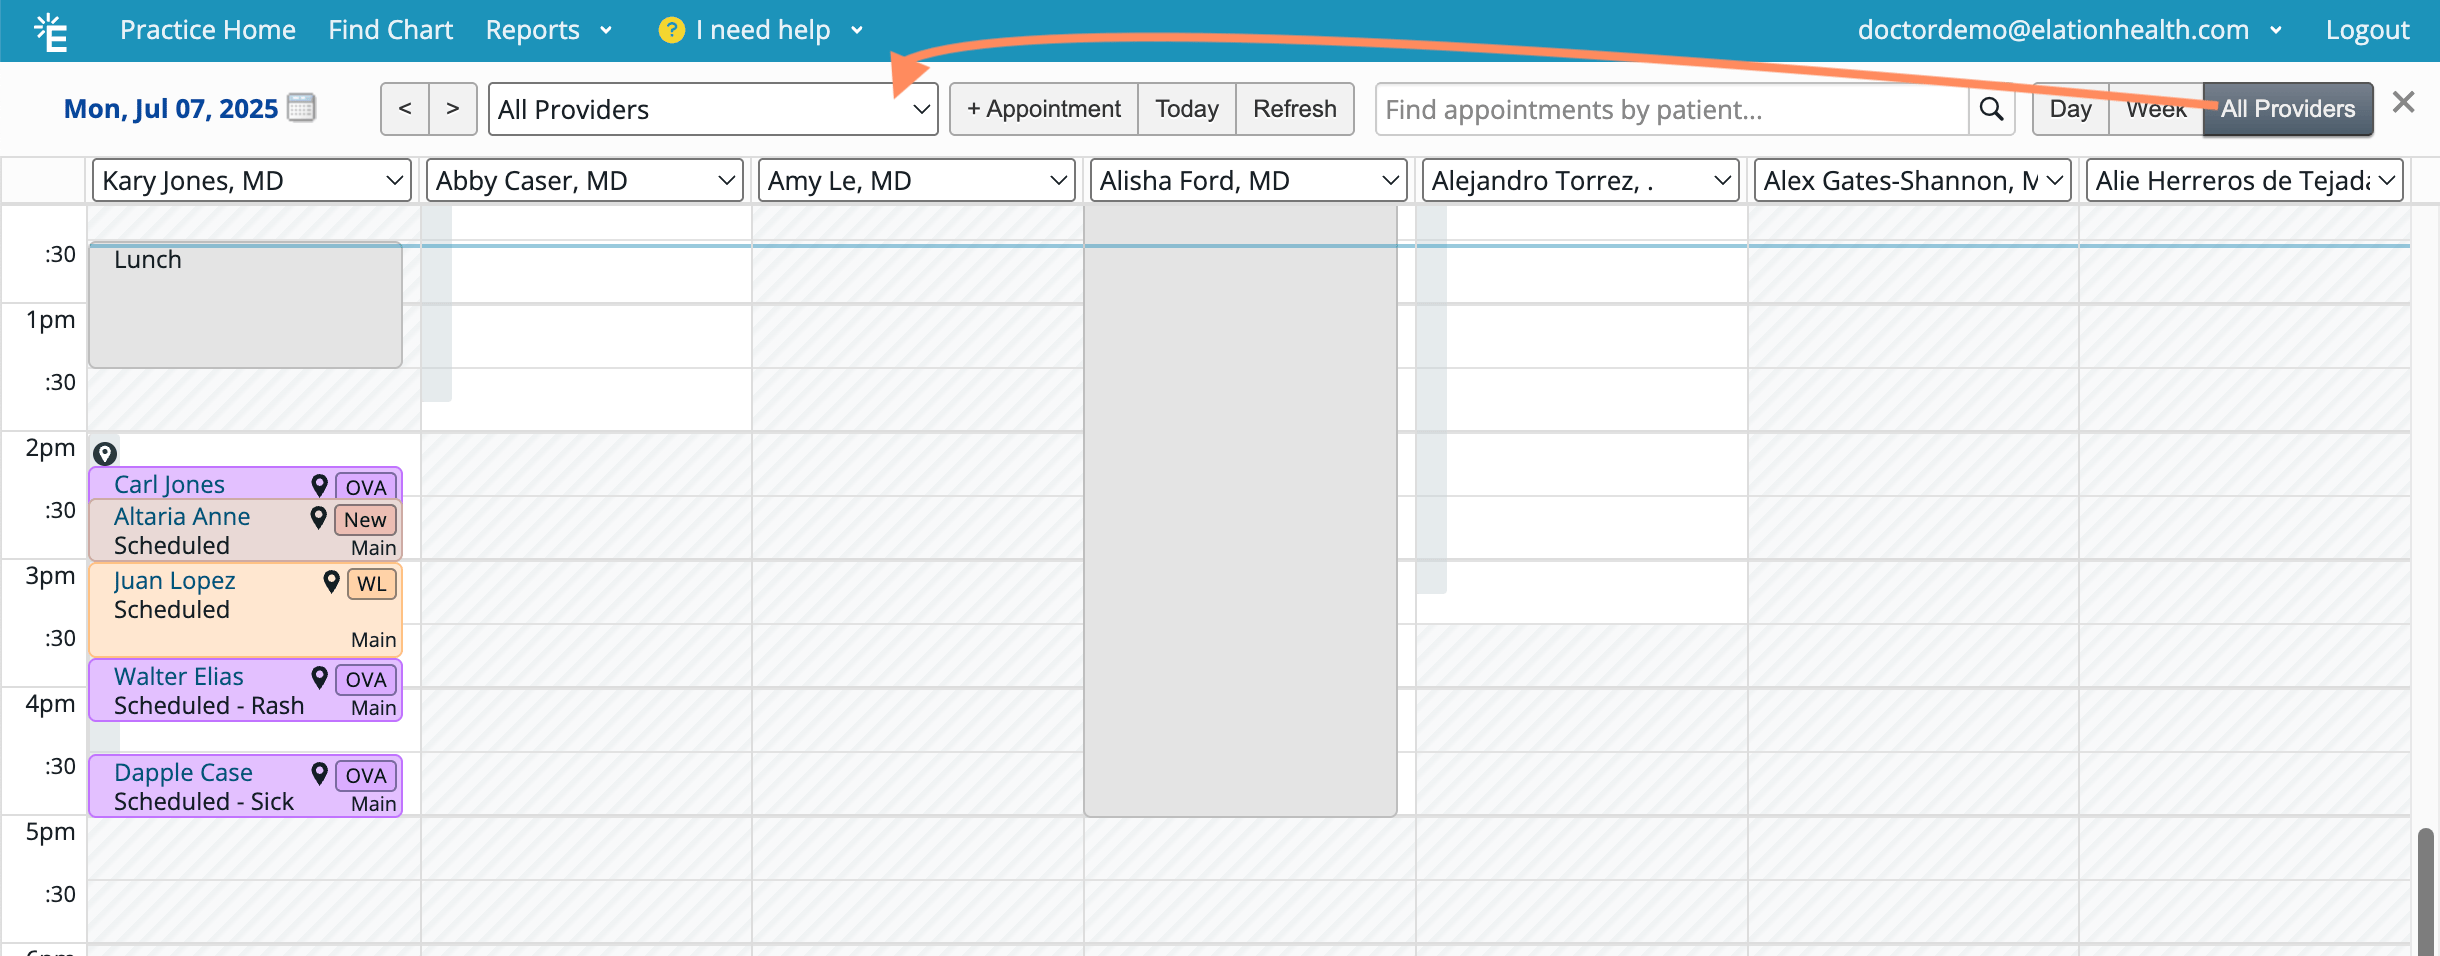
The User Groups feature lets you group specific providers together, making it easy to view their calendars side by side. You can create groups based on availability, specialty, or location.
To filter by a User Group, click **All Providers** and then click the dropdown menu highlighted in the red box below.
[Click here for step-by-step instructions on creating User Groups](/articles/user-groups).
##### Using User Groups for the Expanded View
The User Groups feature lets you group specific providers together, making it easy to view their calendars side by side. You can create groups based on availability, specialty, or location.
To filter by a User Group, click **All Providers** and then click the dropdown menu highlighted in the red box below.
[Click here for step-by-step instructions on creating User Groups](/articles/user-groups).
 ### Adding an appointment to the Calendar
**1**
Add appointments to the Calendar using either of the following options: To book overlapping appointments, click on the white space to the right of the time slot.
1. Click on an open time slot directly in the Calendar.
* This option pre-populates the **Start Time** based on the time slot selected.
2. Click **+ Appointment**.
**2**
Use the [Calendar Guide](/articles/calendar-and-booking-settings#Appointment_Types) to adjust your **Appointment Type** settings. Selecting an **Appointment Type** will automatically apply its associated settings, including **Duration**, color, tag, in-person or virtual designation, and any linked Visit Note Templates or Patient Forms.
Fill in the following required fields
* **Patient Name**
* **Appointment Type**
Use the [Calendar Guide](/articles/calendar-and-booking-settings#Appointment_Types) to adjust your **Appointment Type** settings. Selecting an **Appointment Type** will automatically apply its associated settings, including **Duration**, color, tag, in-person or virtual designation, and any linked Visit Note Templates or Patient Forms.
* **Start Time**
* **Duration**
* **Provider**
**3**
**(Optional)** Make it a [recurring appointment](/articles/recurring-patient-appointments) by clicking **Recurrence** -> **Custom…**.
1. Specify the repeat interval by entering a number and selecting **week** or **month**.
2. If **week** is selected, pick the day(s) of the week you want the appointment to repeat on.
3. If **month** is selected, choose when you want the appointment to repeat each month. The available options are based on the date and day of the week of the first appointment.
4. Select the end condition
5. Select **On** if you want the series to end by a specific date and then enter the Date.
6. The latest possible end date for a recurring appointment series is **18 months** from the date it is created.
7. Select **After** if you want the series to end after a certain number of recurrences and then enter the number of recurrences.
8. The maximum number of allowed recurrences is **52**.
9. Click **Save**.
**4**
Premium EHR Users can turn on a feature to require practice location selection when scheduling appointments for patients. If you are a Premium EHR User and you would like Elation to turn this feature on for you, ask an Admin Level User in the practice use the **I need help** -> **Contact Elation Support** button to send a request to our Support Team and a member of the Support Team will turn this feature on for you. [Click here to learn more about this feature](/articles/using-multi-location-scheduling) .
Utilize these optional fields to add more details to each appointment as needed
* **Description- chief complaint (CC)**
* Text in this field will automatically be added to the **Exam Reason (CC)** field in the Visit Note created for the appointment.
* [Location](/articles/using-multi-location-scheduling) (Practice Location)
* This detail is required in order to utilize the [Quick Reschedule](#reschedule) feature.
* **In person/Virtual**
* [Click here to learn more about Elation's Integrated Video feature](/articles/Elation-Telehealth-powered-by-Zoom).
* **Visit instructions for patient**
* If you chose **Virtual** above, Elation will automatically send your [pre-set virtual visit instructions](/articles/Elation-Telehealth-powered-by-Zoom#VirtualVisitInstructions) to patients.
* You can add extra details on top of the virtual visit instructions by entering text into this box.
* **Patient Payment**
* For recurring appointments, information added to the **Patient Payment** field will only apply to the first appointment in the series.
* **Billing Note**
* For recurring appointments, information added to the **Billing Note** field will only apply to the first appointment in the series.
**5**
Review scheduling conflicts.
1. **[recurring appointments](/articles/recurring-patient-appointments)** If any conflicting appointments are detected while creating a recurring appointment, the conflicting dates will be listed at the top of the create appointment dialog.
2. These conflicts must be resolved separately. You can find each overlapping appointment in the patient appointment search after the series is created and then solve each conflict separately.
3. If the **Appointment Type**, **Start Time**, or **Duration** falls outside the provider's availability, a note will appear at the bottom of the appointment details to indicate the conflict.
**6**
Click **Save** to save the appointment(s) to the Calendar.
To book multiple appointments in the same time slot, click on the white space to the right of the time slot. The most recently booked appointment will appear on top.
### Adding a Calendar Block to the Calendar
A Calendar Block lets you block off time on the calendar when a provider isn't available for appointments, like during lunch or a meeting. Calendar Blocks will prevent that time slot from appearing as available when
* you are using the Quick Reschedule feature or booking other appointments or Calendar Blocks.
* patients are booking appointments via the Booking Site.
| **1** | Add Calendar Blocks to the Calendar using either of the following options: Click on an open time slot directly in the Calendar. • Click **+ Appointment**. |
| ----- | ---------------------------------------------------------------------------------------------------------------------------------------------------------- |
| **2** | Choose **Other Event** and then select **Type** -> **Calendar Block** . |
| **3** | Enter the **Event Title** , **Date** , **Start Time** and **End Time** . |
| **4** | Set whether or not you want the appointment to repeat under **Recurrence**\*.\*The options are: Frequency • Ends |
| **5** | Click **Create Event** to save the event to your Calendar. |
### Adding a Non-blocking Calendar Event (Non-blocking Placeholder) to the Calendar
A Non-blocking Calendar Event (non-blocking placeholder) lets you show additional availability preferences on the calendar without preventing you from scheduling appointments or other calendar blocks during that time. This is especially useful for setting specific availability on a daily basis without locking those time slots. Patients will also still be able to book appointments during those times via the Booking Site if the Provider's main availability preferences (from the Calendar & Booking Site settings) allows it.
| **1** | Add Calendar Blocks to the Calendar using either of the following options: Click on an open time slot directly in the Calendar. • Click **+ Appointment**. |
| ----- | ---------------------------------------------------------------------------------------------------------------------------------------------------------- |
| **2** | Choose **Other Event** and then select **Type** -> **Calendar Block** . |
| **3** | Enter the **Event Title** , **Date** , **Start Time** and **End Time** . |
| **4** | Set whether or not you want the appointment to repeat under **Recurrence**\*.\*The options are: Frequency • Ends |
| **5** | Click **Create Event** to save the event to your Calendar. |
#### Converting a Calendar Block to a Non-Blocking Calendar Event
You can change a Calendar Block to a Non-Blocking Calendar Event by editing the Calendar Block and updating the event type.
| **1** | Click on the Calendar Block event to open the event popover. |
| ----- | ----------------------------------------------------------------------------- |
| **2** | Click **Edit** . |
| **3** | Change the **Type** from **Calendar Block** to **Non-blocking Placeholder** . |
| **4** | Click **Save** . |
### Managing appointments
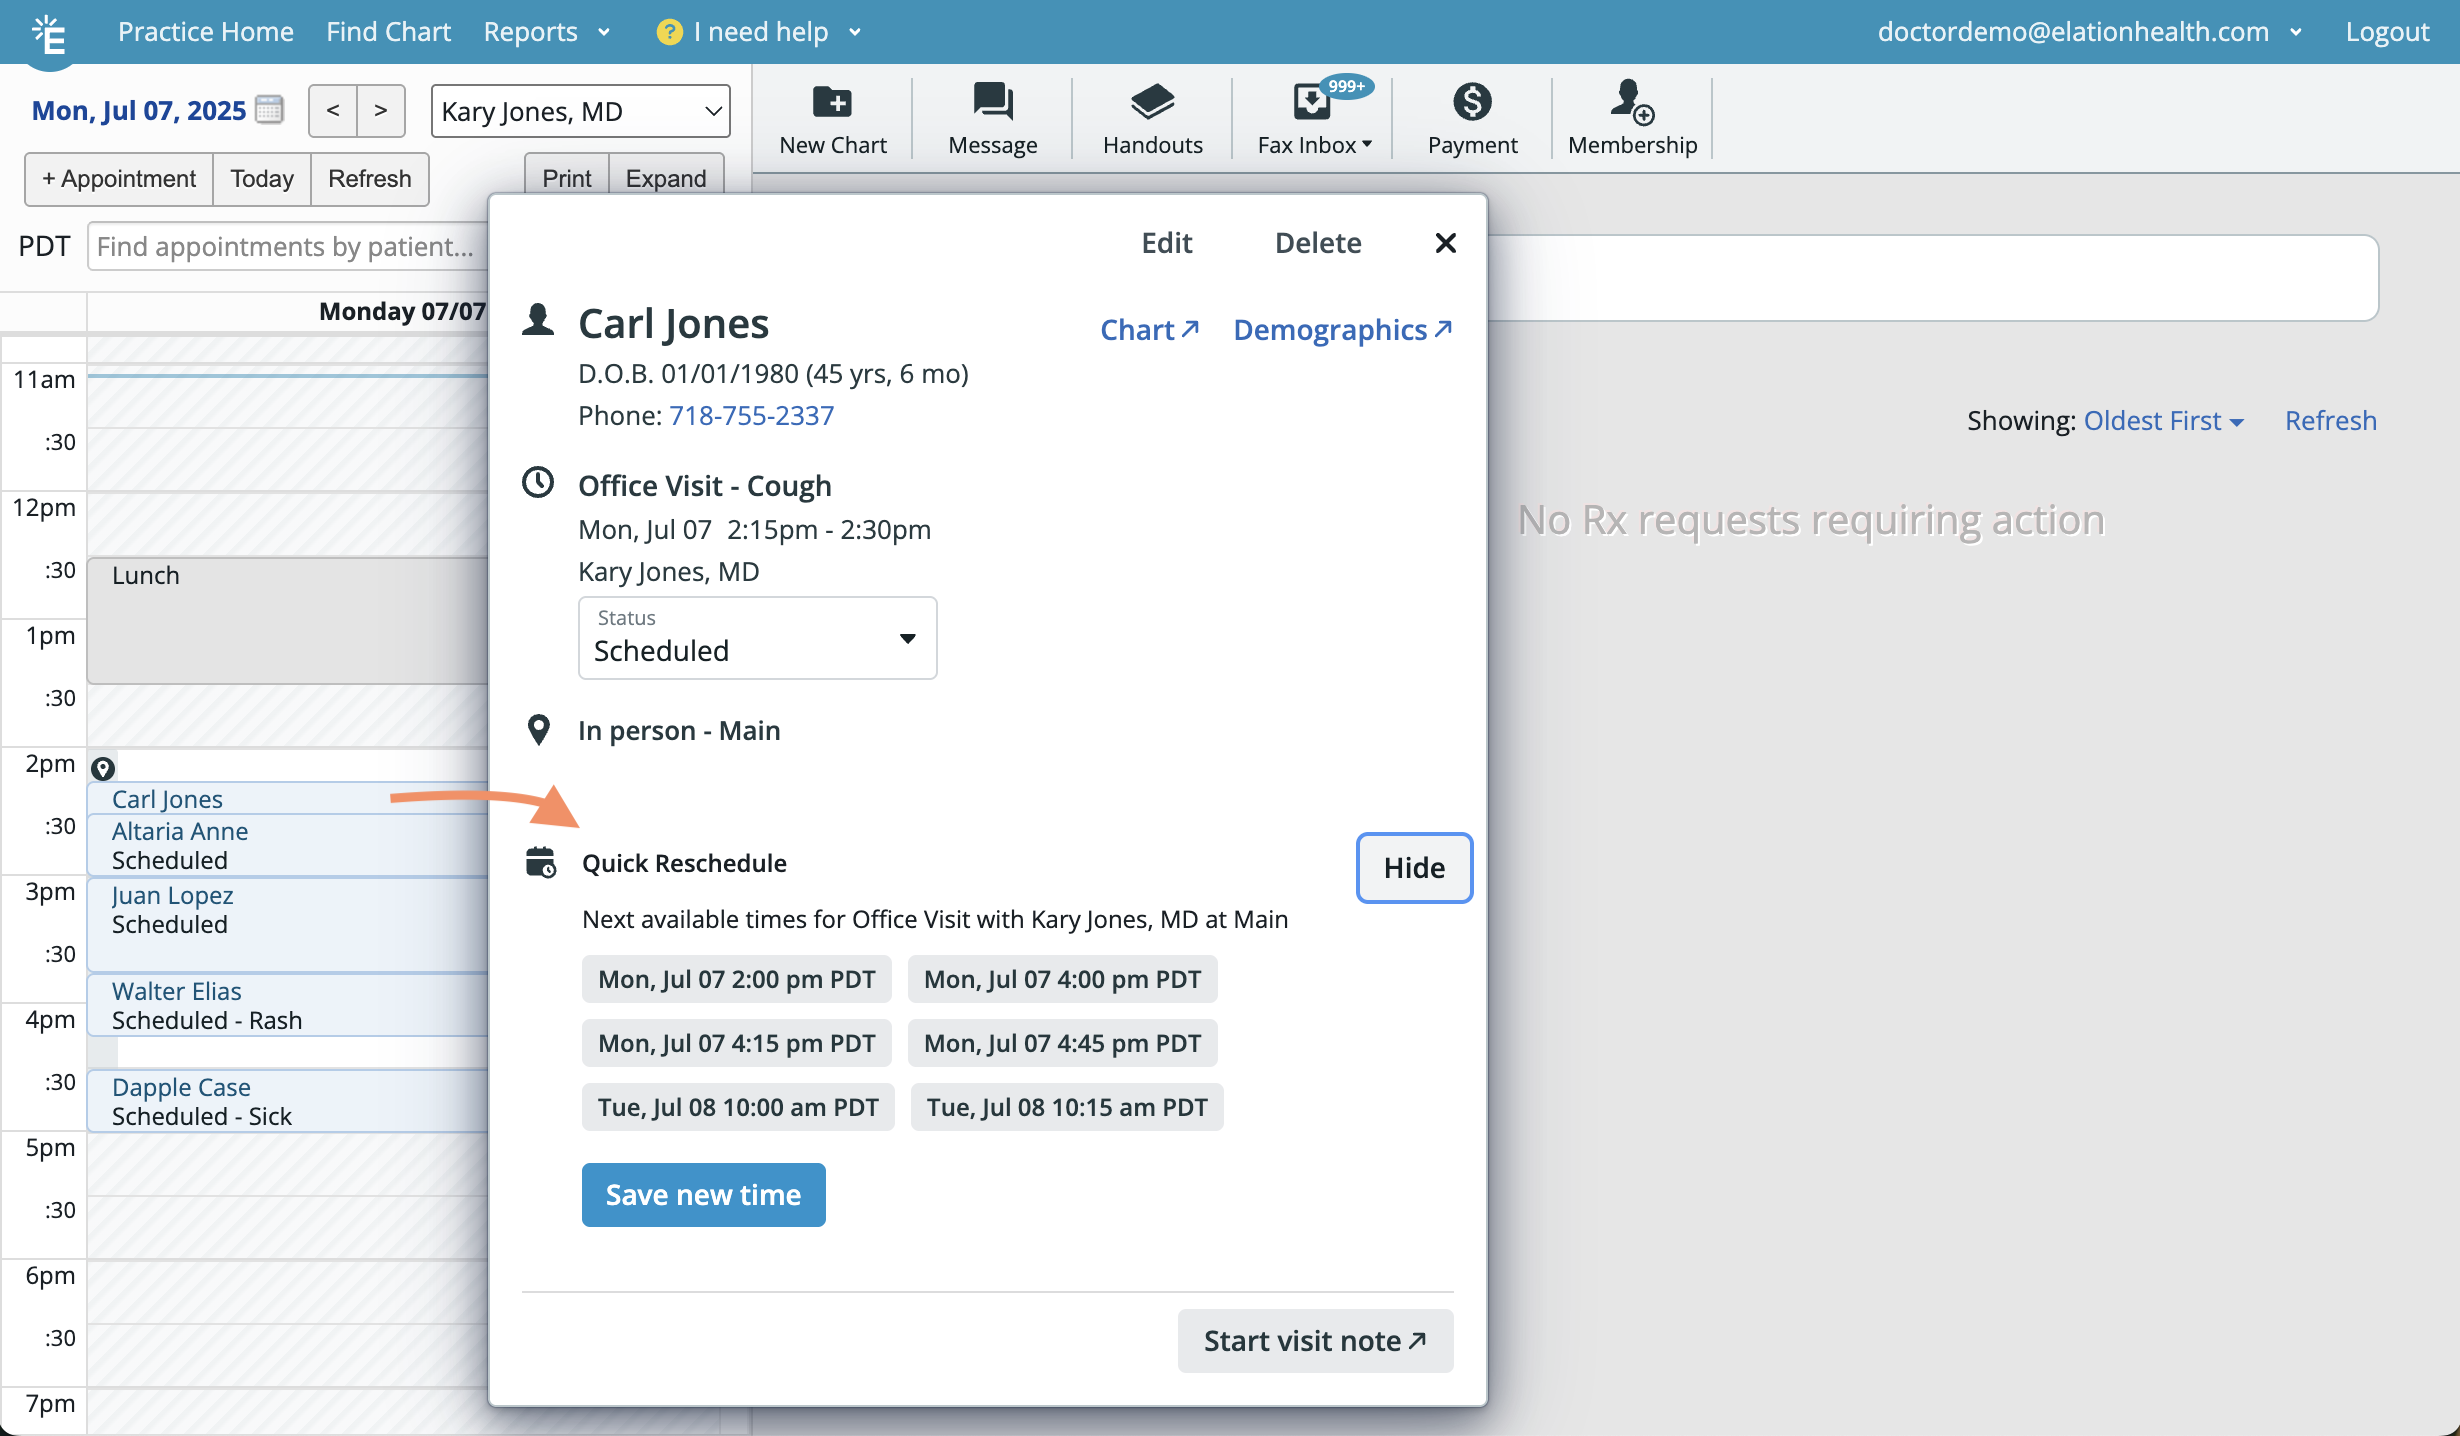
Click in the shaded area of the appointment to open the appointment popover box. From here you can:
* view the patient's appointment details
* [edit](#edit_appointment) or delete the appointment (1)
* [Click here for more information about editing recurring appointments](/articles/recurring-patient-appointments).
* navigate to the patient’s chart or demographics (2)
* update the appointment status (3)
* start virtual video consults (4)
* [Click here to learn more about Elation's Integrated Video feature](/articles/Elation-Telehealth-powered-by-Zoom).
* resend visit instructions to the patient (5)
* view the status of Patient Forms and resend them if needed (6)
* [quickly reschedule](#reschedule) an appointment (7)
* start the appointment's visit note (8)
(see numbers in diagram below)
The **Start Visit Note** button (8) appears only for appointments scheduled for today. Clicking this button triggers Visit Note Automation, which automatically populates the note with content based on the settings for the associated Appointment Type—such as Visit Note Categories and Visit Note Templates. [Click here to learn more about using visit note automation for appointments](/articles/visit-note-automation) .
#### Editing appointments
Click **Edit** in an appointment to
* Update the appointment details.
* Input patient payment details and add billing notes.
* View the **Activity Log** to see changes and notifications sent.
#### Rescheduling appointments quickly
To quickly reschedule a patient’s appointment:
| **1** | Click in the shaded area of the appointment to open the appointment popover box. |
| ----- | ----------------------------------------------------------------------------------------------------------------------------------------------------------------------------------------------------------------------------------------------------------------------------------------------------------------------------------------------------------------- |
| **2** | Click **Show suggested times** next to Quick Reschedule. |
| **3** | Select a new appointment time from the list of the next six available options, based on the appointment’s **Location** and **Duration** and the Provider’s **Availability**. [Click here for instructions on how to configure Provider Availability](/articles/Calendar-Booking-Site-Guide-Enhanced-Provider-availability-by-Practice-Location-Appointment-Type). |
| **4** | Click **Save new time** . |
### Adding an appointment to the Calendar
**1**
Add appointments to the Calendar using either of the following options: To book overlapping appointments, click on the white space to the right of the time slot.
1. Click on an open time slot directly in the Calendar.
* This option pre-populates the **Start Time** based on the time slot selected.
2. Click **+ Appointment**.
**2**
Use the [Calendar Guide](/articles/calendar-and-booking-settings#Appointment_Types) to adjust your **Appointment Type** settings. Selecting an **Appointment Type** will automatically apply its associated settings, including **Duration**, color, tag, in-person or virtual designation, and any linked Visit Note Templates or Patient Forms.
Fill in the following required fields
* **Patient Name**
* **Appointment Type**
Use the [Calendar Guide](/articles/calendar-and-booking-settings#Appointment_Types) to adjust your **Appointment Type** settings. Selecting an **Appointment Type** will automatically apply its associated settings, including **Duration**, color, tag, in-person or virtual designation, and any linked Visit Note Templates or Patient Forms.
* **Start Time**
* **Duration**
* **Provider**
**3**
**(Optional)** Make it a [recurring appointment](/articles/recurring-patient-appointments) by clicking **Recurrence** -> **Custom…**.
1. Specify the repeat interval by entering a number and selecting **week** or **month**.
2. If **week** is selected, pick the day(s) of the week you want the appointment to repeat on.
3. If **month** is selected, choose when you want the appointment to repeat each month. The available options are based on the date and day of the week of the first appointment.
4. Select the end condition
5. Select **On** if you want the series to end by a specific date and then enter the Date.
6. The latest possible end date for a recurring appointment series is **18 months** from the date it is created.
7. Select **After** if you want the series to end after a certain number of recurrences and then enter the number of recurrences.
8. The maximum number of allowed recurrences is **52**.
9. Click **Save**.
**4**
Premium EHR Users can turn on a feature to require practice location selection when scheduling appointments for patients. If you are a Premium EHR User and you would like Elation to turn this feature on for you, ask an Admin Level User in the practice use the **I need help** -> **Contact Elation Support** button to send a request to our Support Team and a member of the Support Team will turn this feature on for you. [Click here to learn more about this feature](/articles/using-multi-location-scheduling) .
Utilize these optional fields to add more details to each appointment as needed
* **Description- chief complaint (CC)**
* Text in this field will automatically be added to the **Exam Reason (CC)** field in the Visit Note created for the appointment.
* [Location](/articles/using-multi-location-scheduling) (Practice Location)
* This detail is required in order to utilize the [Quick Reschedule](#reschedule) feature.
* **In person/Virtual**
* [Click here to learn more about Elation's Integrated Video feature](/articles/Elation-Telehealth-powered-by-Zoom).
* **Visit instructions for patient**
* If you chose **Virtual** above, Elation will automatically send your [pre-set virtual visit instructions](/articles/Elation-Telehealth-powered-by-Zoom#VirtualVisitInstructions) to patients.
* You can add extra details on top of the virtual visit instructions by entering text into this box.
* **Patient Payment**
* For recurring appointments, information added to the **Patient Payment** field will only apply to the first appointment in the series.
* **Billing Note**
* For recurring appointments, information added to the **Billing Note** field will only apply to the first appointment in the series.
**5**
Review scheduling conflicts.
1. **[recurring appointments](/articles/recurring-patient-appointments)** If any conflicting appointments are detected while creating a recurring appointment, the conflicting dates will be listed at the top of the create appointment dialog.
2. These conflicts must be resolved separately. You can find each overlapping appointment in the patient appointment search after the series is created and then solve each conflict separately.
3. If the **Appointment Type**, **Start Time**, or **Duration** falls outside the provider's availability, a note will appear at the bottom of the appointment details to indicate the conflict.
**6**
Click **Save** to save the appointment(s) to the Calendar.
To book multiple appointments in the same time slot, click on the white space to the right of the time slot. The most recently booked appointment will appear on top.
### Adding a Calendar Block to the Calendar
A Calendar Block lets you block off time on the calendar when a provider isn't available for appointments, like during lunch or a meeting. Calendar Blocks will prevent that time slot from appearing as available when
* you are using the Quick Reschedule feature or booking other appointments or Calendar Blocks.
* patients are booking appointments via the Booking Site.
| **1** | Add Calendar Blocks to the Calendar using either of the following options: Click on an open time slot directly in the Calendar. • Click **+ Appointment**. |
| ----- | ---------------------------------------------------------------------------------------------------------------------------------------------------------- |
| **2** | Choose **Other Event** and then select **Type** -> **Calendar Block** . |
| **3** | Enter the **Event Title** , **Date** , **Start Time** and **End Time** . |
| **4** | Set whether or not you want the appointment to repeat under **Recurrence**\*.\*The options are: Frequency • Ends |
| **5** | Click **Create Event** to save the event to your Calendar. |
### Adding a Non-blocking Calendar Event (Non-blocking Placeholder) to the Calendar
A Non-blocking Calendar Event (non-blocking placeholder) lets you show additional availability preferences on the calendar without preventing you from scheduling appointments or other calendar blocks during that time. This is especially useful for setting specific availability on a daily basis without locking those time slots. Patients will also still be able to book appointments during those times via the Booking Site if the Provider's main availability preferences (from the Calendar & Booking Site settings) allows it.
| **1** | Add Calendar Blocks to the Calendar using either of the following options: Click on an open time slot directly in the Calendar. • Click **+ Appointment**. |
| ----- | ---------------------------------------------------------------------------------------------------------------------------------------------------------- |
| **2** | Choose **Other Event** and then select **Type** -> **Calendar Block** . |
| **3** | Enter the **Event Title** , **Date** , **Start Time** and **End Time** . |
| **4** | Set whether or not you want the appointment to repeat under **Recurrence**\*.\*The options are: Frequency • Ends |
| **5** | Click **Create Event** to save the event to your Calendar. |
#### Converting a Calendar Block to a Non-Blocking Calendar Event
You can change a Calendar Block to a Non-Blocking Calendar Event by editing the Calendar Block and updating the event type.
| **1** | Click on the Calendar Block event to open the event popover. |
| ----- | ----------------------------------------------------------------------------- |
| **2** | Click **Edit** . |
| **3** | Change the **Type** from **Calendar Block** to **Non-blocking Placeholder** . |
| **4** | Click **Save** . |
### Managing appointments
Click in the shaded area of the appointment to open the appointment popover box. From here you can:
* view the patient's appointment details
* [edit](#edit_appointment) or delete the appointment (1)
* [Click here for more information about editing recurring appointments](/articles/recurring-patient-appointments).
* navigate to the patient’s chart or demographics (2)
* update the appointment status (3)
* start virtual video consults (4)
* [Click here to learn more about Elation's Integrated Video feature](/articles/Elation-Telehealth-powered-by-Zoom).
* resend visit instructions to the patient (5)
* view the status of Patient Forms and resend them if needed (6)
* [quickly reschedule](#reschedule) an appointment (7)
* start the appointment's visit note (8)
(see numbers in diagram below)
The **Start Visit Note** button (8) appears only for appointments scheduled for today. Clicking this button triggers Visit Note Automation, which automatically populates the note with content based on the settings for the associated Appointment Type—such as Visit Note Categories and Visit Note Templates. [Click here to learn more about using visit note automation for appointments](/articles/visit-note-automation) .
#### Editing appointments
Click **Edit** in an appointment to
* Update the appointment details.
* Input patient payment details and add billing notes.
* View the **Activity Log** to see changes and notifications sent.
#### Rescheduling appointments quickly
To quickly reschedule a patient’s appointment:
| **1** | Click in the shaded area of the appointment to open the appointment popover box. |
| ----- | ----------------------------------------------------------------------------------------------------------------------------------------------------------------------------------------------------------------------------------------------------------------------------------------------------------------------------------------------------------------- |
| **2** | Click **Show suggested times** next to Quick Reschedule. |
| **3** | Select a new appointment time from the list of the next six available options, based on the appointment’s **Location** and **Duration** and the Provider’s **Availability**. [Click here for instructions on how to configure Provider Availability](/articles/Calendar-Booking-Site-Guide-Enhanced-Provider-availability-by-Practice-Location-Appointment-Type). |
| **4** | Click **Save new time** . |
 ### Viewing a patient's upcoming & past appointments
To look at a patient's appointments:
| **1** | Enter the patient's name in the box above the Calendar (highlighted in the image below). |
| ----- | ---------------------------------------------------------------------------------------- |
| **2** | Select the matching patient's name to view a list of all past and upcoming appointments. |
| **3** | Click on an appointment to view its details. |
### Printing the Calendar
Click **Print** to print the Standard daily schedule for the currently selected provider and date.
#### Troubleshooting printed schedule time discrepancies
The **Print** button on the Calendar generates a Standard daily schedule based on:
* The currently selected day and calendar view (provider vs location)
* The timezone and time settings on your device
##### Common causes of mismatched times
If the printed schedule shows different times than what appears on screen, check for these common causes:
* **Computer timezone mismatch**: Your computer's timezone does not match the practice's timezone.
* **View mismatch**: You printed from a location view while comparing against a provider view (or vice versa).
* **Stale printout**: You printed the schedule before appointment times or durations were updated.
* **Different device settings**: Different staff members printed from different machines with mismatched time settings.
##### Checklist before contacting Support
Before escalating to Support, verify the following:
* Confirm you are on the correct provider (or location) and date when selecting **Print**.
* Verify your computer's timezone and system clock match the practice's timezone.
* Re-print the schedule after making any appointment changes.
* Check whether all staff see the same time on screen and on the printed page.
##### When to contact Support
If the same visit consistently shows different times on screen vs print after completing the checklist above, contact Elation Support using the **I need help** button.
Include the following information in your request:
* Provider name
* Date of the appointment
* Patient name or initials
* Time as shown on screen
* A scan or photo of the printed schedule showing the discrepancy
## Frequently Asked Questions
### Can I create a calendar for my staff?
Only Provider Level Users have Calendars. If you need a calendar for a Staff Level User, contact Elation Support using the **I need help** button, describe the use case to us and we will see what alternative options are available.
### Can I create a recurring appointment?
Yes, you can create a recurring appointment.
### Can I send text messages to patients about their appointment?
Yes, you can send text messages to patients about their appointment either as:
* [automated appointment reminders](/articles/appointment-reminders).
* manual text via the Visit Instructions box of the appointment. Simply enter the text you want to send in the box, save the appointment and then click **Send** from the appointment popover.
Patients must be [opted in to SMS](/articles/SMS-Text-Message-Opt-In-Guide) in order to receive text messages.
### Will patients see Non-blocking Placeholders on my Booking Site?
No, Non-blocking Placeholders are internal-only and will not appear on your Booking Site.
### Can I change existing events to Non-blocking Placeholders?
Yes, you can change a Calendar Block to a Non-blocking Placeholder by editing the Calendar Block and updating the event type.
### Can patients book recurring appointments themselves?
No, patients cannot book recurring appointments through the Booking Site.
### Can I book recurring appointments for multiple patients at once?
You can only book recurring appointments for one patient at a time.
**How far in advance can I schedule recurring appointments?**
The latest possible end date for a recurring appointment series is **18 months** from the date it is created or a maximum of **52** **recurrences**.
### Can I change the **Repeats On** selection when editing a recurring appointment?
Yes, the **Repeats On** selection can be changed once the recurring appointment series has been created.
### How are conflicting appointments handled when creating recurring appointments?
If any conflicts are detected while creating a recurring appointment, the conflicting dates will be listed at the top of the create appointment dialog. These conflicts must be resolved separately. You can find each overlapping appointment in the patient appointment search after the series is created and then solve each conflict separately.
**Next Step**
**Start scheduling appointments in your Elation Calendar today!**
## Related Articles
* [Calendar Guide- How to set up the provider calendar](/articles/calendar-and-booking-settings)
* [Calendar Guide - Schedule recurring patient appointments](/articles/recurring-patient-appointments)
* [Elation Integrated Video- Connecting with patients using video](/articles/Elation-Telehealth-powered-by-Zoom)
* [User Groups Guide- Simplifying office messages & expanded calendar view](/articles/user-groups)
* [Visit Note Documentation Guide- Using visit note automation for appointments](/articles/visit-note-automation)
* [Telehealth: Billing & Workflow Recommendations](/articles/Telehealth-Coding-and-Workflows-Recommendations)
### Viewing a patient's upcoming & past appointments
To look at a patient's appointments:
| **1** | Enter the patient's name in the box above the Calendar (highlighted in the image below). |
| ----- | ---------------------------------------------------------------------------------------- |
| **2** | Select the matching patient's name to view a list of all past and upcoming appointments. |
| **3** | Click on an appointment to view its details. |
### Printing the Calendar
Click **Print** to print the Standard daily schedule for the currently selected provider and date.
#### Troubleshooting printed schedule time discrepancies
The **Print** button on the Calendar generates a Standard daily schedule based on:
* The currently selected day and calendar view (provider vs location)
* The timezone and time settings on your device
##### Common causes of mismatched times
If the printed schedule shows different times than what appears on screen, check for these common causes:
* **Computer timezone mismatch**: Your computer's timezone does not match the practice's timezone.
* **View mismatch**: You printed from a location view while comparing against a provider view (or vice versa).
* **Stale printout**: You printed the schedule before appointment times or durations were updated.
* **Different device settings**: Different staff members printed from different machines with mismatched time settings.
##### Checklist before contacting Support
Before escalating to Support, verify the following:
* Confirm you are on the correct provider (or location) and date when selecting **Print**.
* Verify your computer's timezone and system clock match the practice's timezone.
* Re-print the schedule after making any appointment changes.
* Check whether all staff see the same time on screen and on the printed page.
##### When to contact Support
If the same visit consistently shows different times on screen vs print after completing the checklist above, contact Elation Support using the **I need help** button.
Include the following information in your request:
* Provider name
* Date of the appointment
* Patient name or initials
* Time as shown on screen
* A scan or photo of the printed schedule showing the discrepancy
## Frequently Asked Questions
### Can I create a calendar for my staff?
Only Provider Level Users have Calendars. If you need a calendar for a Staff Level User, contact Elation Support using the **I need help** button, describe the use case to us and we will see what alternative options are available.
### Can I create a recurring appointment?
Yes, you can create a recurring appointment.
### Can I send text messages to patients about their appointment?
Yes, you can send text messages to patients about their appointment either as:
* [automated appointment reminders](/articles/appointment-reminders).
* manual text via the Visit Instructions box of the appointment. Simply enter the text you want to send in the box, save the appointment and then click **Send** from the appointment popover.
Patients must be [opted in to SMS](/articles/SMS-Text-Message-Opt-In-Guide) in order to receive text messages.
### Will patients see Non-blocking Placeholders on my Booking Site?
No, Non-blocking Placeholders are internal-only and will not appear on your Booking Site.
### Can I change existing events to Non-blocking Placeholders?
Yes, you can change a Calendar Block to a Non-blocking Placeholder by editing the Calendar Block and updating the event type.
### Can patients book recurring appointments themselves?
No, patients cannot book recurring appointments through the Booking Site.
### Can I book recurring appointments for multiple patients at once?
You can only book recurring appointments for one patient at a time.
**How far in advance can I schedule recurring appointments?**
The latest possible end date for a recurring appointment series is **18 months** from the date it is created or a maximum of **52** **recurrences**.
### Can I change the **Repeats On** selection when editing a recurring appointment?
Yes, the **Repeats On** selection can be changed once the recurring appointment series has been created.
### How are conflicting appointments handled when creating recurring appointments?
If any conflicts are detected while creating a recurring appointment, the conflicting dates will be listed at the top of the create appointment dialog. These conflicts must be resolved separately. You can find each overlapping appointment in the patient appointment search after the series is created and then solve each conflict separately.
**Next Step**
**Start scheduling appointments in your Elation Calendar today!**
## Related Articles
* [Calendar Guide- How to set up the provider calendar](/articles/calendar-and-booking-settings)
* [Calendar Guide - Schedule recurring patient appointments](/articles/recurring-patient-appointments)
* [Elation Integrated Video- Connecting with patients using video](/articles/Elation-Telehealth-powered-by-Zoom)
* [User Groups Guide- Simplifying office messages & expanded calendar view](/articles/user-groups)
* [Visit Note Documentation Guide- Using visit note automation for appointments](/articles/visit-note-automation)
* [Telehealth: Billing & Workflow Recommendations](/articles/Telehealth-Coding-and-Workflows-Recommendations)