> ## Documentation Index
> Fetch the complete documentation index at: https://help.elationhealth.com/llms.txt
> Use this file to discover all available pages before exploring further.
# Filing a Corrected Claim
> Learn how to file a corrected claim in Elation Billing
This article provides step-by-step instructions on how to file a corrected claim in Elation Billing.
## Overview
### What is a Corrected Claim?
A corrected claim is a resubmission of a previously submitted claim with updated information. It includes a correction code and the original claim's ICN (Internal Control Number) to identify which claim is being corrected.
### Automatic Corrected Claims
Corrected claims have been partially automated! If the payer has provided an ERA in Elation Billing, simply update and resubmit the claim to file it as Corrected. Our clearinghouse will automatically add the ICN and file the claim as Corrected.
If the claim does not have an ERA in Elation Billing, you'll need to manually mark the claim as corrected and add the ICN by following the steps below.
## Workflow Instructions
### Filing a Corrected Claim Manually
1. **Navigate to the Claim** - Find the claim in your Worklist or locate it in the patient's chart by clicking **Claims**.
2. **Save the Payer ICN** - We suggest adding the ICN to a saved list for reuse:
* Click **Corrected Claim Info**
* Click **Add ICN to List**
* Select the Insurance Payer
* Enter the ICN
* Click **Save**
### Finding the ICN
1. Go to the Superbill
2. Click the **Claim History** button
3. Under the Clearinghouse History section, look for **ERA Received**
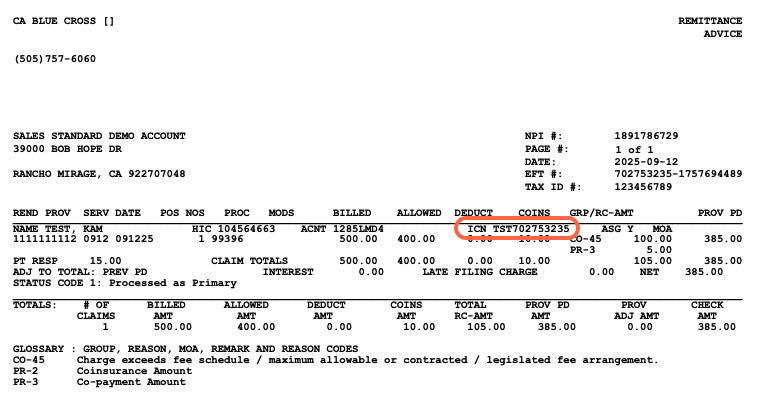
4. The ICN will be under the Messages column
You can also click **Open ERA** to see the ICN in the ERA.
 3. **Attach the ICN and Correction Code** - From the Claim Corrections Screen:
* Select a **Correction Code**:
* **Original Claim** (Frequency Code 1)
* **Corrected Claim** (Frequency Code 7) - All resubmitted claims will have this code and ICN automatically included
* **Voided Claim** (Frequency Code 8)
* Enter an ICN OR select one from your list by clicking on it
* Click **Save**
The correction code will be attached to the claim for ONE SUBMISSION ONLY. This keeps correction codes from following the claim to subsequent secondary billing.
> 4. **Lightning Bill the Claim** - Bill the claim to the payer using the usual method.
>
> Once the Corrected Claim has been billed, the **Corrected** tag will automatically be added.
For information on the disposition of the claim after submitting, contact the payer (typically via their portal).
## Related Articles
* [Filing a Claim](/articles/filing-a-claim)
* [Claim History](/articles/claim-history)
* [Claim Appeals](/articles/claim-appeals)
3. **Attach the ICN and Correction Code** - From the Claim Corrections Screen:
* Select a **Correction Code**:
* **Original Claim** (Frequency Code 1)
* **Corrected Claim** (Frequency Code 7) - All resubmitted claims will have this code and ICN automatically included
* **Voided Claim** (Frequency Code 8)
* Enter an ICN OR select one from your list by clicking on it
* Click **Save**
The correction code will be attached to the claim for ONE SUBMISSION ONLY. This keeps correction codes from following the claim to subsequent secondary billing.
> 4. **Lightning Bill the Claim** - Bill the claim to the payer using the usual method.
>
> Once the Corrected Claim has been billed, the **Corrected** tag will automatically be added.
For information on the disposition of the claim after submitting, contact the payer (typically via their portal).
## Related Articles
* [Filing a Claim](/articles/filing-a-claim)
* [Claim History](/articles/claim-history)
* [Claim Appeals](/articles/claim-appeals)